1. Introduction
Thank you for choosing the SHHJCO KPS10010D Laboratory DC Stabilized Power Supply. This manual provides essential information for the safe and efficient operation, setup, and maintenance of your device. Please read this manual thoroughly before use and retain it for future reference.
1.1. Safety Instructions
To ensure safe operation and prevent damage to the unit or injury, please observe the following safety precautions:
- Always connect the power supply to a grounded outlet.
- Do not operate the device in wet or damp conditions.
- Ensure proper ventilation around the unit to prevent overheating.
- Do not open the casing; there are no user-serviceable parts inside. Refer all servicing to qualified personnel.
- Verify the input voltage matches your local power supply (110V for this model).
- Disconnect power before making any connections or adjustments to the output terminals.
2. Product Features
The SHHJCO KPS10010D is a high-performance laboratory DC power supply designed for precision and stability. Key features include:
- Precise and stable output for reliable operation.
- Compact design to optimize workbench space.
- Bright, 3-digit back-lit LED display for clear voltage and current readings.
- Intelligent temperature-controlled fan and heat sink for efficient heat dissipation and quiet operation.
- Encoder adjustment for precise setting of voltage and current.
- Comprehensive protection functions: Over Voltage Protection (OVP), Over Current Protection (OCP), Over Power Protection (OPP), and Over Temperature Protection (OTP).
3. Package Contents
Please check the package for the following items:
- SHHJCO KPS10010D DC Power Supply Unit
- Power Cord (110V compatible)
- User Manual
4. Component Identification
4.1. Front Panel Overview
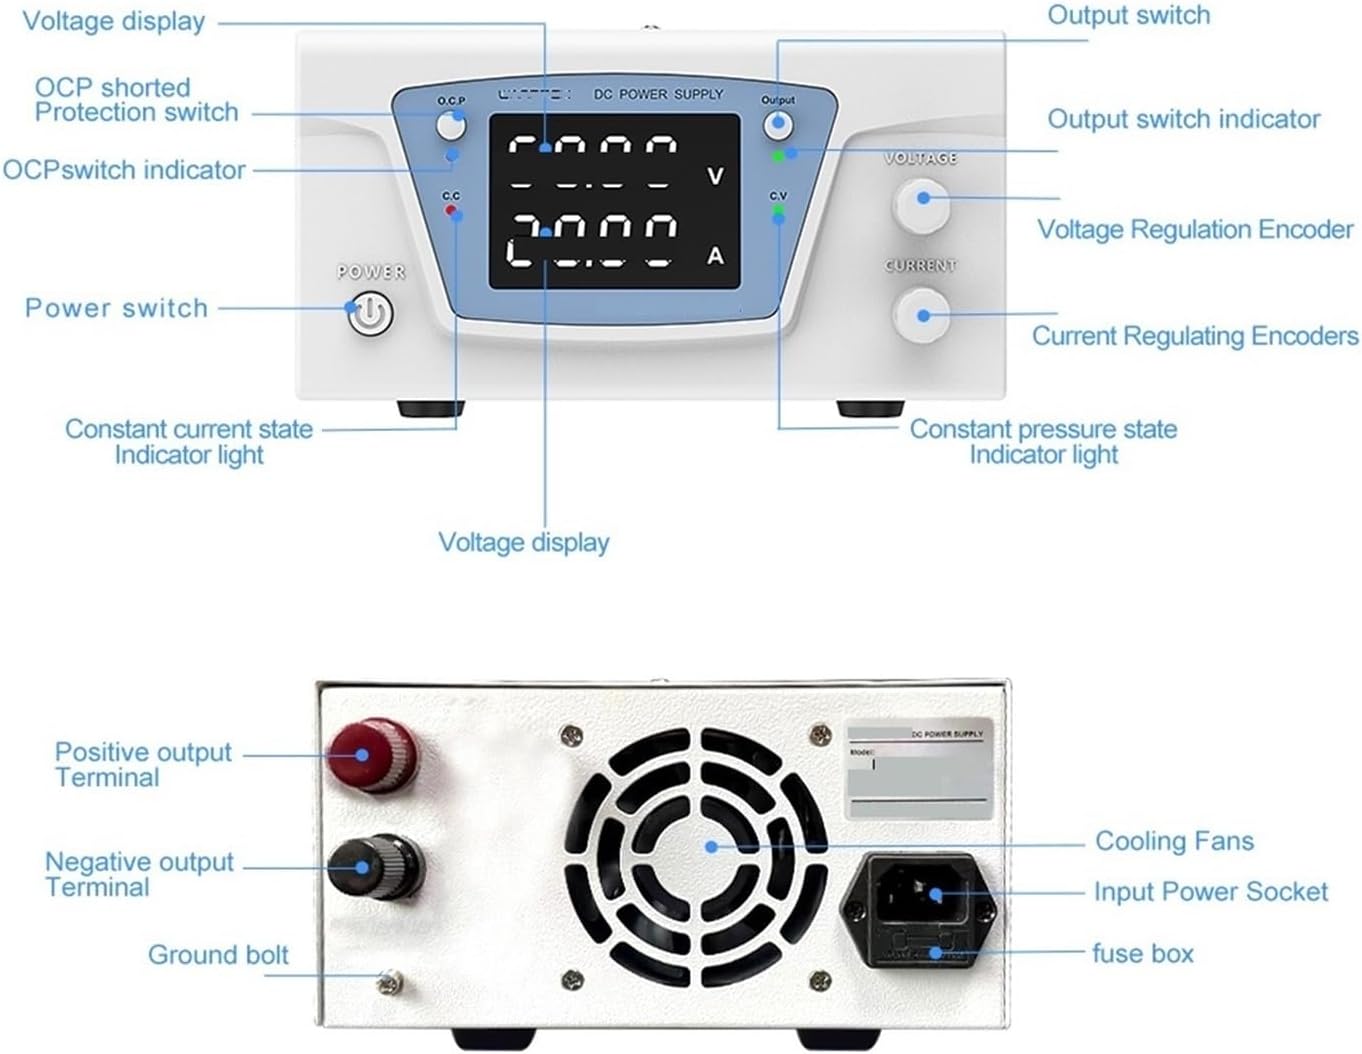
This image illustrates the front and rear panels of the power supply, highlighting key controls and connections. The front panel features the display, control knobs, and power switch, while the rear panel shows the output terminals and power input.
- Power Switch: Turns the unit on or off.
- O.C.P. (Over Current Protection) Switch: Activates or deactivates the over current protection function.
- Output Switch: Enables or disables the DC output to the terminals.
- Voltage Display: Shows the set or actual output voltage in Volts (V).
- Current Display: Shows the set or actual output current in Amperes (A).
- Voltage Regulation Encoder: Adjusts the output voltage.
- Current Regulating Encoder: Adjusts the output current limit.
- C.V. (Constant Voltage) Indicator: Lights up when the unit is operating in constant voltage mode.
- C.C. (Constant Current) Indicator: Lights up when the unit is operating in constant current mode.
4.2. Rear Panel Overview
The rear panel includes essential connections and cooling components:
- Positive Output Terminal (Red): Connects to the positive input of your load.
- Negative Output Terminal (Black): Connects to the negative input of your load.
- Ground Bolt: Provides an additional grounding point.
- Cooling Fans: Dissipate heat from the unit.
- Input Power Socket: Connects the power cord to the AC mains.
- Fuse Box: Contains the protective fuse for the unit.
5. Setup
- Placement: Place the power supply on a stable, level surface with adequate ventilation space around it. Ensure the cooling fans are not obstructed.
- Power Connection: Connect the provided power cord to the input power socket on the rear panel and then to a grounded 110V AC outlet.
- Initial Power On: Press the Power Switch on the front panel. The display should illuminate.
- Output Connections: With the power supply output disabled (Output switch off), connect your load to the Positive (red) and Negative (black) output terminals using appropriate cables.
6. Operating Instructions
6.1. Basic Operation
- Ensure the power supply is connected and turned on.
- Adjust the Voltage Regulation Encoder and Current Regulating Encoder to set the desired output voltage and current limit.
- Press the Output Switch to enable the DC output. The C.V. or C.C. indicator will light up depending on the operating mode.
- To disable the output, press the Output Switch again.
6.2. Voltage and Current Adjustment

This image highlights the encoder adjustment mechanism. The voltage and current knobs can be pressed to shift adjustment modes and rotated to change values.
- Setting Voltage: Rotate the Voltage Regulation Encoder clockwise to increase voltage and counter-clockwise to decrease it. Pressing the encoder may switch between coarse and fine adjustment modes.
- Setting Current Limit: Rotate the Current Regulating Encoder to set the maximum current the power supply will deliver. This acts as a current limit to protect your load. Pressing the encoder may switch between coarse and fine adjustment modes.
6.3. Protection Functions

This image displays icons representing the various safeguard features integrated into the power supply, ensuring safe operation under different conditions.
- OVP (Over Voltage Protection): Automatically shuts down the output if the voltage exceeds a preset safe limit, protecting connected devices.
- OCP (Over Current Protection): Limits the output current to the set value or shuts down if an overcurrent condition occurs, preventing damage to the load or power supply. This can be toggled via the O.C.P. switch.
- OPP (Over Power Protection): Protects the unit from excessive power draw.
- OTP (Over Temperature Protection): Activates if the internal temperature of the power supply exceeds safe operating limits, shutting down the unit to prevent damage.
7. Maintenance
Proper maintenance ensures the longevity and reliable performance of your power supply.
- Cleaning: Use a soft, dry cloth to clean the exterior of the unit. Do not use abrasive cleaners or solvents.
- Ventilation: Regularly check that the cooling vents and fans are free from dust and obstructions.
- Storage: When not in use for extended periods, store the unit in a dry, dust-free environment.
7.1. Intelligent Temperature Control Cooling

This image illustrates the intelligent cooling system at the rear of the power supply. The fan automatically adjusts its speed based on the internal temperature, ensuring optimal cooling and extending fan life while minimizing noise.
The power supply features an intelligent temperature-controlled fan system. The cooling fan automatically activates and adjusts its speed when the internal temperature reaches a certain threshold, ensuring efficient heat dissipation and contributing to a longer fan life and lower operational noise.
8. Troubleshooting
If you encounter issues with your power supply, refer to the table below for common problems and solutions.
| Problem | Possible Cause | Solution |
|---|---|---|
| No power/Display off | Power cord not connected; Power switch off; Blown fuse. | Check power cord connection; Turn on power switch; Replace fuse (refer to qualified personnel). |
| No output voltage/current | Output switch off; OCP/OVP/OPP/OTP activated; Incorrect voltage/current settings. | Press Output switch; Check for protection activation and resolve cause; Adjust voltage/current settings. |
| Unit overheats | Blocked ventilation; Excessive load. | Ensure clear airflow around the unit; Reduce load or operating time. |
| Unstable output | Loose connections; Faulty load. | Check all cable connections; Test with a different load. |
9. Specifications
Detailed technical specifications for the SHHJCO KPS10010D power supply:
| Parameter | Value |
|---|---|
| Model | KPS10010D |
| Output Voltage | 0-100V |
| Output Current | 0-10A |
| Output Power | 1000W |
| Input Voltage | AC110V (Specific model) |
| Operating Humidity | <80%RH |
| Storage Humidity | <70%RH |
| Set Value Resolution (Voltage) | 0.01V |
| Set Value Resolution (Current) | 0.01A |
| Readback Value Resolution (Voltage) | 0.01V |
| Readback Value Resolution (Current) | 0.01A |
| Display Accuracy | 0.5% ±3 words |
| Display Resolution (Voltage) | 0.01V |
| Display Resolution (Current) | 0.001A |
| CV Voltage Stability | 0.5% ±20mV |
| CV Load Stability | 0.5% ±20mV |
| CV Ripple Voltage | 0.5% Vp-p |
| CC Current Stability | 0.5% ±20mA |
| CC Load Stability | 0.5% ±20mA |
| CC Ripple Current | 0.5% Vp-p |
| Temperature Coefficient | 100ppm/°C |
| Rise Time (No load) | 15ms |
| Rise Time (Fully loaded) | 30ms |
| Dynamic Response Time | 2ms |
| Protective Functions | OVP, OCP, OPP, OTP |
| Item Weight | 4.41 pounds (2000 Grams) |
10. Warranty and Support
10.1. Warranty Information
This product is covered by a standard manufacturer's warranty. Please refer to the product packaging or contact your retailer for specific warranty terms and conditions.
10.2. Customer Support
For technical assistance, troubleshooting beyond this manual, or warranty claims, please contact the seller or manufacturer directly. Have your product model number (KPS10010D) and purchase information ready when contacting support.