1. Introduction
Thank you for choosing the LEYF DVB-S2 Satellite Receiver. This compact Full HD 1080p HDMI TV Stick is designed to provide a high-quality satellite television experience. Its discreet design allows it to be hidden behind your television, reducing cable clutter. This manual provides essential information for the safe and efficient operation of your device, including setup, usage, and troubleshooting.
2. Product Overview and Components
The LEYF DVB-S2 Satellite Receiver is a mini-stick device that connects directly to your TV's HDMI port. It supports H.265 HEVC Main 10-bit decoding and comes with a 2-in-1 universal remote control.

Figure 1: LEYF DVB-S2 Satellite Receiver, remote control, and connection cables.
2.1 Device Ports and Indicators

Figure 2: LEYF DVB-S2 Satellite Receiver with labeled connection points.
- 1. HDMI: Connects directly to your television's HDMI input.
- 2. Type-C: Power input port for the device.
- 3. IR: Port for connecting the external infrared (IR) receiver.
- 4. Coaxial Cable Input: For connecting the satellite dish coaxial cable.
- 5. USB: For connecting USB storage devices to play media files (JPEG, MP3, MKV).
2.2 Remote Control Functions
The included 2-in-1 universal remote control allows you to operate both the satellite receiver and basic TV functions.
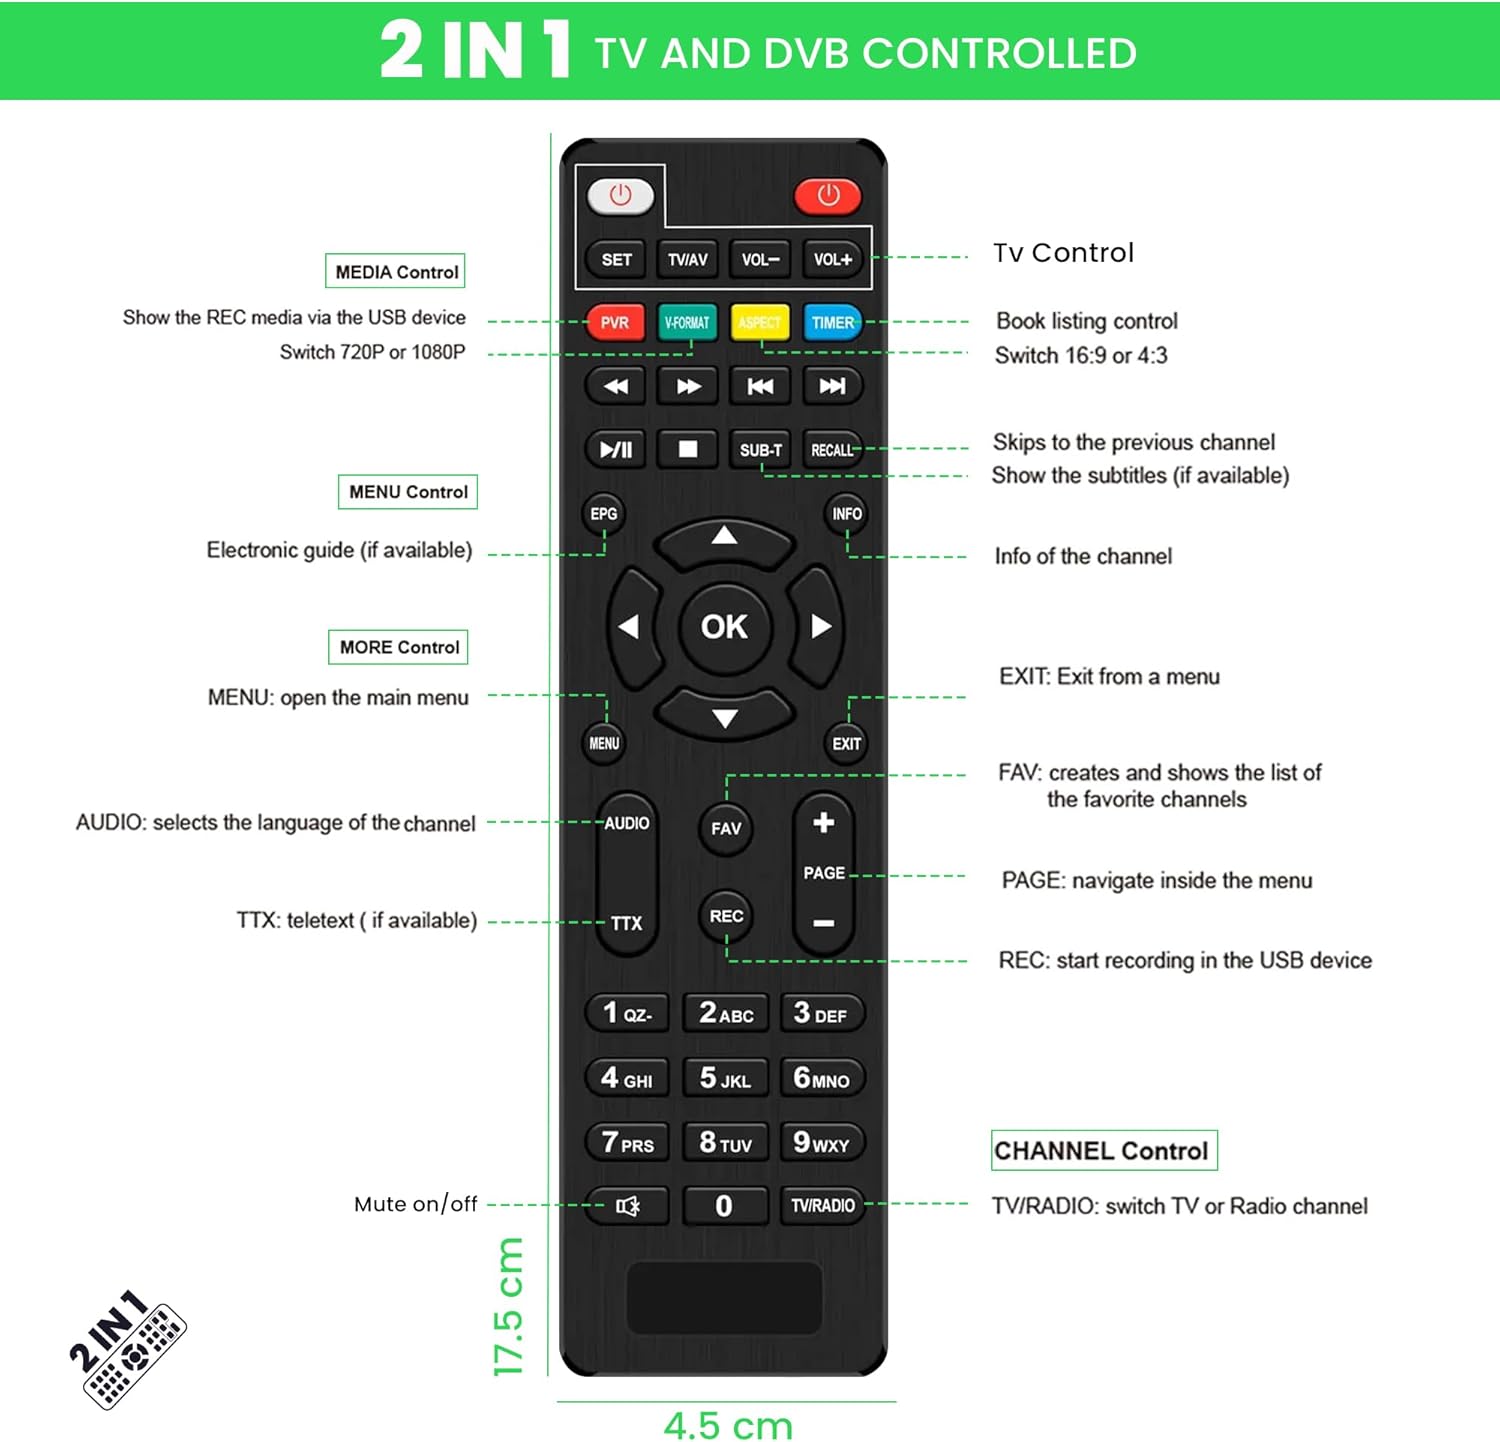
Figure 3: Remote control button layout and functions.
- SET / TV/AV / VOL+/-: TV Control buttons.
- PVR / V.FORMAT / ASPECT / TIMER: Media Control buttons for recording, video format, aspect ratio, and timer settings.
- Play/Pause, Stop, Rewind, Fast Forward, Previous/Next Track: Media playback controls.
- SUB-T / RECALL: Subtitle and recall last channel functions.
- EPG / INFO: Electronic Program Guide and channel information.
- MENU / EXIT: Navigation for menus.
- Arrow Keys / OK: Menu navigation and selection.
- AUDIO / FAV / PAGE / REC: Audio language, favorite channels, page navigation, and recording.
- Number Pad (0-9): Direct channel input.
- Mute / TV/RADIO: Mute audio and switch between TV/Radio modes.
3. Setup and Installation
Follow these steps to connect your LEYF DVB-S2 Satellite Receiver to your television.

Figure 4: Visual guide for connecting the satellite receiver.
- Step 1: Connect the Coaxial Cable. Connect your satellite dish's coaxial cable to the DVB-S2 TV stick's coaxial input (labeled 4 in Figure 2).
- Step 2: Connect Power. Connect the Type-C power cable to the device (labeled 2 in Figure 2) and then to a suitable 12V DC power source.
- Step 3: Connect the IR Receiver Cable. Plug the external IR receiver cable into the IR port on the DVB-S2 TV stick (labeled 3 in Figure 2).
- Step 4: Connect to TV HDMI Port. Plug the HDMI connector of the DVB-S2 TV stick (labeled 1 in Figure 2) directly into an available HDMI input on your television.
- Step 5: Position the IR Receiver. Place the external IR receiver in a location where it has a clear line of sight to your remote control, typically on the edge of the TV or a nearby surface. This allows you to control the hidden device.
Once all connections are made, switch on your television and select the corresponding HDMI input. The device is designed to be hidden behind your TV, reducing cable clutter and saving space.

Figure 5: The compact design allows the device to be hidden behind the TV.
4. Operating Instructions
4.1 Initial Setup and Channel Scan
- After connecting the device and selecting the correct HDMI input, the initial setup wizard should appear on your screen.
- Follow the on-screen prompts to select your language, region, and perform a channel scan. This process will detect and store available satellite channels.
- Ensure your satellite dish is properly aligned for optimal signal reception.
4.2 Basic Operation
- Power On/Off: Press the POWER button on the remote control to turn the device on or off.
- Channel Selection: Use the CH+/- buttons or the number pad to change channels.
- Volume Control: Use the VOL+/- buttons to adjust the volume.
- Menu Navigation: Press the MENU button to access the main menu. Use the arrow keys and OK button to navigate and select options. Press EXIT to leave the menu.
- Electronic Program Guide (EPG): Press the EPG button to view program schedules.
- Media Playback: Insert a USB storage device into the USB port (labeled 5 in Figure 2). Use the remote's media control buttons to play supported files (JPEG images, MP3 audio, MKV videos).
- Resolution Settings: The device supports various resolutions including Full HD 1080i, 1080p, and 720p. These can typically be adjusted in the system settings menu.
5. Maintenance
To ensure the longevity and optimal performance of your LEYF DVB-S2 Satellite Receiver, follow these simple maintenance guidelines:
- Cleaning: Use a soft, dry cloth to clean the device. Do not use liquid cleaners, aerosols, or abrasive materials, as these can damage the unit.
- Ventilation: Ensure the device's ventilation slots are not blocked to prevent overheating. Although designed to be hidden, ensure adequate airflow.
- Storage: If storing the device for an extended period, disconnect it from power and store it in a cool, dry place away from direct sunlight and extreme temperatures.
- Remote Control: Replace batteries in the remote control when they are depleted. Refer to the remote control's battery compartment for the correct battery type.
6. Troubleshooting
If you encounter issues with your LEYF DVB-S2 Satellite Receiver, please refer to the following common problems and solutions:
| Problem | Possible Cause | Solution |
|---|---|---|
| No picture or sound | Incorrect HDMI input selected on TV; loose HDMI cable; power issue. | Ensure TV is on the correct HDMI input. Check HDMI cable connection. Verify power cable is securely connected and power source is active. |
| "NO SIGNAL" message on screen | Satellite dish not aligned; coaxial cable loose or damaged; channel scan not performed or incomplete. | Check coaxial cable connection to the device and satellite dish. Ensure satellite dish is properly aligned. Perform a new channel scan through the menu. |
| Remote control not responding | Dead batteries; IR receiver blocked or not connected; remote out of range. | Replace remote control batteries. Ensure the external IR receiver is securely connected and has a clear line of sight to the remote. Move closer to the IR receiver. |
| Audio/Video lag or synchronization issues | Temporary software glitch; signal interference. | Turn off the receiver and unplug it from the power source for a few minutes, then reconnect and restart. Check for any potential sources of interference. |
| Cannot play media from USB | Unsupported file format; USB device not recognized; corrupted files. | Ensure files are in supported formats (JPEG, MP3, MKV). Try a different USB device or reformat the current one. Check if the USB device is properly inserted. |
If the problem persists after trying these solutions, please contact customer support.
7. Specifications
| Feature | Specification |
|---|---|
| Brand | LEYF |
| Model Number | 4262430870684 |
| Colour | Black |
| Connectivity Technology | HDMI |
| Item Weight | 0.23 Kilograms |
| Audio Output Mode | Stereo, Surround |
| Total HDMI Ports | 1 |
| Compatible Devices | Television |
| Supported Audio Format | MP3 |
| Voltage | 12 Volts (DC) |
| Included Components | 1x LEYF Decodificador TDT full HD 1080P DVB S2 |
| Satellite Service Description | Standard Satellite TV Services |
| Video Output Resolution | 1080p |
| Supported Standards | DVB-S2, H.265, MP3, MKV, JPEG |
| Aspect Ratio | 16:9 |
8. Support Information
For further assistance, technical support, or warranty inquiries, please refer to the contact information provided with your purchase or visit the official LEYF product support website. Keep your purchase receipt and model number handy when contacting support.