1. Introduction
This manual provides essential information for setting up, operating, maintaining, and troubleshooting your UMIDIGI G9A Android 14 Go Unlocked Phone. Please read this manual carefully to ensure proper use and to maximize the performance of your device.
The UMIDIGI G9A is a feature-rich smartphone designed for everyday use. It runs on the efficient Android 14 Go operating system, offering a smooth user experience. Key features include a large 6.75-inch HD+ display, a long-lasting 5000mAh battery, versatile camera system, and expandable storage.
2. What's in the Box
Verify that all items are present in your product package:
- 1 x UMIDIGI G9A Phone
- 1 x Protective Film (pre-applied)
- 1 x Phone Case
- 1 x Type-C Cable
- 1 x Power Adapter
- 1 x SIM Tray Ejector
- 1 x Quick Start Guide

3. Phone Overview
The UMIDIGI G9A features a sleek design with a 6.75-inch HD+ display and a slim profile of 7.9mm. Familiarize yourself with the key physical components of your device.
3.1 Front View

The front of the device is dominated by the 6.75-inch HD+ display, providing ample screen real estate for media consumption and daily tasks. The front-facing camera is located at the top center of the display.
3.2 Rear View
The rear panel features the dual camera system, consisting of a 13MP main camera and a 2MP depth camera, along with an LED flash. The UMIDIGI logo is subtly placed at the bottom.
3.3 Side Views and Ports
The right side of the phone typically houses the power button and volume control buttons. The SIM card tray is located on the left side, accessible with the provided SIM ejector tool. The bottom edge includes the USB Type-C port for charging and data transfer, and a 3.5mm headphone jack.
4. Setup
4.1 Inserting SIM Cards and MicroSD Card
The UMIDIGI G9A supports dual Nano SIM cards or one Nano SIM card and one MicroSD card for expandable storage up to 1TB.
- Locate the SIM card tray on the left side of the phone.
- Insert the SIM ejector tool into the small hole next to the tray and push gently until the tray pops out.
- Place your Nano SIM card(s) and/or MicroSD card into the designated slots on the tray. Ensure the cards are correctly oriented.
- Carefully push the tray back into the phone until it is flush with the side.

4.2 Powering On and Initial Setup
- Press and hold the power button on the right side of the phone until the UMIDIGI logo appears.
- Follow the on-screen prompts to complete the initial setup, including selecting your language, connecting to Wi-Fi, and setting up your Google account.
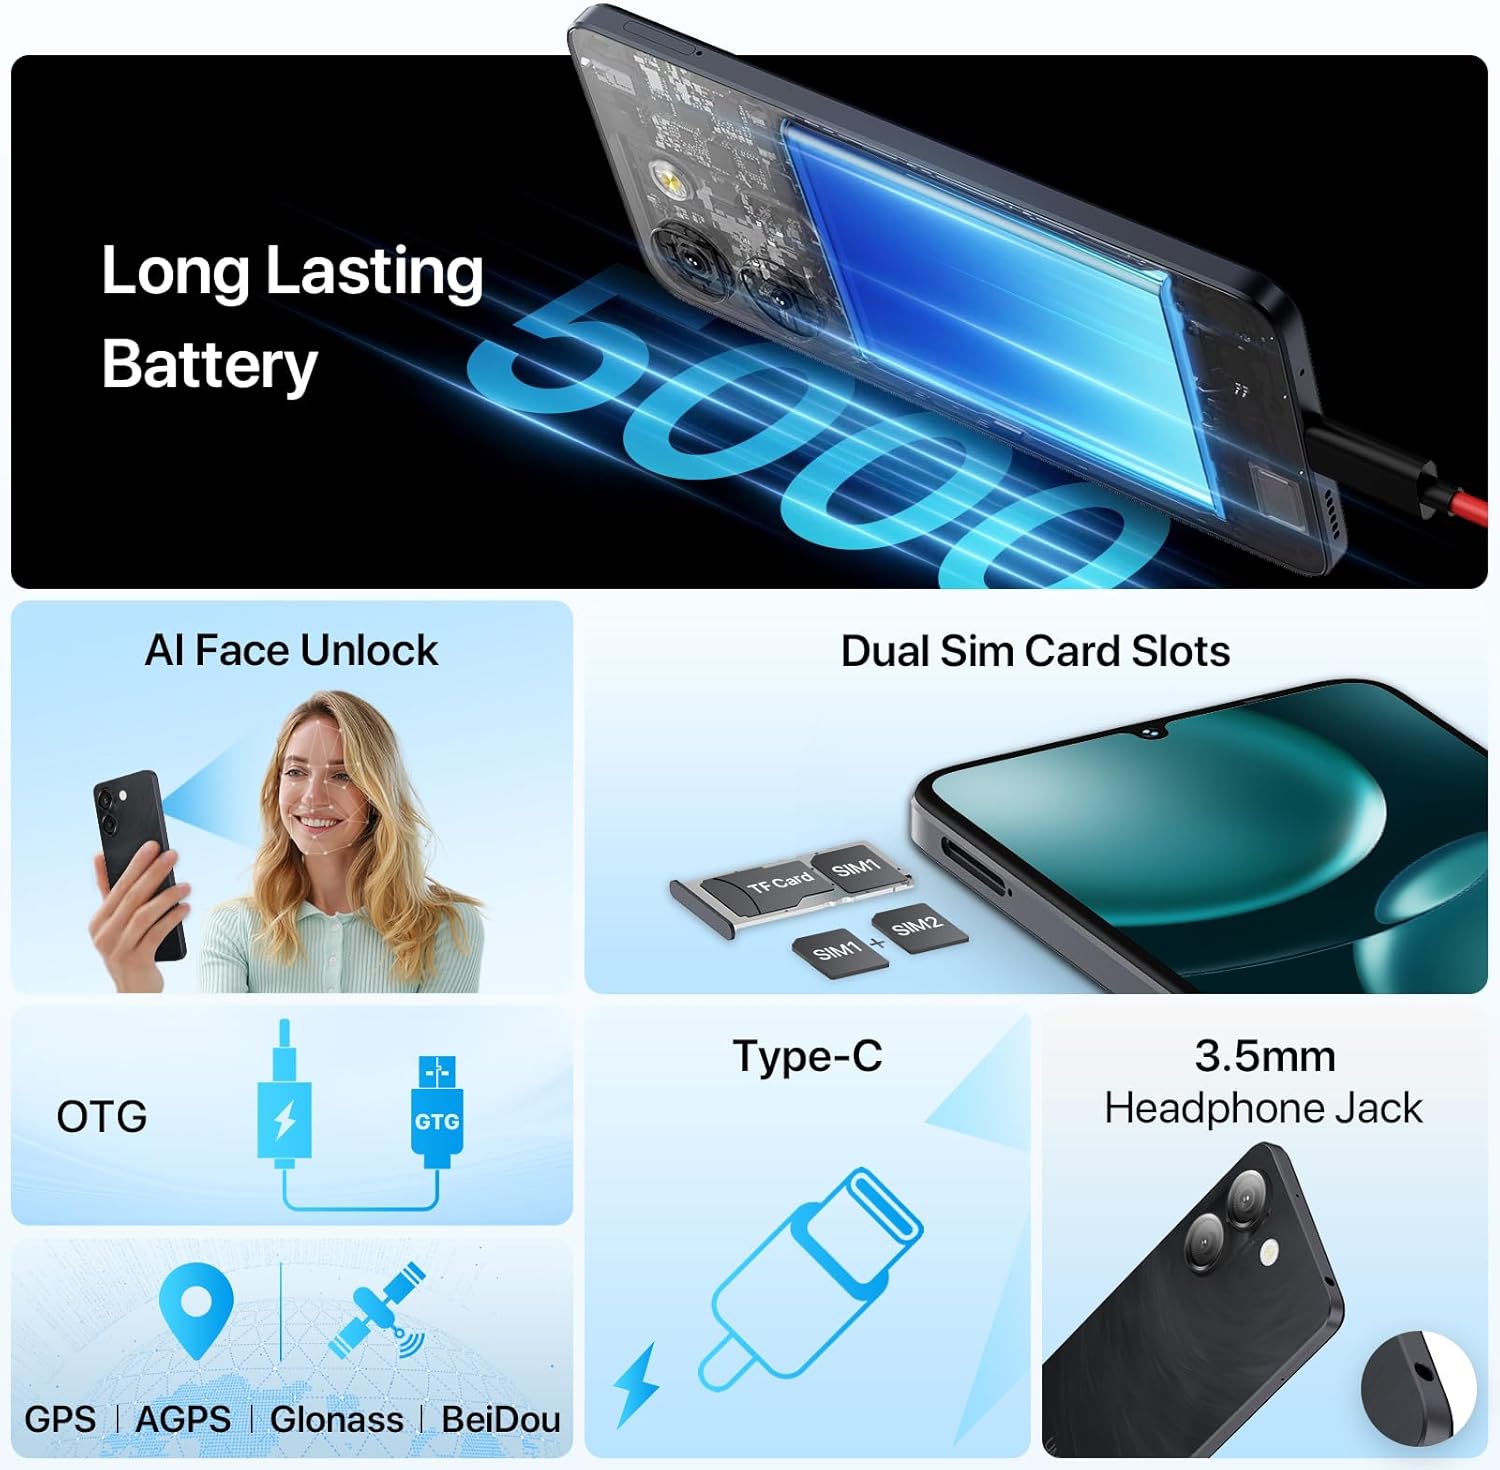
- You may also set up AI Face Unlock or Fingerprint Recognition during this process.
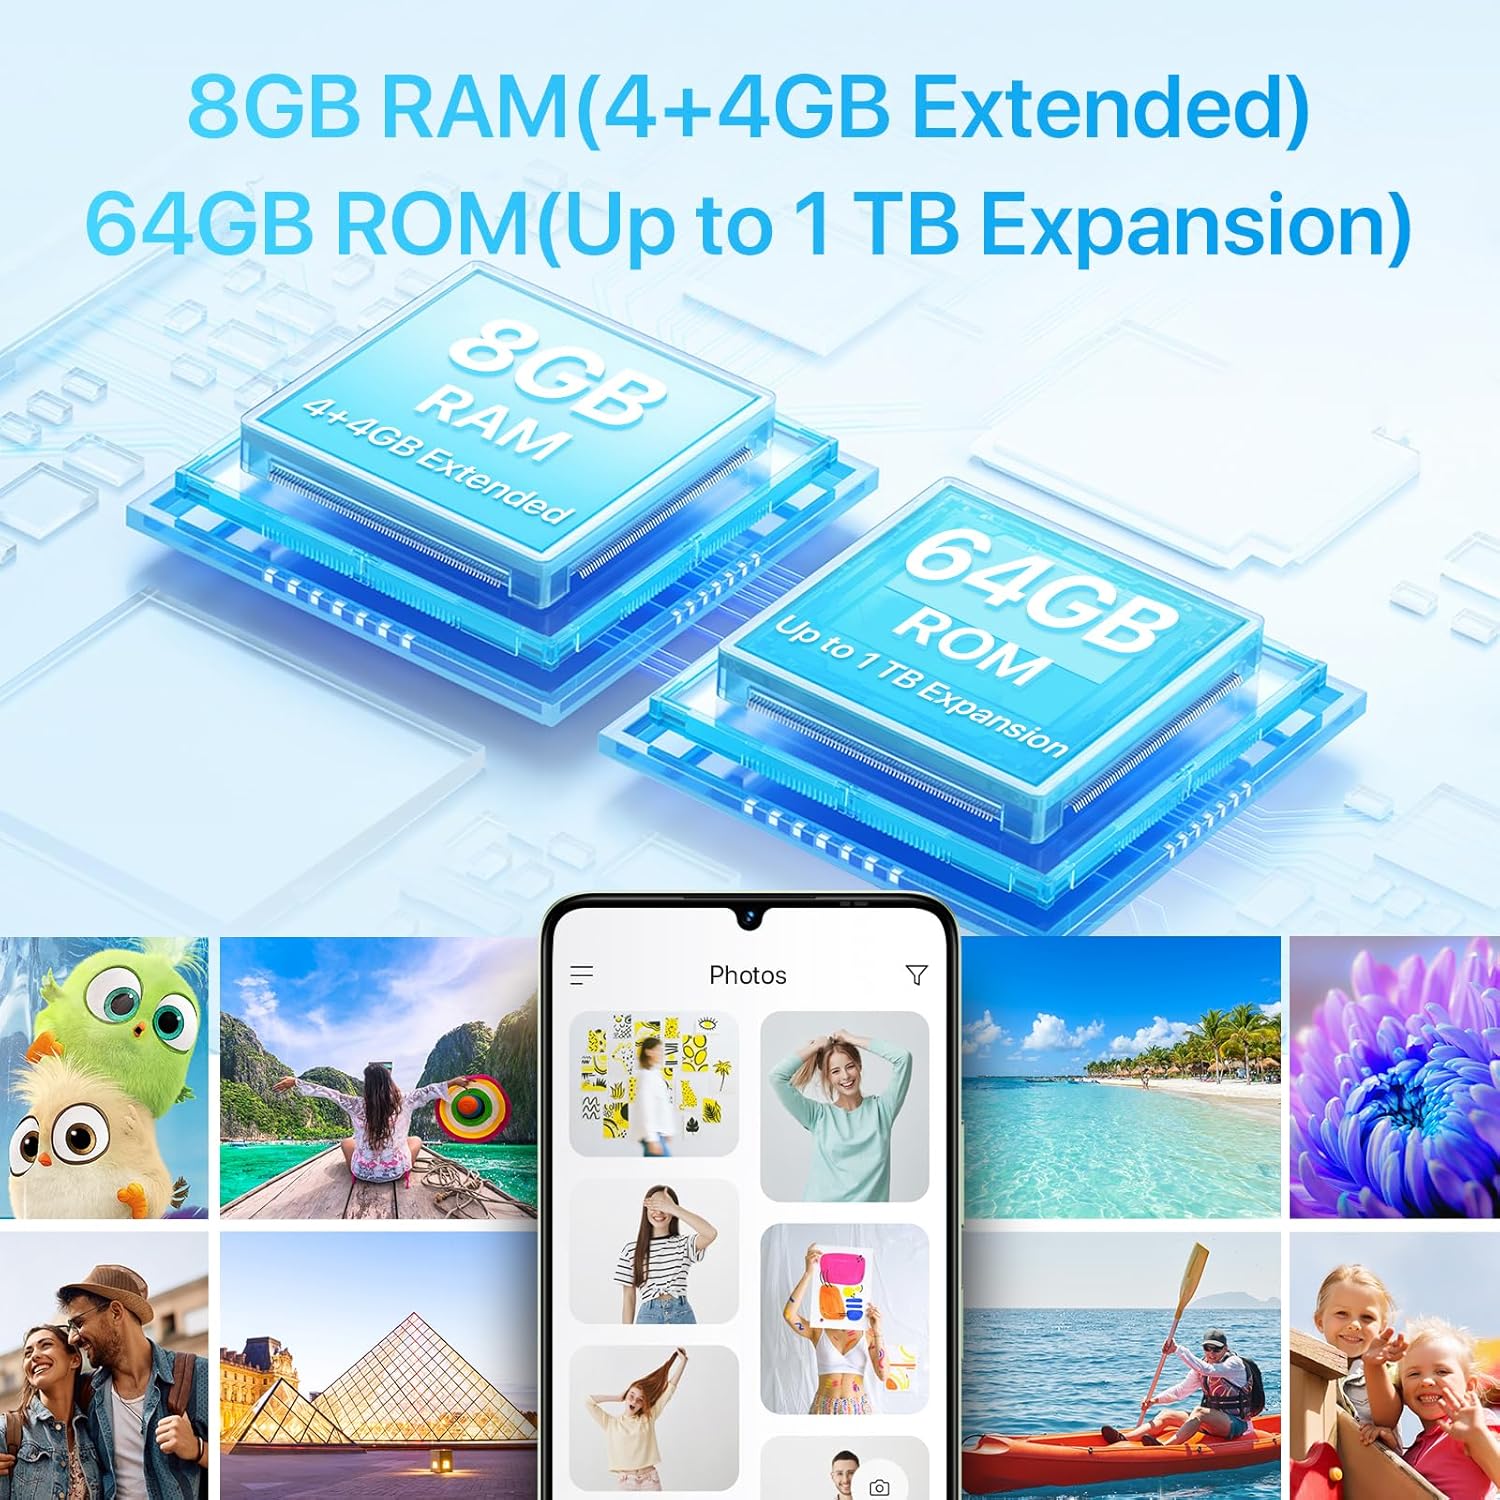
4.3 Memory Expansion (RAM)
The UMIDIGI G9A supports virtual RAM expansion, allowing you to allocate a portion of your internal storage to function as additional RAM. This can improve multitasking performance.
- Go to Settings on your phone.
- Find and tap on Memory Expansion.
- Select Set RAM extend Size.
- Choose the desired RAM expansion size (e.g., 2GB, 4GB).
- The phone will prompt you to reboot for the changes to take effect. Confirm the reboot.

4.4 Unboxing Video
5. Operating Your Phone
5.1 Display
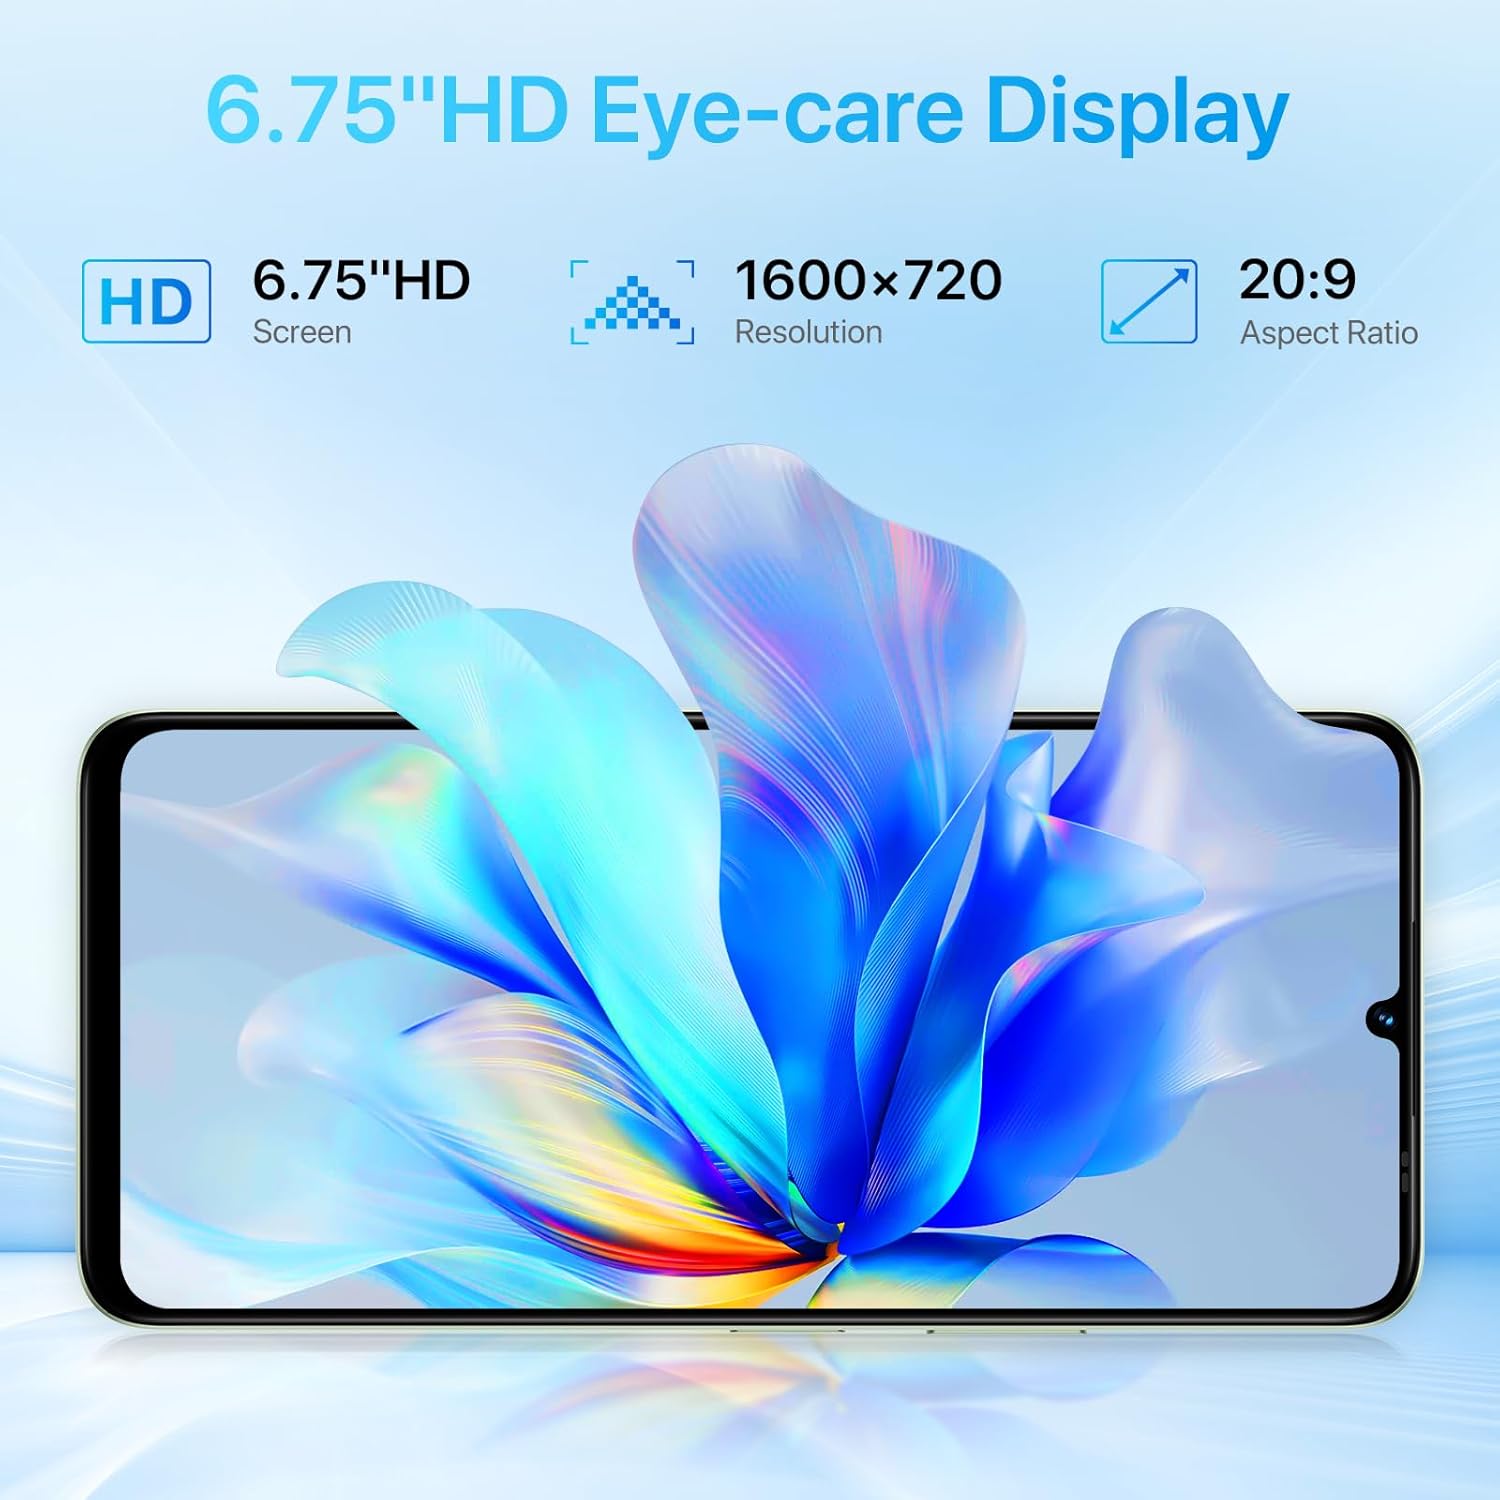
The UMIDIGI G9A features a 6.75-inch HD+ display with a resolution of 1600x720 pixels and a 20:9 aspect ratio. This provides a clear and immersive visual experience for browsing, watching videos, and gaming.

5.2 Cameras
Capture moments with the G9A's camera system:
- Rear Camera: 13MP main sensor + 2MP depth sensor.
- Front Camera: 8MP sensor for selfies and video calls.
The camera app includes various modes and AI enhancements to help you take clear and detailed photos.

5.3 Battery and Charging
The UMIDIGI G9A is equipped with a 5000mAh battery, providing extended usage time. Use the included Type-C cable and power adapter for optimal charging.

5.4 Connectivity
- 4G Network: Supports various 4G bands for cellular data and calls.
- Wi-Fi: Connect to wireless networks for internet access.
- Bluetooth: Pair with wireless accessories like headphones or speakers.
- GPS: Built-in GPS, AGPS, Glonass, and BeiDou for navigation and location services.
- FM Radio: Listen to FM radio stations. Note that headphones must be connected to function as an antenna.

5.5 Security Features
- AI Face Unlock: Securely unlock your phone using facial recognition.
- Fingerprint Recognition: Unlock your device quickly and securely with your fingerprint.

6. Maintenance
6.1 General Care
- Cleaning: Use a soft, lint-free cloth to clean the screen and body of the phone. Avoid abrasive materials or harsh chemicals.
- Temperature: Avoid exposing your phone to extreme temperatures (hot or cold) as this can affect battery life and overall performance.
- Water Resistance: The UMIDIGI G9A is water resistant. However, this does not mean it is waterproof. Avoid submerging the device in water or exposing it to high-pressure water jets. Damage caused by liquids is typically not covered under warranty.
- Protection: Use the provided protective film and phone case to guard against scratches and minor impacts.
6.2 Software Updates
Regularly check for and install software updates to ensure your phone has the latest security patches and performance improvements. You can usually find this option in Settings > System > System update.
7. Troubleshooting
If you encounter issues with your UMIDIGI G9A, try the following common troubleshooting steps:
7.1 Common Issues and Solutions
- Phone Freezes or Becomes Unresponsive:
Press and hold the power button for about 10-15 seconds to force a restart. - Apps Crashing:
Clear the cache and data for the problematic app in Settings > Apps > [App Name] > Storage. If the issue persists, uninstall and reinstall the app. - Poor Battery Life:
Reduce screen brightness, close unused apps running in the background, disable unnecessary features like GPS or Bluetooth when not in use, and check for apps consuming excessive power in Settings > Battery. - Network Connectivity Issues (Calls/Data):
Ensure your SIM card is correctly inserted. Check your network settings in Settings > Network & internet > Mobile network. Restart your phone. Verify with your carrier that your plan is active and compatible with the device. Some users have reported potential compatibility issues with specific US mobile networks; consult your carrier for supported frequency bands. - Slow Performance:
Close background apps, clear cache, and consider utilizing the RAM expansion feature (see Section 4.3). If performance remains slow, a factory reset might be necessary.
7.2 Factory Reset (Data Erase)
Warning: A factory reset will erase all data from your phone, including apps, photos, and settings. Back up important data before proceeding.
- Go to Settings.
- Tap on System.
- Select Reset options.
- Choose Erase all data (factory reset).
- Confirm your decision and enter your PIN/password if prompted.
8. Specifications
| Feature | Detail |
|---|---|
| Brand | UMIDIGI |
| Model Name | G9A |
| Operating System | Android 14 Go |
| CPU Model | Mediatek Dimensity 1100 |
| CPU Speed | 1.6 GHz |
| RAM Memory Installed Size | 8 GB (4GB physical + 4GB extended) |
| Memory Storage Capacity | 64 GB (Expandable up to 1TB via MicroSD) |
| Screen Size | 6.75 Inches |
| Resolution | 1600 x 720 (HD+) |
| Aspect Ratio | 20:9 |
| Refresh Rate | 60 Hz |
| Rear Facing Camera | 13 MP (Main) + 2 MP (Depth) |
| Front Photo Sensor Resolution | 8 MP |
| Battery Capacity | 5000 mAh (Lithium-Ion) |
| Phone Talk Time | 18 Hours |
| SIM Card Slot Count | Dual SIM (Nano) |
| Connectivity Technology | 4G, Wi-Fi, USB Type C, Bluetooth |
| Headphones Jack | 3.5 mm |
| Biometric Security | AI Face Unlock, Fingerprint Recognition |
| Additional Features | Built-In GPS, Dual SIM, Expandable Memory, FM Radio, OTG |
| Water Resistance Level | Water Resistant |
| Item Weight | 189 Grams |
| Item Dimensions | 6.57 x 3.03 x 0.31 inches |
| Model Year | 2024 |
9. Warranty Information
The UMIDIGI G9A comes with a 1-year manufacturer's warranty. This warranty covers defects in materials and workmanship under normal use. It does not cover damage caused by accidents, misuse, unauthorized repairs, or liquid damage.
Please retain your proof of purchase for warranty claims.
10. Customer Support
For further assistance or inquiries regarding your UMIDIGI G9A, you can contact customer support through the following methods:
- Via Product Page: On the product page, click on the store name "UMIDIGI Store" and then click on "Ask question" in the upper right corner.
- Via Order History: Go to your Order history, select the applicable order for your UMIDIGI G9A, and contact the seller directly.