KETOTEK KTF0176C
KETOTEK Smart Thermostat 3A User Manual
Model: KTF0176C
1. Introduction
The KETOTEK Smart Thermostat 3A is designed for intelligent control of water and gas boiler underfloor heating systems. It offers advanced features such as Wi-Fi connectivity, compatibility with smart home platforms like Alexa and Smart Life, and comprehensive programming options to optimize your home's heating efficiency and comfort.

Figure 1: KETOTEK Smart Thermostat 3A and its mobile application interface.
This image displays the KETOTEK Smart Thermostat, a white rectangular device with a large digital display showing temperature and time, and a prominent silver rotary dial. A smartphone screen is overlaid in the foreground, showing the thermostat's control app with a temperature reading of 15.5°C. This illustrates the device's modern design and its smart control capabilities.
2. Safety Information
Please read all safety warnings and instructions carefully before installing or operating this device. Failure to follow these instructions may result in electric shock, fire, or other hazards.
- Professional Installation Required: Installation should only be performed by a qualified electrician.
- Power Disconnection: Always disconnect power at the circuit breaker before installing or servicing the thermostat.
- Voltage Compatibility: Ensure the thermostat's voltage (AC 90~240V 50/60Hz) is compatible with your electrical system.
- Wiring: Correct wiring is crucial. Refer to the wiring diagram provided in this manual. This thermostat requires both phase and neutral wires to power it. Port 5 and Port 6 are dry contacts for the boiler (no voltage).
- Child Safety: Keep the device out of reach of children. Utilize the child lock function to prevent unauthorized adjustments.
- Environmental Conditions: Do not expose the thermostat to excessive moisture, dust, or extreme temperatures.
3. Product Features
- Intelligent Control: Wi-Fi enabled for remote control via Smart Life app and voice commands through Alexa.
- High Accuracy: Integrated NTC temperature sensors with 0.5°C display accuracy and temperature calibration function (-9.9°C to 9.9°C).
- Programmable Modes: Manual, Programming (5+2, 6+1, 7 days with 6 periods), and Holiday modes.
- Memory Function: Power-off memory retains settings.
- Child Lock: Prevents accidental changes to settings.
- Adjustable Backlight: Customizable brightness for standby backlight.
- Window Function: Detects open windows to save energy.
- Temperature History: Track indoor temperature trends via the app.
- Device Sharing: Share control of the thermostat with multiple users via the app.
4. Package Contents
Verify that all items are present in the package:
- 1 x KETOTEK Smart Thermostat (KTF0176C)
- 1 x Instruction Manual
- 2 x Mounting Screws
5. Installation Guide
5.1 Pre-installation Checks
- Ensure the power to your heating system is turned off at the main circuit breaker.
- Confirm your heating system is a water or gas boiler underfloor heating system. This thermostat is not suitable for electric underfloor heating mats.
- Verify your boiler requires a dry contact (voltage-free) signal for activation.
- Prepare a standard 86mm or European 60mm pattress box for flush mounting.
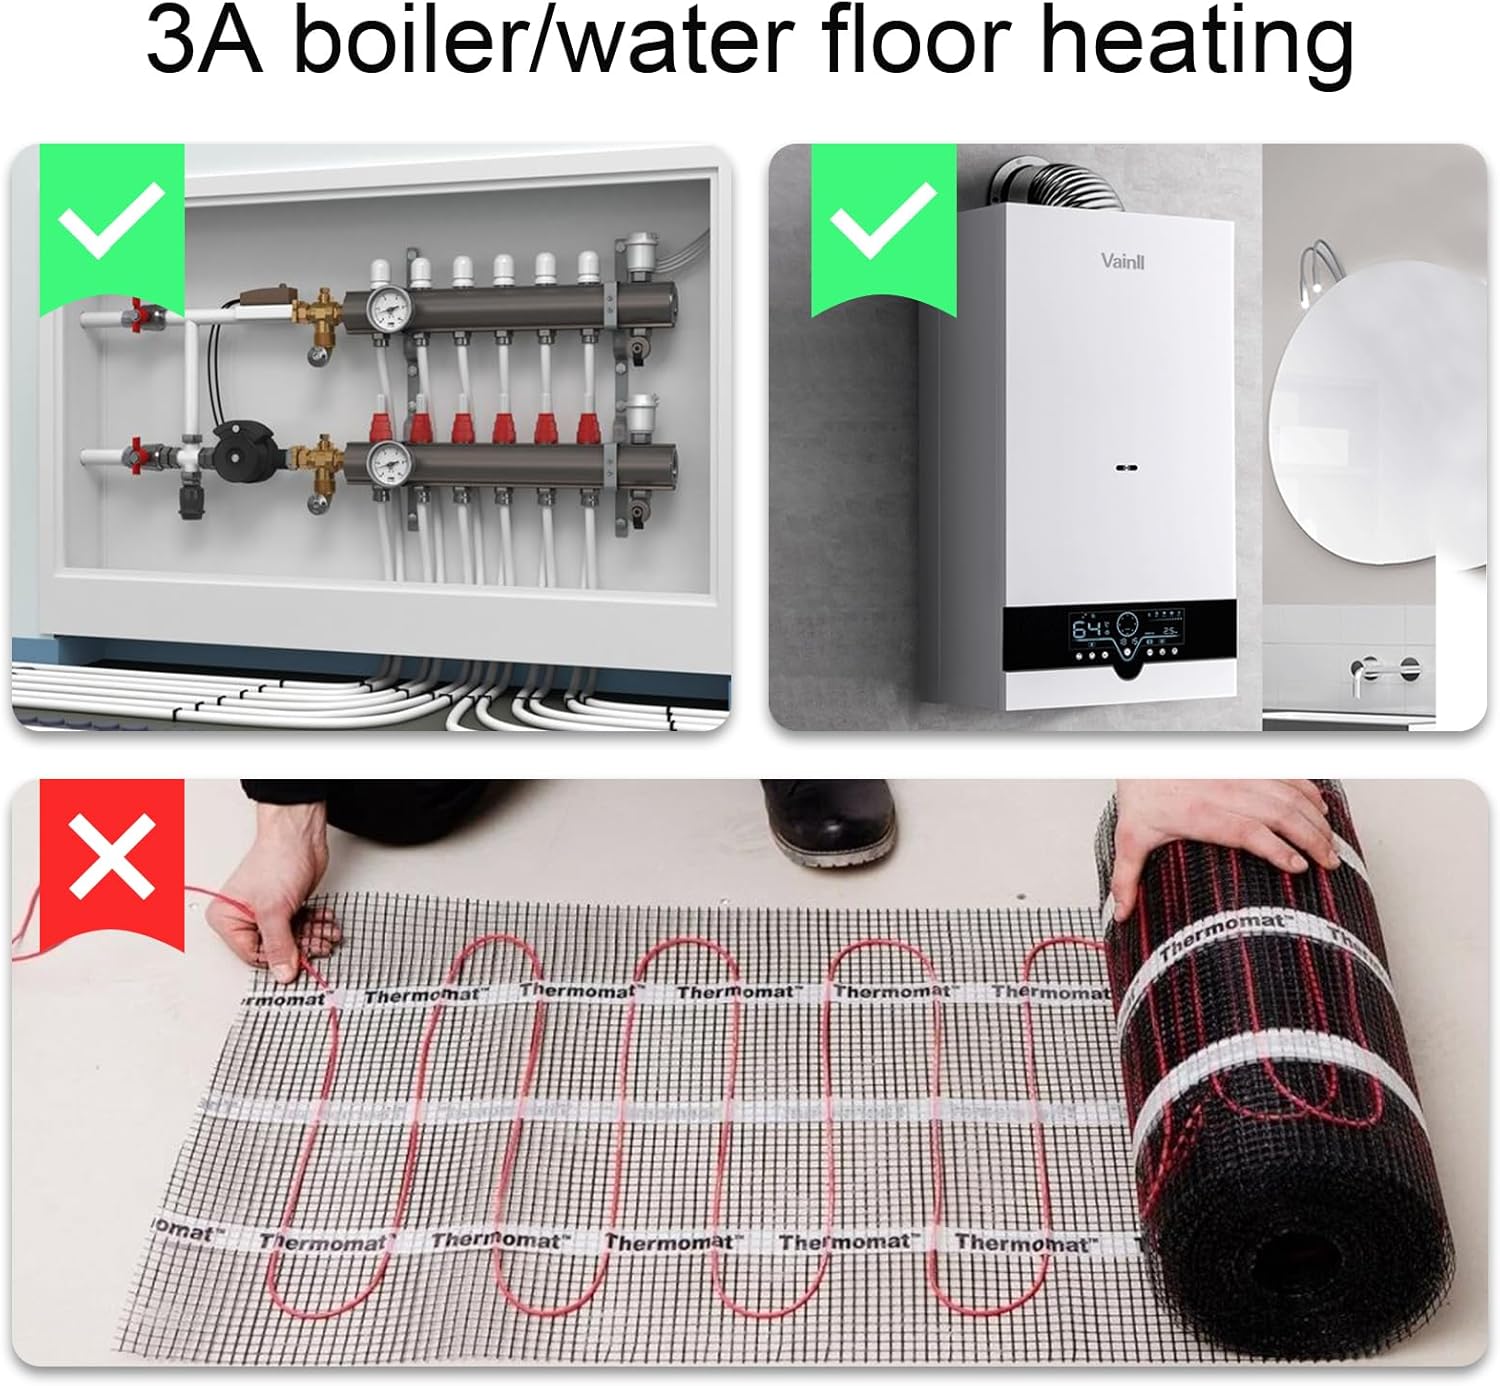
Figure 2: Compatible heating systems for the 3A thermostat.
This image illustrates the types of heating systems compatible with the 3A thermostat. It shows checkmarks next to images of a water manifold system and a gas boiler, indicating compatibility. An 'X' mark is shown over an image of an electric underfloor heating mat, indicating incompatibility. This clarifies that the thermostat is designed for water and gas boiler systems only.
5.2 Wiring Diagram
Carefully follow the wiring diagram below. Incorrect wiring can damage the thermostat or your heating system.

Figure 3: Thermostat dimensions and wiring connections.
This image provides a detailed technical drawing of the thermostat, including its dimensions (8.6cm x 8.6cm x 1.7cm depth from wall). It also shows the back of the thermostat with clearly labeled wiring terminals. Terminals 1 and 2 are for AC 90-240V power input (Live and Neutral), and terminals 5 and 6 are dry contacts for the boiler connection. A note emphasizes that the thermostat requires both phase and neutral wires for power, and that ports 5 and 6 are dry contacts (no voltage) for the boiler.
- Connect the Live (L) wire from your power supply to terminal 1.
- Connect the Neutral (N) wire from your power supply to terminal 2.
- Connect the boiler's control wires to terminals 5 and 6. These are dry contacts, meaning they provide a switch closure, not voltage, to activate the boiler.
- Ensure all connections are secure.
5.3 Mounting
- Carefully separate the front panel of the thermostat from the backplate.
- Mount the backplate to the pattress box using the provided screws.
- Align the front panel with the mounted backplate and gently push until it clicks into place.
6. Initial Setup and Wi-Fi Connection
6.1 Power On
After installation, restore power to the thermostat at the circuit breaker. The thermostat display will light up.
6.2 Wi-Fi Pairing (Smart Life/Tuya App)
To enable smart features, connect your thermostat to the Smart Life or Tuya app.
- Download the "Smart Life" or "Tuya Smart" app from your mobile app store.
- Register or log in to your account.
- On the thermostat, press and hold the Wi-Fi icon button (usually for 5-7 seconds) until the Wi-Fi indicator on the display starts blinking rapidly. This indicates pairing mode.
- In the app, tap "Add Device" or the "+" icon. Select "Small Home Appliance" > "Thermostat" or allow the app to auto-discover the device.
- Follow the in-app instructions to connect to your 2.4GHz Wi-Fi network. (5GHz networks are not supported).
- Once connected, the Wi-Fi indicator on the thermostat will become solid, and you can control the device via the app.

Figure 4: App remote control and smart home integration.
This image demonstrates the thermostat's remote control capabilities. The thermostat is mounted on a wall, and a smartphone in the foreground displays the Smart Life app interface, showing temperature control. Nearby smart speakers (like Amazon Echo Dots) are visible, indicating compatibility with voice assistants and broader smart home ecosystems.
7. Operation Modes and Programming
The thermostat offers several operating modes to suit your heating needs.
7.1 Manual Mode
In Manual Mode, the thermostat maintains a constant temperature set by the user. Use the rotary dial or app to adjust the desired temperature.
7.2 Programming Mode
This mode allows you to set a weekly heating schedule with different temperatures for various times of the day. You can choose from 5+2 days (weekdays + weekend), 6+1 days (Mon-Sat + Sunday), or 7 days (each day individually programmable) planning, with up to 6 periods per day.

Figure 5: Programmable thermostat schedule options.
This image illustrates the programmable features of the thermostat. It shows a graphic representation of a weekly schedule with 6 time slots (Wake up, Outdoor, Back home, Outdoor, Back home, Sleep) and corresponding temperatures. Below this, options for 5+2 days, 6+1 days, and 7 days programming are highlighted. A person is shown using a smartphone, which displays the app's interface for setting these workday schedules, demonstrating the ease of programming.
7.3 Holiday Mode
Set a specific temperature for the duration of your holiday. The thermostat will maintain this temperature until the end of the set holiday period, after which it will revert to the previously selected mode (e.g., Programming Mode).
8. Advanced Functions
8.1 Temperature Calibration
If you find the displayed temperature does not match an external thermometer, you can calibrate the thermostat. This function allows for adjustments from -9.9°C to 9.9°C.

Figure 6: Manual temperature calibration.
This image illustrates two features: the power-off memory function and manual temperature calibration. The top part shows the thermostat on a wall, implying that settings are retained even if power is lost. The bottom part shows a hand adjusting the thermostat's rotary dial, with an arrow indicating rotation, demonstrating how the temperature can be manually calibrated for accuracy.
8.2 Child Lock
Activate the child lock to prevent unauthorized changes to the thermostat settings. This is particularly useful in households with young children.

Figure 7: Child Lock Setting.
This image visually represents the child lock feature. It shows a baby reaching towards the thermostat, with a red circle and diagonal line (a 'no entry' symbol) overlaid on the baby's hand, and a lock icon in the corner. This signifies that the thermostat can be locked to prevent accidental or unauthorized adjustments by children.
8.3 Adjustable Backlight
The brightness of the thermostat's display backlight can be adjusted to your preference, especially for standby mode.

Figure 8: Adjustable Backlight.
This image demonstrates the adjustable backlight feature of the thermostat. It shows three representations of the thermostat's display: one with a bright backlight, one with a dimmer backlight, and one showing the rotary dial being adjusted, implying that the backlight brightness can be controlled by the user. This feature allows for comfortable viewing in various lighting conditions, including during sleep.
8.4 Power-off Memory Function
The thermostat retains all its settings, including programmed schedules and current mode, even after a power outage.
8.5 Device Sharing
Through the Smart Life/Tuya app, you can share control of your thermostat with family members or other authorized users.

Figure 9: Device Sharing via App.
This image illustrates the device sharing functionality available through the mobile app. A smartphone screen is shown displaying the app's settings, with a prominent 'Share Device' option. Below this, multiple smaller images of people (adults and children) using smartphones or tablets are connected by dashed lines to the main phone, symbolizing that control of the thermostat can be shared among family members or other authorized users.
8.6 Temperature History Function
The app allows you to view historical temperature data, helping you monitor and understand your heating patterns.
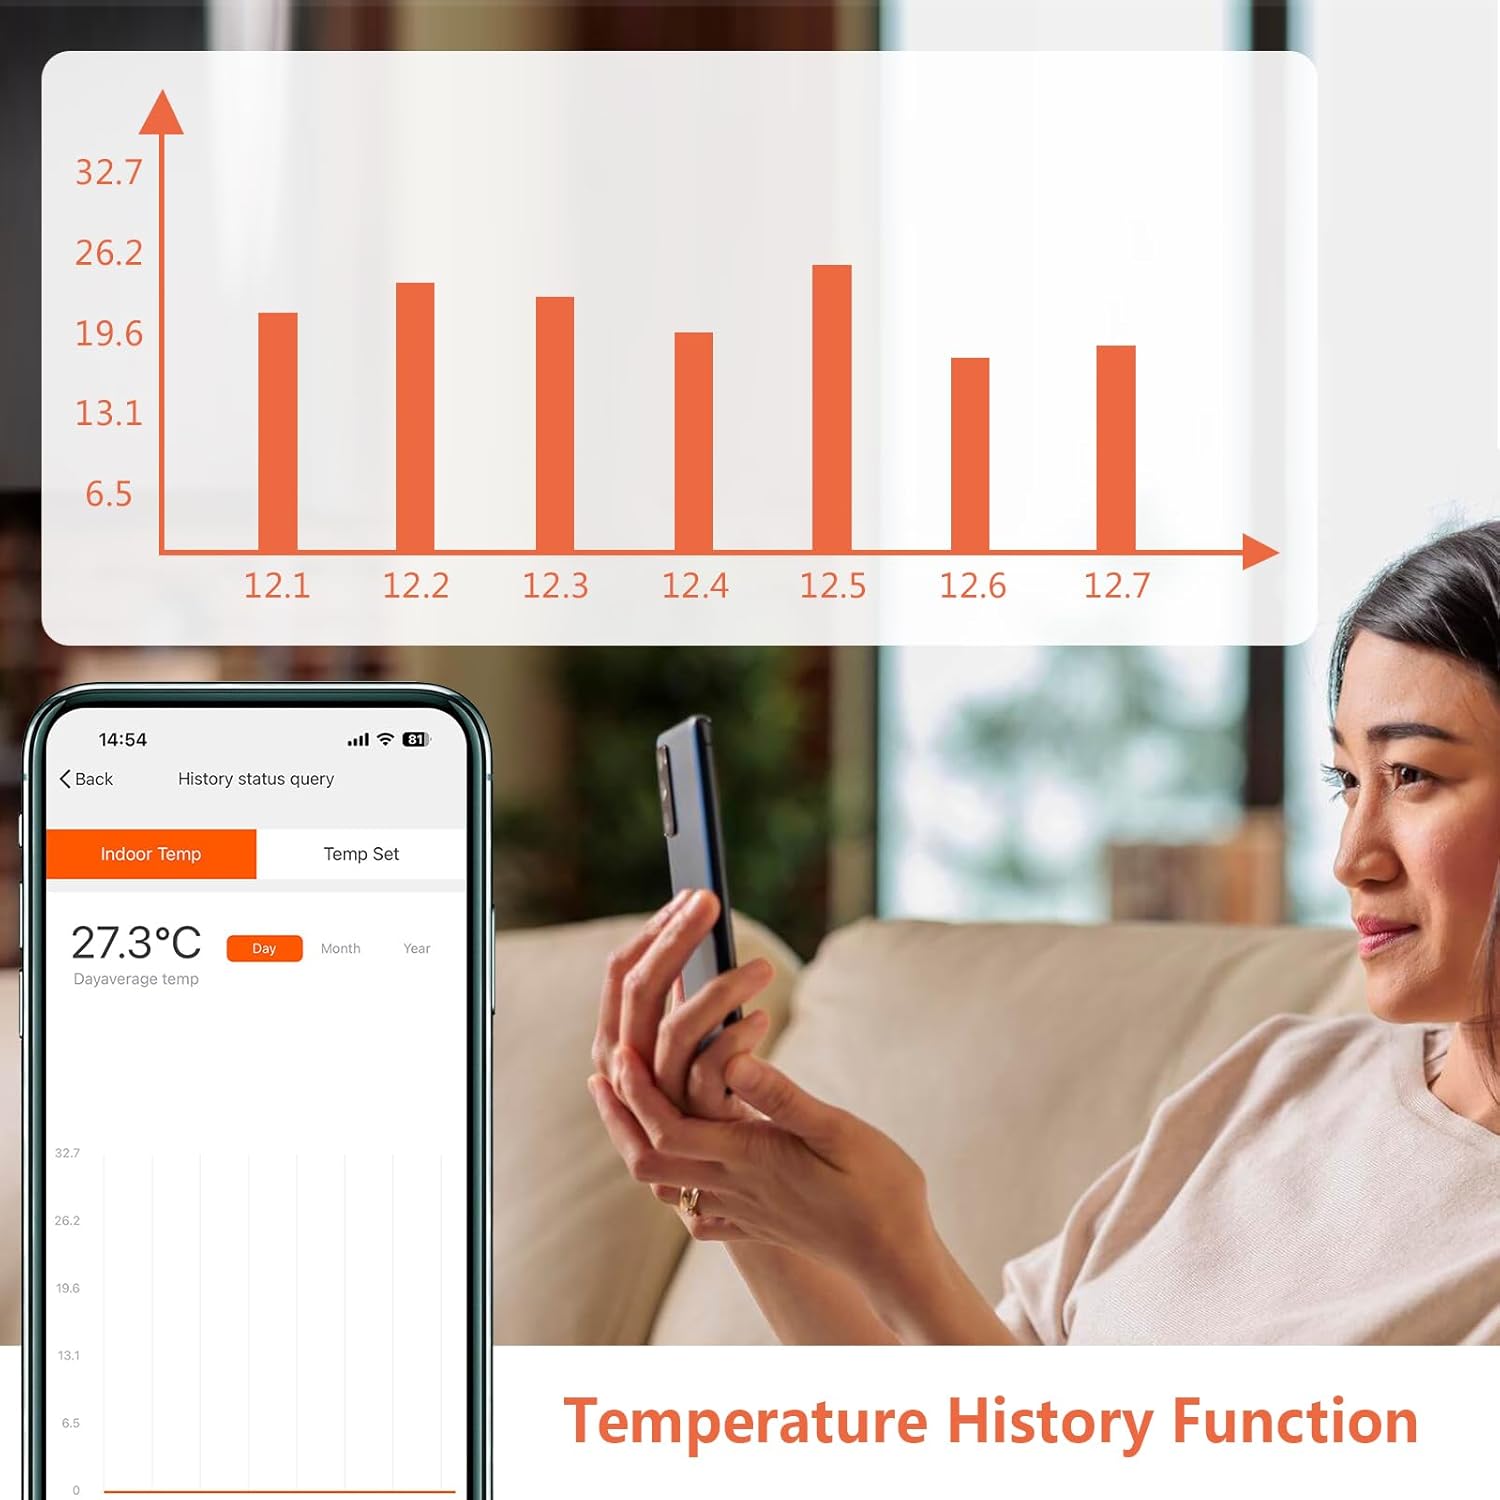
Figure 10: Temperature History Function.
This image shows a user looking at a smartphone, which displays a graph of temperature history. The graph shows temperature readings over several days, allowing the user to track and analyze indoor temperature trends. This feature provides valuable insights into heating performance and energy consumption.
9. Troubleshooting
| Problem | Possible Cause | Solution |
|---|---|---|
| Thermostat not powering on | No power supply; incorrect wiring. | Check circuit breaker. Verify Live and Neutral wires are correctly connected to terminals 1 and 2. |
| Boiler not activating | Incorrect boiler wiring; boiler issue; thermostat not in heating mode. | Ensure boiler control wires are connected to terminals 5 and 6. Check boiler's own power and settings. Confirm thermostat is set to a temperature higher than ambient. |
| Wi-Fi connection unstable or failing | 2.4GHz vs 5GHz network; weak Wi-Fi signal; incorrect password. | Ensure you are connecting to a 2.4GHz Wi-Fi network. Move thermostat closer to router or use a Wi-Fi extender. Re-enter Wi-Fi password carefully. |
| Temperature reading inaccurate | Need for calibration. | Use the temperature calibration function in the settings to adjust the reading. |
| Thermostat settings change unexpectedly | Child lock not enabled; accidental input. | Activate the child lock feature to prevent unintended adjustments. |
10. Specifications
| Parameter | Value |
|---|---|
| Model | KTF0176C |
| Voltage | AC 90~240V, 50/60Hz |
| Max Current | 3A |
| Power Source | Corded Electric |
| Product Dimensions | 8.6 x 8.6 x 1.7 cm |
| Item Weight | 230 g |
| Temperature Display Accuracy | 0.5°C |
| Temperature Setting Range | 1°C~70°C (Default: 5°C~35°C) |
| Connectivity Technology | Wi-Fi (2.4GHz only) |
| Controller Type | Amazon Alexa, Smart Life/Tuya App |
| Special Features | App & Voice Control, Programmable, Child Lock, Power-off Memory, Adjustable Backlight |
11. Warranty and Support
KETOTEK products are manufactured to high quality standards. For warranty information and technical support, please refer to the contact details provided with your purchase documentation or visit the official KETOTEK website. Keep your purchase receipt as proof of purchase for warranty claims.
Manufacturer: Xiamen Atfinger Technology Co., Ltd. www.ketotek.cc
Importer: Xiamenyingtuwangluokejiyouxiangongsi info@cnketotek.com
Ask a question about this manual
Ask about setup, troubleshooting, compatibility, parts, safety, or missing instructions. Manuals+ will review the question and use this page’s manual context to help answer it.