Introduction
This manual provides essential information for the installation, operation, and maintenance of your RATION Carburetor and Filter Kit. This kit is specifically designed as a direct replacement for the original carburetor and filter units in Troy-Bilt TB320BV and TB310QS 31cc leaf blowers. Proper installation and maintenance will ensure optimal fuel and intake efficiency, contributing to reliable starting, improved throttle response, and smoother engine performance.
Please read this manual thoroughly before attempting any installation or maintenance procedures. Keep this manual for future reference.
Safety Information
Always prioritize safety when working with power tools and fuel systems. Failure to follow safety instructions can result in serious injury or damage to equipment.
- Ensure the leaf blower engine is OFF and COOL before beginning any work.
- Disconnect the spark plug wire to prevent accidental starting.
- Work in a well-ventilated area to avoid inhaling fuel fumes.
- Wear appropriate personal protective equipment (PPE), such as gloves and eye protection.
- Handle fuel with extreme care. Store fuel in approved containers away from ignition sources.
- Dispose of old parts and fuel responsibly according to local regulations.
Kit Contents
The RATION Carburetor & Filter Kit typically includes the following components:
- Carburetor assembly
- Air filter
- Fuel lines
- Primer bulb
- Spark plug
- Gaskets
- Adjustment tool (screwdriver)
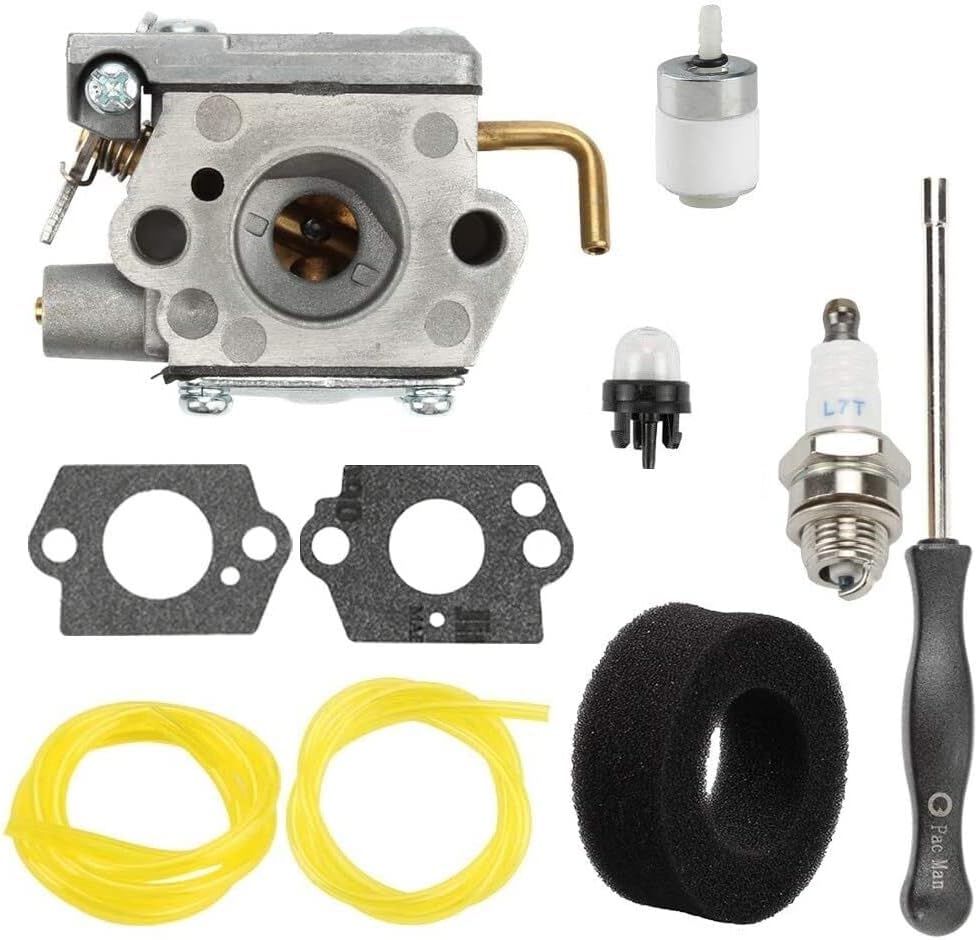
Image 1: Overview of the RATION Carburetor and Filter Kit components, including the carburetor, air filter, fuel lines, primer bulb, spark plug, gaskets, and adjustment tool.
Installation Instructions
This section outlines the general steps for replacing the carburetor and filter. Specific disassembly and reassembly procedures may vary slightly depending on your exact leaf blower model. Refer to your leaf blower's original service manual for detailed instructions if needed.
- Prepare the Blower: Ensure the engine is off and cool. Disconnect the spark plug wire. Drain any fuel from the tank into an approved container.
- Remove Air Filter Cover: Locate and remove the air filter cover, typically secured by screws or clips. Remove the old air filter.
- Disconnect Fuel Lines: Carefully disconnect the fuel lines from the old carburetor. Note their positions for correct reinstallation. Be prepared for residual fuel to leak.
- Remove Old Carburetor: Unbolt the old carburetor from the engine. There may be a gasket between the carburetor and the engine block; remove it.
- Replace Primer Bulb (if applicable): If your kit includes a new primer bulb, replace the old one by carefully prying it out and pressing the new one into place.
- Install New Gaskets: Place the new gaskets provided in the kit in their correct positions between the engine and the new carburetor.
- Install New Carburetor: Mount the new carburetor onto the engine, ensuring it is properly seated with the new gaskets. Secure it with the original bolts.
- Connect Fuel Lines: Attach the new fuel lines (if replacing) or the original fuel lines to the new carburetor, ensuring they are securely connected to the correct ports.
- Install New Air Filter: Insert the new air filter into its housing and reattach the air filter cover.
- Replace Spark Plug: Using a spark plug wrench, remove the old spark plug and install the new spark plug provided in the kit. Tighten it to the manufacturer's specifications (do not overtighten).
- Refuel and Test: Refill the fuel tank with the appropriate fuel mixture. Reconnect the spark plug wire. Prime the carburetor by pressing the primer bulb until fuel is visible. Attempt to start the leaf blower.
- Adjust Carburetor (if necessary): If the engine does not run smoothly, refer to the troubleshooting section for basic carburetor adjustment guidelines.
Operating Principles
The carburetor and filter kit are integral to the proper functioning of your leaf blower's 31cc engine. The carburetor mixes air and fuel in the correct ratio for combustion, while the air filter prevents debris from entering the engine. A properly functioning carburetor ensures consistent fuel delivery, leading to efficient combustion, reliable starting, stable idle, and optimal power output. The new air filter ensures clean air intake, protecting internal engine components from wear and tear.
Maintenance
Regular maintenance of your carburetor and filter kit will extend the life of your leaf blower and ensure consistent performance.
- Air Filter: Inspect the air filter regularly (e.g., every 10-20 hours of operation or before each use). Clean or replace it if it appears dirty or clogged. A clogged air filter restricts airflow, leading to poor engine performance and increased fuel consumption.
- Fuel System: Use fresh, clean fuel mixed according to your leaf blower manufacturer's specifications. Stale or contaminated fuel can clog the carburetor and fuel lines. Consider using a fuel stabilizer if storing the blower for extended periods.
- Spark Plug: Inspect the spark plug periodically. Clean any carbon deposits or replace it if the electrode is worn or fouled. A new spark plug is included in this kit for initial replacement.
- Carburetor Cleaning: If performance issues persist, the carburetor may require cleaning. This typically involves disassembling the carburetor and cleaning its internal passages with carburetor cleaner. This procedure should only be performed by individuals familiar with small engine repair.
Troubleshooting
If your leaf blower experiences issues after installing the new kit, consult the following troubleshooting guide:
| Problem | Possible Cause | Solution |
|---|---|---|
| Engine won't start | No fuel, clogged fuel filter, faulty spark plug, incorrect carburetor adjustment, air leak | Check fuel level and quality. Ensure fuel lines are connected. Replace fuel filter. Check spark plug for spark. Adjust carburetor. Check for loose connections. |
| Engine runs rough/stalls | Clogged air filter, incorrect carburetor adjustment, old/stale fuel, fouled spark plug | Clean or replace air filter. Adjust carburetor. Use fresh fuel. Replace spark plug. |
| Loss of power | Clogged air filter, incorrect carburetor adjustment, worn spark plug | Clean or replace air filter. Adjust carburetor. Replace spark plug. |
| Fuel leaks | Loose fuel lines, damaged gaskets, cracked fuel lines | Tighten fuel line clamps. Replace damaged gaskets. Replace cracked fuel lines. |
Carburetor Adjustment (General Guidelines)
Most small engine carburetors have two adjustment screws: High (H) and Low (L) speed. Some may have an idle speed (T) screw. Adjustments should be made with the engine warm.
- Initial Setting: Gently turn both H and L screws clockwise until they lightly seat, then turn them counter-clockwise 1 to 1.5 turns as a starting point.
- Low Speed (L) Adjustment: With the engine idling, slowly turn the L screw clockwise until the engine begins to slow down, then slowly turn it counter-clockwise until it begins to slow down. Find the midpoint between these two points where the engine idles smoothly.
- High Speed (H) Adjustment: With the engine at full throttle (no load), slowly turn the H screw clockwise until the engine begins to slow down, then slowly turn it counter-clockwise until it begins to slow down. Find the midpoint where the engine runs at maximum RPM without sputtering.
- Idle Speed (T) Adjustment: If present, adjust the T screw to achieve the desired idle RPM.
Note: Fine-tuning carburetor adjustments may require specialized tools and experience. If you are unsure, consult a qualified service technician.
Specifications
Key specifications for the RATION Carburetor & Filter Kit:
- Brand: RATION
- Compatible Models: Troy-Bilt TB320BV, Troy-Bilt TB310QS
- Engine Displacement: 31cc
- Item Weight: Approximately 5 pounds (kit components)
- Product Dimensions: Approximately 2 x 2 x 2 inches (individual carburetor unit)
- OEM Part Number Equivalent: TB320BV TB310QS
- UPC: 670017871629
Warranty and Support
Information regarding specific warranty terms or direct support contacts for this RATION product is not available in the provided documentation. Please refer to the seller or retailer from whom you purchased this kit for any warranty claims or support inquiries.