1. Introduction
This manual provides detailed instructions for the safe and effective use of your SUNHAIXIA 4-in-1 Laser Tape Measure. This device combines a traditional tape measure with advanced laser measurement capabilities, including laser distance metering, laser crosshairs, and an electronic leveling device. Constructed from high-quality aluminum alloy and ABS material, it is designed for durability and ease of use in various applications.

Figure 1: The SUNHAIXIA 4-in-1 Laser Tape Measure.
2. Key Features
- Durable Construction: Made of high-quality aluminum alloy and ABS material, offering sturdiness, durability, and anti-collision properties.
- Integrated Leveling: Built-in electronic leveling device and laser crosshair device for precise alignment. Activate by long-pressing the third button (with triangle and square symbols).
- Clear Display: Backlit LCD display screen ensures clear viewing of measurement data even in low-light conditions.
- Dual Measurement Modes: Combines a 5-meter (16.5 feet) auto-lock tape measure and a 40-meter (131 feet) laser distance meter.
- Easy Operation: One-click ranging for simple and accurate distance measurement.
- Portability: Small, portable, waterproof, and shockproof design.
- Rechargeable Battery: Features a built-in Type-C rechargeable lithium battery, providing up to one week of use on a single charge.

Figure 2: Overview of device components and buttons.

Figure 3: Detailed view of the LCD display indicators.
3. Setup
3.1 Charging the Device
The device comes with a built-in Type-C rechargeable lithium battery. To charge, connect the provided Type-C USB cable to the charging port on the device and to a compatible USB power source. The battery indicator on the LCD screen will show charging status.
3.2 Power On/Off
- Power On: Press the 'ON/MEAS' button to turn on the device. The backlit LCD screen will illuminate.
- Power Off: Long-press the 'C/OFF' button to turn off the device. The device also features an automatic shutdown function after a period of inactivity to conserve battery life.
4. Operating Instructions
4.1 Laser Distance Measurement
To use the laser distance meter:
- Turn on the device by pressing 'ON/MEAS'.
- Point the laser emitter towards the target.
- Press the 'ON/MEAS' button again to take a measurement. The distance will be displayed on the LCD screen.
- The device automatically adds its length to the result when measuring from the back of the unit. Ensure the correct measurement reference point (front or back) is selected if applicable.

Figure 4: Demonstrating laser distance measurement.
Video 1: A seller-provided video demonstrating the laser tape measure in use, showing how to take measurements between two points.
Video 2: A short seller-provided video showcasing the device's measurement capabilities.
4.2 Tape Measurement
The traditional tape measure extends up to 5 meters (16.5 feet) and features an auto-lock mechanism. To retract the tape, press the quick-release button located on the side of the device.

Figure 5: The physical tape measure in use.
4.3 Unit Switching
To switch between measurement units (Ft/Inch/Fractions/M/mm), press the '±/U' button. Cycle through the available units until your desired unit is displayed on the screen.
4.4 Measurement Modes
The device supports various measurement modes. Use the 'FUNC' button to cycle through modes such as single measurement, continuous measurement, area, volume, and Pythagorean calculations. Refer to the display icons (Figure 3) to identify the active mode.
4.5 Laser Crosshairs & Electronic Level
To activate the electronic level and laser crosshairs, long-press the third button (with the triangle and square symbols). This feature is useful for ensuring straight lines and level surfaces.
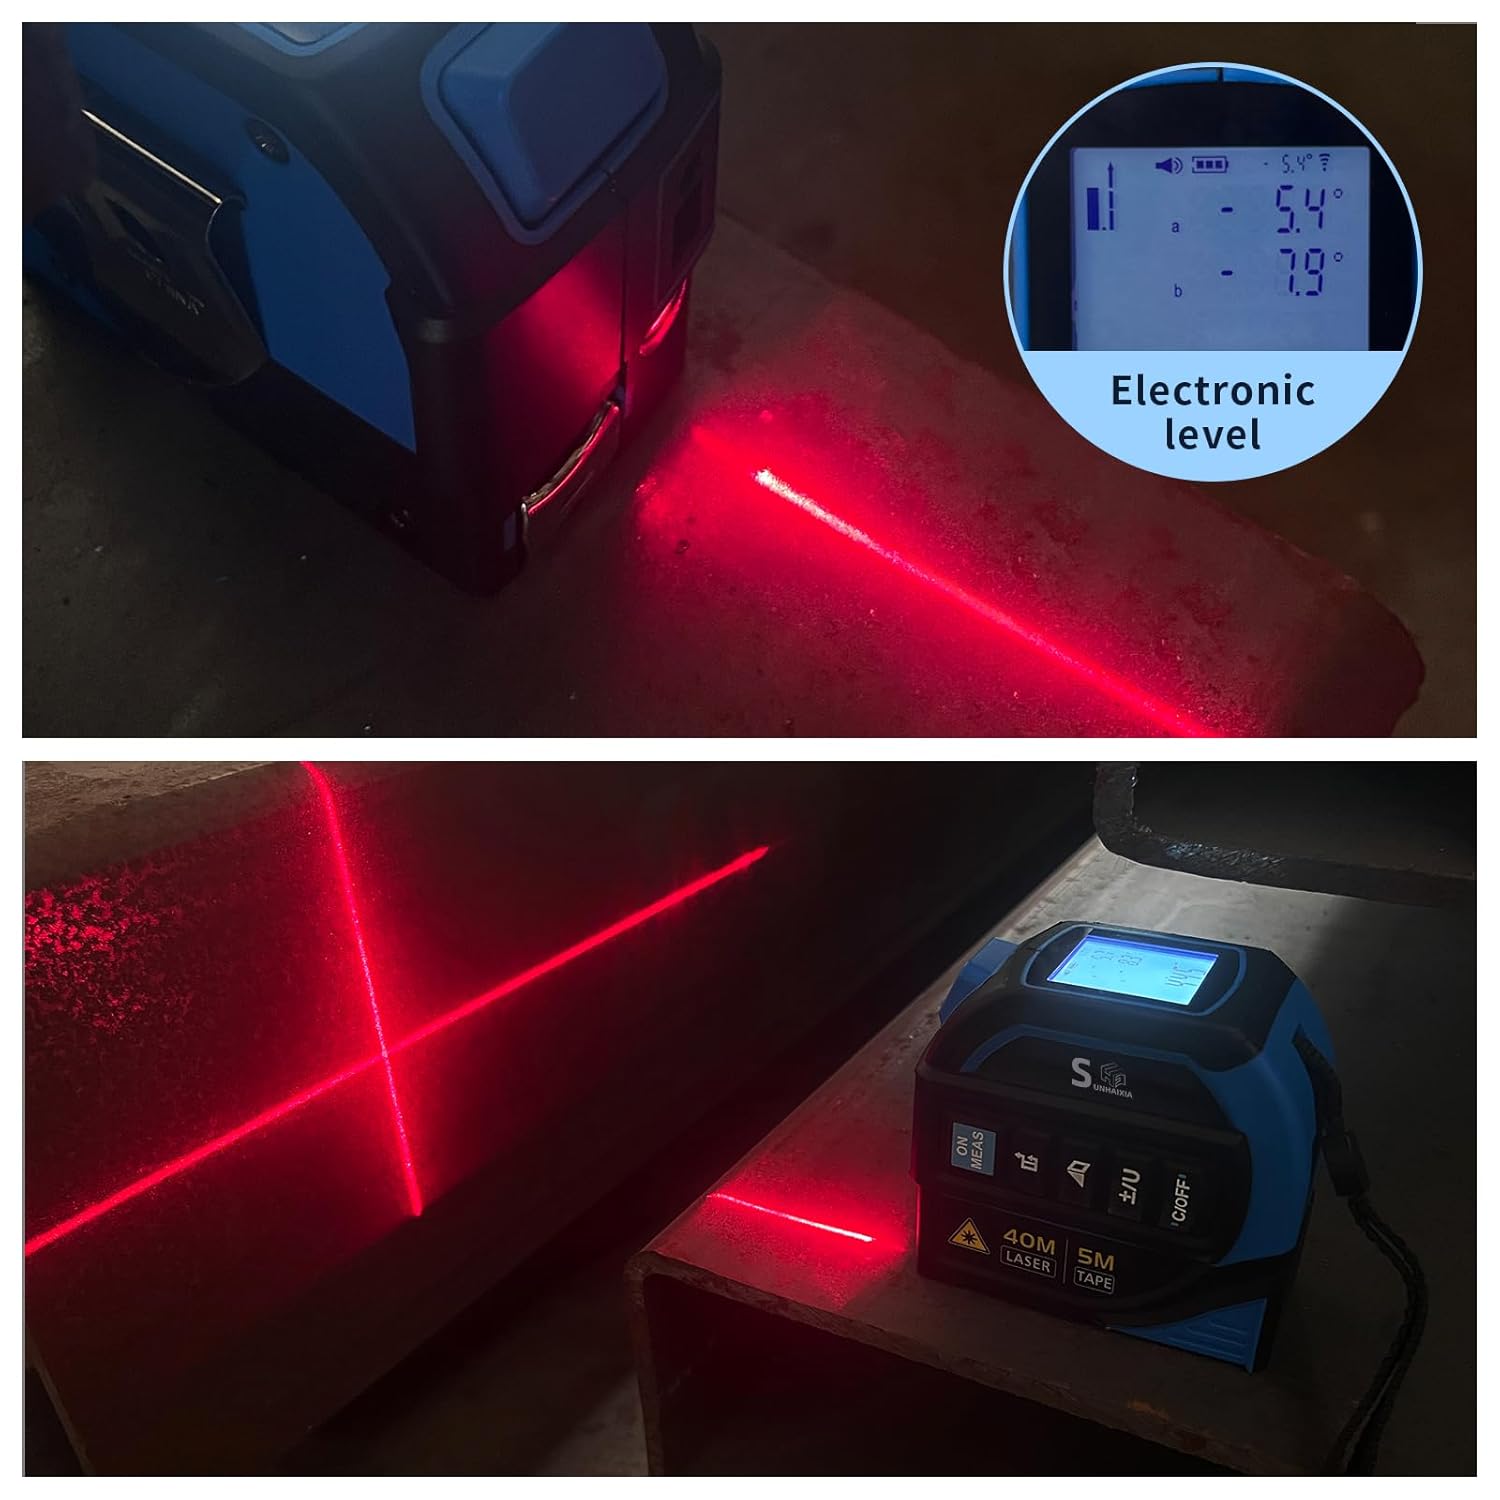
Figure 6: Visual demonstration of the electronic level and laser crosshairs.
Video 3: A seller-provided video demonstrating the laser tape measure with leveling functionality.
5. Maintenance
5.1 Battery Care
To ensure optimal battery life, charge the device regularly. Avoid fully discharging the battery frequently. Use only the provided Type-C cable or a compatible charger.
5.2 Cleaning
Wipe the device with a soft, dry cloth. Do not use abrasive cleaners or solvents. Keep the laser lens and display screen clean for accurate readings.
5.3 Storage
Store the device in a cool, dry place away from direct sunlight and extreme temperatures when not in use.
6. Troubleshooting
- Device not powering on: Ensure the battery is charged. Connect to a power source and try again.
- Inaccurate laser readings: Check if the laser lens is clean. Ensure the device is stable and the target surface is suitable for laser reflection. Verify the correct measurement reference point is selected.
- Tape not retracting: Ensure the quick-release button is fully pressed. Check for any obstructions in the tape mechanism.
- Display issues: If the screen is dim, charge the battery. If the display is frozen or unresponsive, try turning the device off and on again.
7. Specifications
| Feature | Specification |
|---|---|
| Brand | SUNHAIXIA |
| Model Number | LTM-41 |
| Laser Distance Measurement Range | 40m / 131ft |
| Tape Measure Length | 5m / 16.5ft |
| Battery Type | 1 Lithium Ion (included) |
| Charging Port | Type-C |
| Material | Aluminum Alloy + ABS |
| Water Resistance Level | Waterproof |
| Item Weight | 0.7 Pounds (approx. 317.51g) |
8. Warranty & Support
This product is covered by a 2-year warranty. For warranty service or technical support, please refer to the contact information provided with your purchase or visit the official SUNHAIXIA website. Please retain your proof of purchase for warranty claims.