KEENSTAR ST-265TC
KEENSTAR ST-265TC Touch Screen 2-Slice Toaster
Model: ST-265TC
1. Important Safeguards
When using electrical appliances, basic safety precautions should always be followed, including the following:
- Read all instructions before operating the toaster.
- Do not touch hot surfaces. Use handles or knobs.
- To protect against electrical shock, do not immerse cord, plug, or toaster in water or other liquid.
- Close supervision is necessary when any appliance is used by or near children.
- Unplug from outlet when not in use and before cleaning. Allow to cool before putting on or taking off parts.
- Do not operate any appliance with a damaged cord or plug, or after the appliance malfunctions or has been damaged in any manner.
- Do not let cord hang over edge of table or counter, or touch hot surfaces.
- Do not place on or near a hot gas or electric burner, or in a heated oven.
- Do not use the toaster for other than intended use.
- Oversize foods, metal foil packages, or utensils must not be inserted into a toaster as they may involve a risk of fire or electric shock.
- A fire may occur if toasters are covered or touching flammable material, including curtains, draperies, walls, and the like, when in operation.
- Do not attempt to dislodge food when toaster is plugged in.
- This appliance is for household use only.
2. Product Overview
The KEENSTAR ST-265TC is a modern 2-slice toaster featuring a touch screen interface for precise control over your toasting preferences. It includes wide slots to accommodate various bread types and a removable crumb tray for easy cleaning.
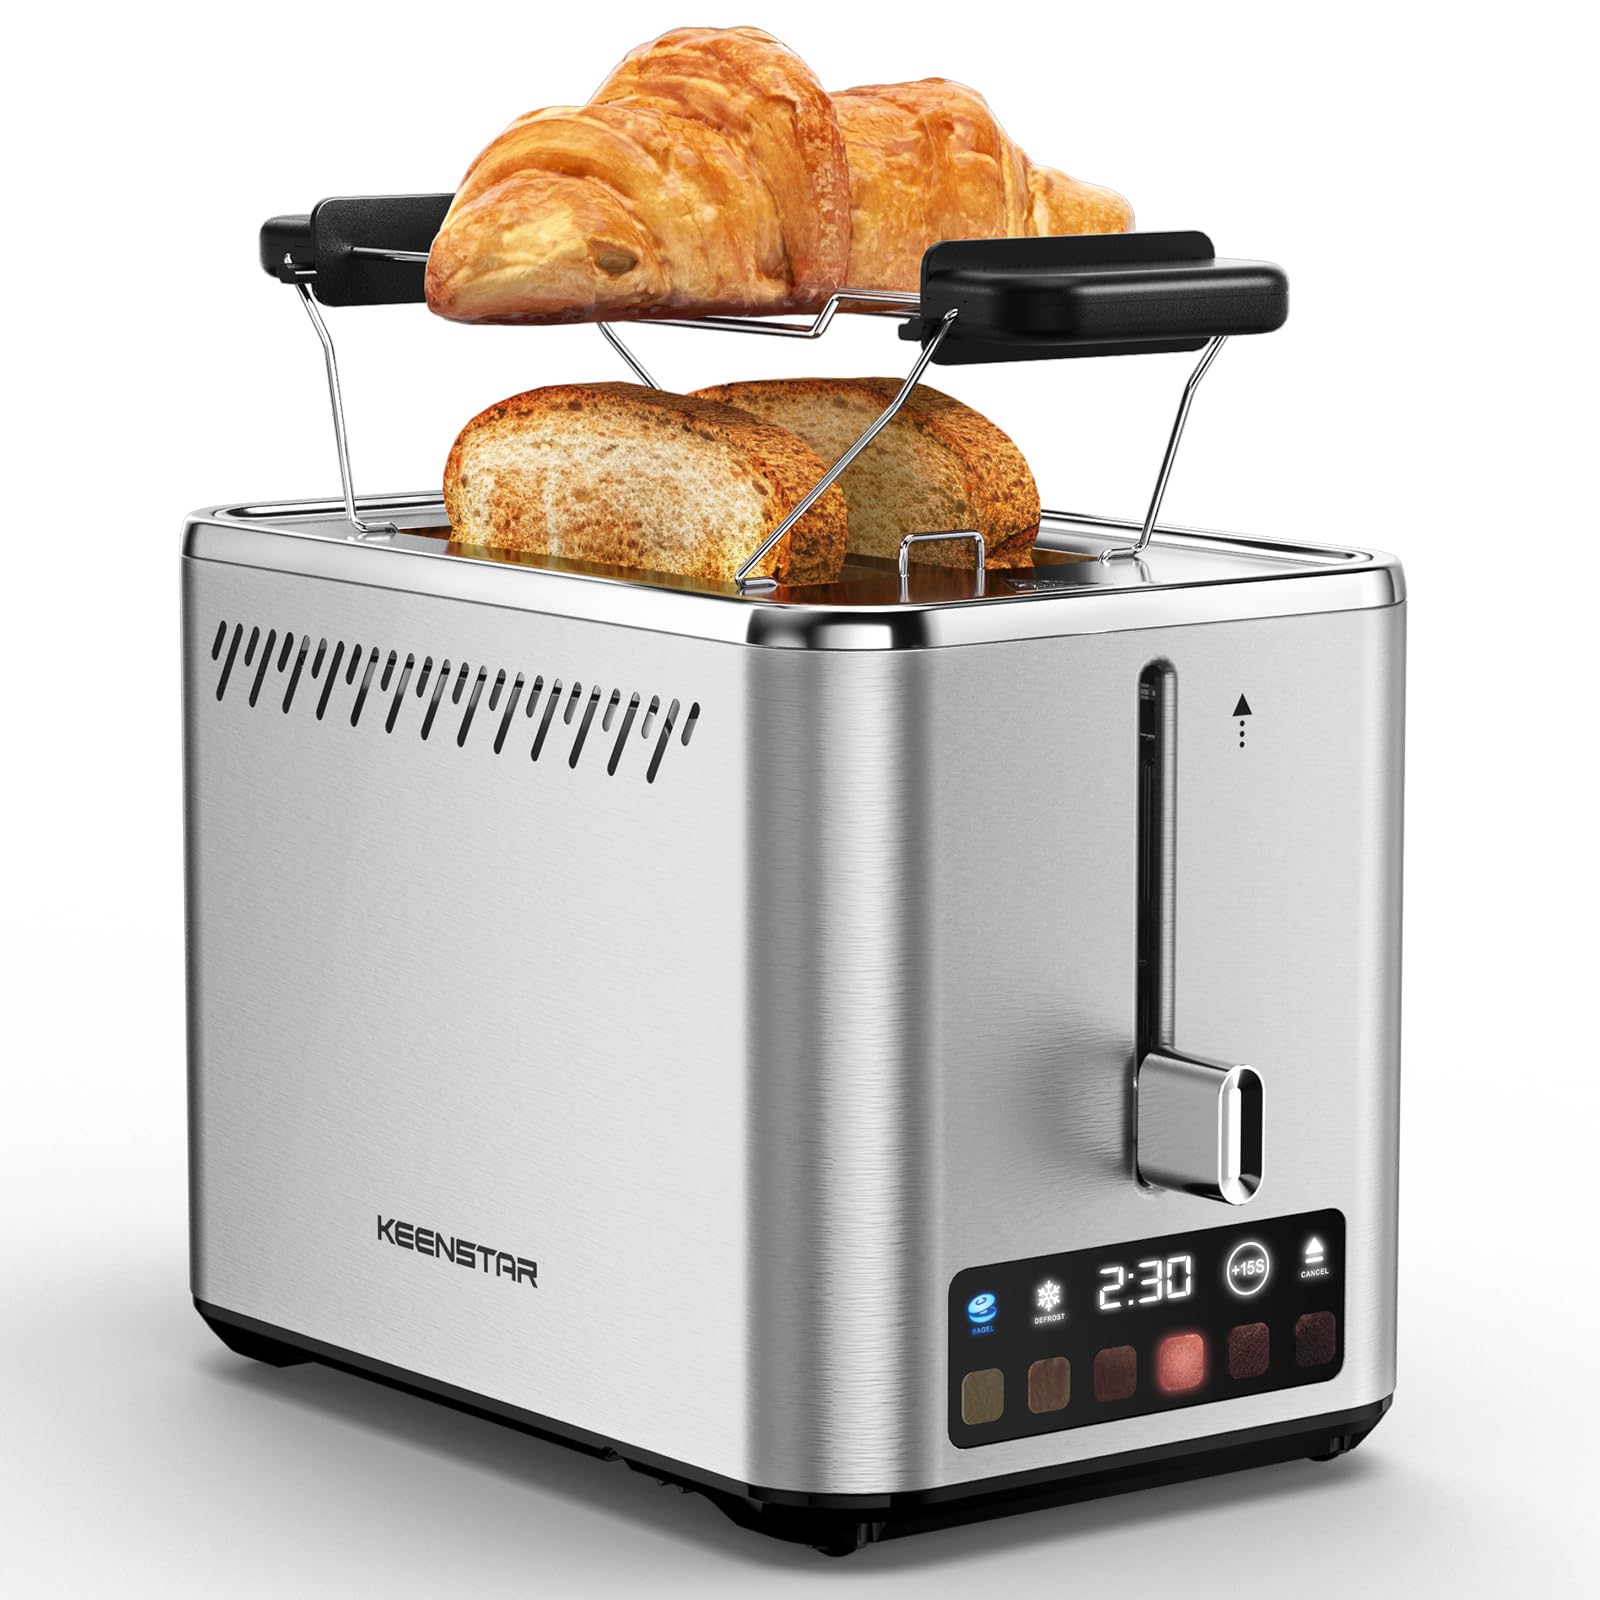
Image: KEENSTAR ST-265TC 2-Slice Toaster in silver stainless steel.
3. Setup
Unpacking
Carefully remove the toaster and all packaging materials from the box. Ensure all accessories, including the warming rack, are present.
Placement
Place the toaster on a stable, flat, heat-resistant surface, away from flammable materials such as curtains or walls. Ensure adequate ventilation around the appliance.
First Use
Before toasting food for the first time, operate the toaster without bread on the highest browning setting (level 6) to burn off any manufacturing residues. A slight odor or smoke may be present; this is normal and will dissipate.
4. Operating Instructions
Control Panel Overview

Image: The toaster's smart touch control display showing 6 browning levels and extra functions like Bagel, Defrost, +15S, and Cancel.
Basic Toasting
- Insert up to two slices of bread into the wide 1.5-inch slots.
- Select your desired browning level (1-6) by touching the corresponding icon on the display. Level 1 is the lightest, and Level 6 is the darkest.
- Press the lever down until it locks into place. The digital display will show a countdown timer.
- The toast will automatically pop up when the cycle is complete.

Image: Visual guide showing the steps for easy toaster operation: 1. Put bread in slots, 2. Select browning level and function, 3. Press the lever down, 4. Enjoy delicious bread.
Bagel Function
This function is designed to toast the cut side of bagels while gently warming the outer side.
- Insert bagel halves into the slots with the cut side facing outwards.
- Select your desired browning level.
- Touch the BAGEL button on the display. It will illuminate.
- Press the lever down until it locks.

Image: The toaster's display showing the illuminated BAGEL mode. BAGEL mode toasts one side only; place the cut side facing outward.
Defrost Function
Use this function to toast frozen bread without pre-thawing.
- Insert frozen bread into the slots.
- Select your desired browning level.
- Touch the DEFROST button on the display. It will illuminate.
- Press the lever down until it locks.

Image: The toaster's display showing the illuminated DEFROST mode. This mode allows you to cook frozen breads easily without guesswork.
+15S Function
If your toast is not quite browned enough after a cycle, you can add an additional 15 seconds of toasting time.
- After a toasting cycle, if more browning is desired, touch the +15S button.
- The toaster will initiate a 15-second toasting cycle.
Cancel Function
To stop the toasting cycle at any time, simply touch the CANCEL button. The lever will automatically raise, and the heating elements will turn off.

Image: The toaster's display highlighting the +15S button to increase baking time by 15 seconds, and the Cancel button to stop heating.
Warming Rack
The included warming rack can be used to warm pastries, croissants, or other items that cannot be placed directly into the toaster slots.
- Place the warming rack securely on top of the toaster, aligning it over the slots.
- Place the item to be warmed on the rack.
- Start a toasting cycle (without bread in the slots) to generate heat. The heat rising from the toaster will warm the item on the rack.
- Monitor the item closely to prevent over-warming or burning.

Image: The removable warming rack attached to the toaster, with a croissant placed on it for warming.
Product Videos
Video: Demonstrates the touchscreen and warming tray features of the KEENSTAR toaster.
Video: A detailed review of the KEENSTAR Smart 2-Slice Toaster, highlighting its touch screen and various functions.
Video: Explores the key features and functionalities of the KEENSTAR toaster.
5. Maintenance and Cleaning
General Cleaning
Always unplug the toaster from the power outlet and allow it to cool completely before cleaning. Wipe the exterior with a soft, damp cloth. Do not use abrasive cleaners or metal scouring pads, as these can scratch the stainless steel finish.
Crumb Tray
The removable crumb tray collects crumbs during toasting and should be emptied regularly to prevent fire hazards.
- Ensure the toaster is unplugged and completely cool.
- Pull out the crumb tray located at the bottom rear of the toaster.
- Discard crumbs and wipe the tray clean with a damp cloth.
- Slide the crumb tray back into place until it clicks securely.

Image: The toaster's convenient design showing the removable crumb tray being pulled out and the cord storage area on the bottom.
Cord Storage
For neat storage, the power cord can be wrapped around the designated area on the underside of the toaster.
6. Troubleshooting
- Toaster not turning on: Ensure the power cord is securely plugged into a working electrical outlet. Make sure the toast lever is fully pressed down.
- Uneven toasting: Ensure bread slices are centered in the slots. Try adjusting the browning level. Different types of bread may require different settings.
- Bread stuck in slots: Unplug the toaster immediately and allow it to cool. Gently remove the bread using non-metallic tongs. Never use metal utensils.
- Smoke coming from toaster: Unplug the toaster immediately. Remove any food particles or crumbs that may be lodged inside the slots or on the heating elements. Ensure the crumb tray is clean.
7. Specifications
| Brand | KEENSTAR |
| Model | ST-265TC |
| Power | 900 watts |
| Voltage | 120 Volts (AC) |
| Number of Slices | 2 |
| Material | Stainless Steel |
| Product Dimensions (D x W x H) | 10.39" x 7.1" x 6.1" |
| Slot Width | 1.5 inches |
| Special Features | Cancel Function, LED Indicator, Removable Crumb Tray, Touchscreen, Warming Rack |

Image: Diagram showing the dimensions of the KEENSTAR ST-265TC toaster: 9.4 inches (24cm) length, 6.1 inches (15.6cm) width, 7 inches (18cm) height, and 1.5 inch (3.8cm) wide slots.
8. Warranty and Support
Warranty
This KEENSTAR toaster comes with a 2-year warranty. Please refer to the warranty card included in the product packaging for detailed terms and conditions.
Customer Support
For any questions, technical assistance, or warranty claims, please contact KEENSTAR customer support. Contact information can typically be found on the warranty card or the official KEENSTAR website.
Ask a question about this manual
Ask about setup, troubleshooting, compatibility, parts, safety, or missing instructions. Manuals+ will review the question and use this page’s manual context to help answer it.