1. Introduction
This manual provides essential information for the safe and efficient operation of the AFITSEP TPR-3020D DC Power Supply. Please read this manual thoroughly before using the device and retain it for future reference. The TPR-3020D is a high-precision, stable, and programmable DC regulated power supply designed for various laboratory, industrial, and educational applications.
2. Safety Instructions
WARNING: Failure to follow these safety instructions may result in electric shock, fire, or personal injury.
- Ensure the power supply is connected to a properly grounded AC outlet.
- Do not operate the device in wet or damp conditions.
- Do not open the casing of the power supply. There are no user-serviceable parts inside. Refer all servicing to qualified personnel.
- Verify the input voltage matches the power supply's rating before connecting to the mains.
- Avoid short-circuiting the output terminals.
- Always disconnect the power supply from the mains before making or breaking connections to the output terminals.
- Use appropriate current-rated wires for connections.
- Keep the ventilation openings clear to prevent overheating.
3. Product Overview
The AFITSEP TPR-3020D is a linear DC power supply offering precise control over voltage and current. It features multiple protection functions to ensure safe operation.
3.1 Key Features
- High precision and stability: Output voltage and current are precisely adjustable.
- Programmable control: Supports various programming interfaces for remote automated operation.
- Wide range output: Covers a variety of voltage and current ranges (30V, 20A).
- Multi-protection: Includes over-current, over-voltage, and other protection functions.
3.2 Front Panel Layout
The front panel provides all necessary controls and indicators for operation.
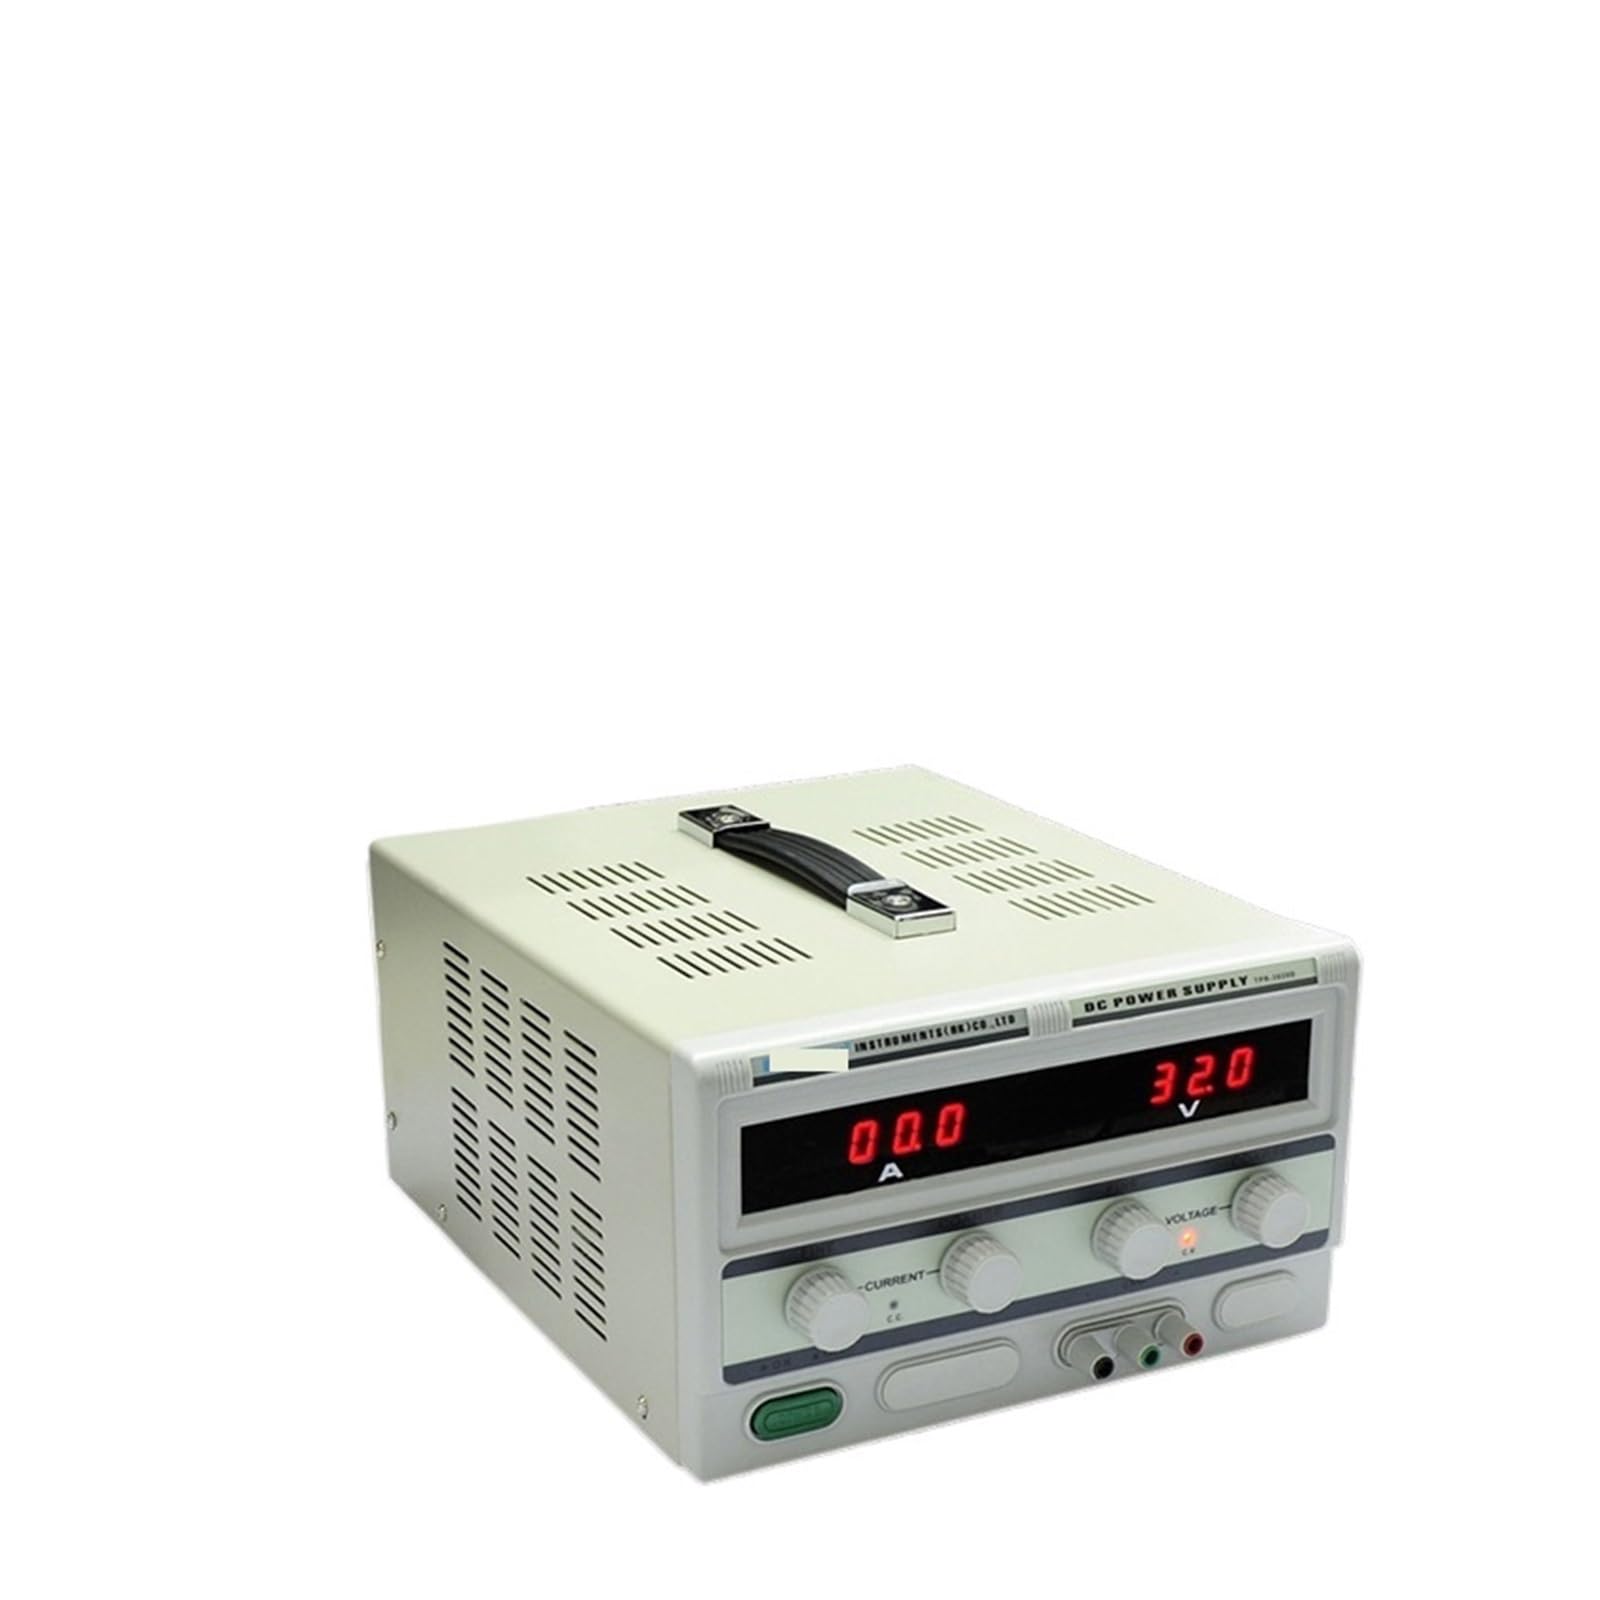
Figure 1: Front Panel of the TPR-3020D DC Power Supply. This image shows the main display, voltage and current adjustment knobs, output terminals, and power switch.
- Voltage Display: Shows the current output voltage.
- Current Display: Shows the current output current.
- Voltage Adjustment Knob: Coarse and fine adjustment for output voltage.
- Current Adjustment Knob: Coarse and fine adjustment for output current limit.
- Output Terminals: Positive (+), Negative (-), and Ground (GND) terminals.
- Power Switch: Turns the unit ON/OFF.
3.3 Rear Panel Layout
The rear panel contains the AC power input and ventilation.
Figure 2: Rear Panel of the TPR-3020D DC Power Supply. This image illustrates the AC power input socket, fuse holder, and cooling fan vents.
- AC Power Input: Connects to the mains power cable.
- Fuse Holder: Contains the protective fuse.
- Cooling Fan: Provides necessary ventilation.
4. Setup
Follow these steps to set up your AFITSEP TPR-3020D DC Power Supply.
- Unpacking: Carefully remove the power supply from its packaging. Inspect for any signs of damage during transit. Report any damage to your supplier immediately.
- Placement: Place the power supply on a stable, level surface. Ensure adequate ventilation around the unit, keeping at least 10 cm (4 inches) clear space on all sides, especially around the rear fan.
- Power Connection:
- Ensure the power switch on the front panel is in the OFF position.
- Connect the provided AC power cord to the AC power input socket on the rear panel.
- Plug the other end of the AC power cord into a grounded mains outlet.
- Output Connections:
- Before connecting any load, ensure the power supply is OFF.
- Connect the positive (+) terminal of your load to the red (+) output terminal of the power supply.
- Connect the negative (-) terminal of your load to the black (-) output terminal of the power supply.
- If grounding is required for your application, connect the ground terminal of your load to the green (GND) output terminal.
- Ensure all connections are secure and properly insulated.
5. Operating Instructions
This section details the basic operation of the TPR-3020D DC Power Supply.
5.1 Basic Operation
- Power On: After making all connections, turn the power switch to the ON position. The displays will illuminate.
- Setting Voltage:
- Adjust the Voltage Adjustment Knob (coarse) to set the approximate desired voltage.
- Use the Voltage Adjustment Knob (fine) for precise voltage adjustment.
- Observe the Voltage Display to confirm the setting.
- Setting Current Limit:
- Important: It is recommended to set the current limit before connecting a sensitive load.
- To set the current limit without a load, short-circuit the output terminals (briefly connect + to - with a suitable wire). The current display will show the maximum current.
- Adjust the Current Adjustment Knob (coarse) to set the approximate desired current limit.
- Use the Current Adjustment Knob (fine) for precise current limit adjustment.
- Remove the short circuit. The current display will now show zero (or a very small leakage current).
- Connecting Load: Connect your load to the output terminals as described in the Setup section. The power supply will now deliver the set voltage and current (up to the set limit).
- Power Off: Before disconnecting the load, turn the power switch to the OFF position.
5.2 Constant Voltage (CV) and Constant Current (CC) Modes
The TPR-3020D automatically switches between Constant Voltage (CV) and Constant Current (CC) modes depending on the load conditions.
- Constant Voltage (CV) Mode: When the load resistance is high, the output current is less than the set current limit. The power supply maintains the set output voltage.
- Constant Current (CC) Mode: When the load resistance is low, the output current reaches the set current limit. The power supply maintains the set output current, and the output voltage drops accordingly.
6. Maintenance
Proper maintenance ensures the longevity and reliable operation of your power supply.
- Cleaning: Disconnect the power supply from the mains before cleaning. Use a soft, dry cloth to wipe the exterior. Do not use abrasive cleaners or solvents.
- Ventilation: Regularly check that the ventilation openings on the rear panel are free from dust and obstructions. Use compressed air to clear dust if necessary.
- Fuse Replacement: If the power supply does not turn on, the fuse may need replacement.
- Disconnect the power supply from the mains.
- Locate the fuse holder on the rear panel.
- Carefully remove the fuse holder and replace the fuse with one of the same type and rating (e.g., 250V/5A).
- Reinsert the fuse holder securely.
- Storage: When not in use for extended periods, store the power supply in a dry, dust-free environment.
7. Troubleshooting
This section provides solutions to common issues you might encounter.
| Problem | Possible Cause | Solution |
|---|---|---|
| No power, displays are off. |
|
|
| No output voltage/current. |
|
|
| Output voltage drops significantly under load. |
|
|
| Unit overheats. |
|
|
8. Specifications
Technical specifications for the AFITSEP TPR-3020D DC Power Supply.
| Parameter | Value |
|---|---|
| Model | TPR-3020D |
| Input Voltage | AC 110V/220V ±10% (Switchable) |
| Output Voltage | 0-30V DC (Adjustable) |
| Output Current | 0-20A DC (Adjustable) |
| Voltage Regulation | CV ≤ 0.01% + 3mV |
| Current Regulation | CC ≤ 0.1% + 3mA |
| Ripple & Noise (Voltage) | ≤ 1mV RMS |
| Ripple & Noise (Current) | ≤ 3mA RMS |
| Display Accuracy | Voltage: ±0.5% + 2 digits; Current: ±0.5% + 2 digits |
| Protection | Overload, Over-temperature, Over-voltage, Over-current |
| Operating Temperature | 0°C to 40°C (32°F to 104°F) |
| Dimensions (L x W x H) | Approx. 1.18 x 0.79 x 0.39 inches (Package Dimensions, actual unit will be larger) |
| Weight | Approx. 1.1 pounds (500 Grams) |
Note: Specifications are subject to change without prior notice for product improvement.
9. Warranty and Support
AFITSEP products are designed for reliability and performance. For warranty information and technical support, please refer to the following:
- Warranty Period: Please refer to the warranty card included with your product or contact your local distributor for specific warranty terms.
- Technical Support: For technical assistance, troubleshooting, or service inquiries, please contact AFITSEP customer support through the retailer where the product was purchased or visit the official AFITSEP website.
- Online Resources: Additional resources, FAQs, and software updates (if applicable) may be available on the AFITSEP official website.
Please have your product model number (TPR-3020D) and purchase date available when contacting support.
10. Product Videos
No official product videos from the seller are available for embedding at this time.


