
1. Introduction
This manual provides comprehensive instructions for the installation, operation, and maintenance of your DELIPOP 40W 3980LM Dimmable LED Ceiling Light. Please read this manual thoroughly before installation and use to ensure proper function and safety. Keep this manual for future reference.

Image 1.1: DELIPOP LED Ceiling Light in a modern living space.
2. Safety Instructions
- Electrical Safety: Always turn off the main power supply at the circuit breaker before attempting any installation, maintenance, or repair. Failure to do so may result in electric shock or serious injury.
- Qualified Installation: Installation should be performed by a qualified electrician or a person with sufficient knowledge of electrical systems to ensure compliance with local electrical codes.
- Voltage Compatibility: Ensure the voltage supply (220-240V) matches the requirements of the ceiling light.
- Secure Mounting: Ensure the mounting surface is capable of supporting the weight of the fixture.
- Avoid Water: Do not install this fixture in areas where it may come into direct contact with water or high humidity, unless specifically rated for such environments.
- Cleaning: Disconnect power before cleaning. Use a soft, dry cloth. Do not use abrasive cleaners or solvents.
3. Package Contents
Verify that all components are present and undamaged before proceeding with installation.
- LED Ceiling Light Fixture
- Remote Control
- Mounting Hardware (screws, anchors)
- Instruction Manual
4. Specifications
| Feature | Specification |
|---|---|
| Brand | DELIPOP |
| Model Number | 69d2a8b0-db01-4fc8-9a7a-96d893432143 |
| Dimensions | 40 x 28.5 x 6 cm (15.75 x 11.22 x 2.36 inches) |
| Weight | 1.05 kg |
| Power | 40W |
| Luminous Flux | 3980 LM |
| Color Temperature | 3000K-6500K (Dimmable) |
| Brightness | 10%-100% (Dimmable) |
| Voltage | 220-240V |
| Material | Aluminum, Acrylic |
| Color | Silver |
| Illumination Area | 10-20 m² |
| Light Source Type | Integrated LED |
| Energy Efficiency Class | E |
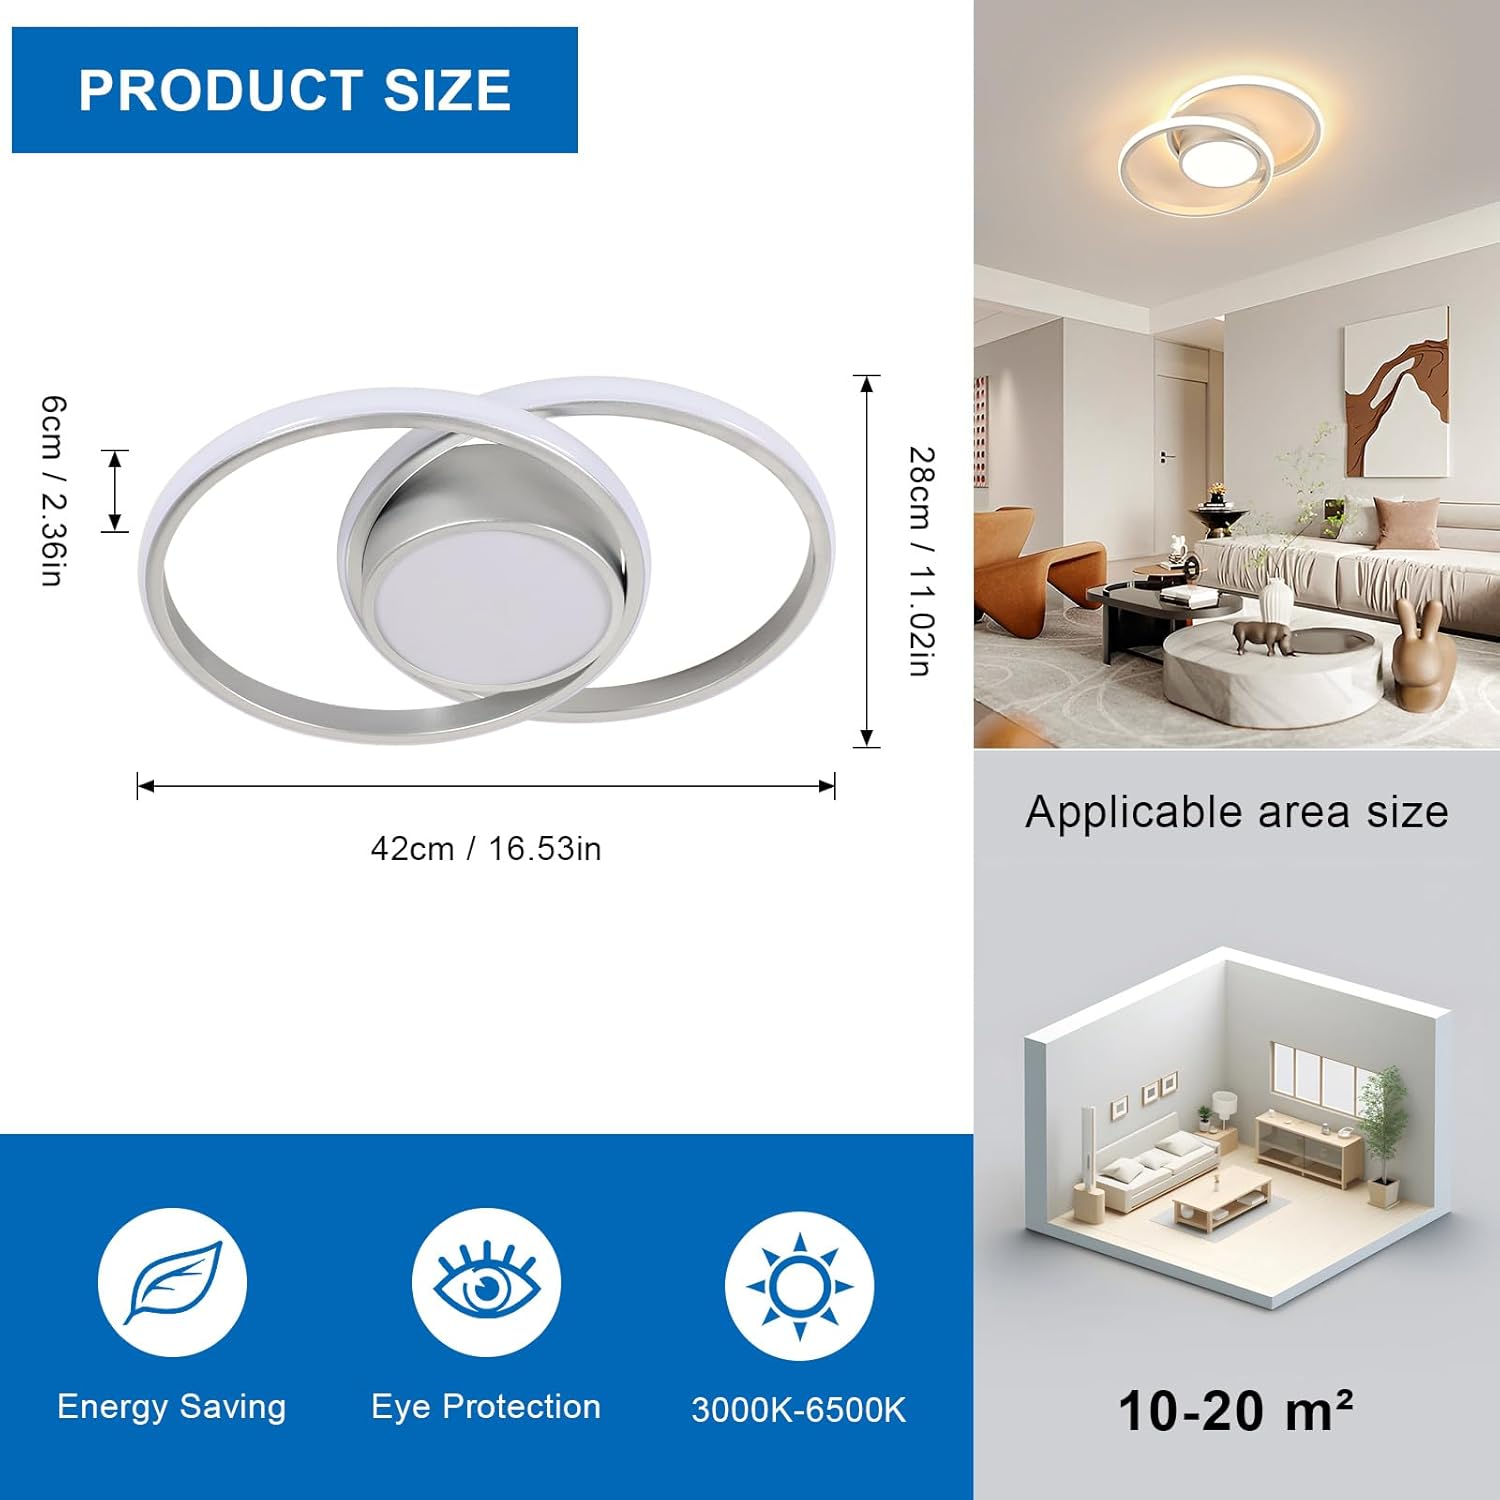
Image 4.1: Product dimensions and recommended illumination area.

Image 4.2: Energy Efficiency Label (Class E). For more details, refer to the EPREL database.
5. Installation Guide (Setup)
The DELIPOP LED Ceiling Light is designed for straightforward installation. Please follow these steps carefully:
- Prepare for Installation: Ensure the main power supply to the installation area is turned off at the circuit breaker. This is a critical safety step.
- Unpack Components: Carefully remove the ceiling light and all accessories from the packaging. Inspect for any damage.
- Mark Mounting Holes: Position the mounting bracket against the ceiling or wall where you intend to install the light. Use a pencil to mark the locations for drilling holes.
- Drill Holes: Drill holes at the marked locations. Insert the provided wall anchors into the drilled holes.
- Secure Mounting Bracket: Attach the mounting bracket to the ceiling/wall using the provided screws. Ensure it is firmly secured.
- Electrical Connection: Connect the household electrical wires to the corresponding terminals on the light fixture. Typically, this involves connecting live (L), neutral (N), and ground (E) wires. Ensure all connections are tight and secure.
- Attach Fixture: Carefully align the ceiling light fixture with the mounting bracket and secure it in place. Follow the specific instructions in the included manual for your model to ensure correct attachment.
- Restore Power: Once the fixture is securely installed and all electrical connections are verified, restore power at the circuit breaker.
No additional assembly is required for the light fixture itself, simplifying the installation process.
6. Operation Instructions
Your DELIPOP LED Ceiling Light can be controlled via the included remote control or a compatible smartphone application.
6.1. Basic Functions
- Power On/Off: Use the ON/OFF buttons on the remote control or the wall switch.
- Brightness Adjustment (Dimming): The brightness can be continuously adjusted from 10% to 100% using the remote control.
- Color Temperature Adjustment: The color temperature can be adjusted from 3000K (Warm White) to 6500K (Cool White) using the remote control.

Image 6.1: Visual representation of dimmable color temperature and brightness.
6.2. Advanced Functions
- Memory Function: If the light is turned off via the wall switch and then turned back on, it will recall the last used brightness and color temperature settings. This eliminates the need for frequent adjustments.
- Night Light Mode: Activate the night light mode via the remote control for a soft, low-brightness illumination (5% brightness), ideal for sleeping environments.
- Timer Function: The remote control includes a timer function to automatically turn off the light after 30 or 60 minutes. This is useful for bedtime routines.

Image 6.2: Overview of key features including dimming, night light, and timer functions.
7. Remote Control Functions
The remote control provides full control over your ceiling light. Familiarize yourself with the button layout:

Image 7.1: Remote control button layout and functions.
- ON/OFF: Power on/off the light.
- Brightness + / -: Increase or decrease brightness.
- Color Temperature + / -: Adjust color temperature (Warmer/Cooler).
- Night Light Mode: Activates 5% brightness.
- Timer (30min/60min): Sets auto-off timer.
- Auxiliary Lights: (If applicable, check specific model features).
- 50% Brightness: Quick access to 50% brightness.
- Color Temperature Switch Key: Cycles through preset color temperatures (e.g., 3000K, 4500K, 6500K).
7.2. App Control
This ceiling light also supports control via a smartphone application. Refer to the specific instructions provided with the product for downloading and pairing the app with your device. The app typically offers similar control functionalities as the remote control, including brightness, color temperature, and timer settings.
8. Maintenance
Regular maintenance ensures the longevity and optimal performance of your LED ceiling light.
- Cleaning: Before cleaning, ensure the power supply is disconnected. Use a soft, dry, or slightly damp cloth to wipe the surface of the fixture. Avoid using harsh chemicals, abrasive cleaners, or solvents, as these can damage the finish or electronic components.
- Inspection: Periodically check the fixture for any signs of damage, loose connections, or wear. If any issues are found, disconnect power and consult a qualified electrician.
- LED Longevity: The integrated LED light source is designed for long life (up to 50,000 hours) and does not require replacement.
9. Troubleshooting
If you encounter any issues with your DELIPOP LED Ceiling Light, refer to the following common troubleshooting steps:
| Problem | Possible Cause | Solution |
|---|---|---|
| Light does not turn on | No power supply Loose wiring connection Remote control battery low/dead | Check circuit breaker and wall switch Verify wiring connections (with power off) Replace remote control batteries |
| Remote control not working | Batteries low/dead Obstruction between remote and light Remote not paired (if applicable) | Replace batteries Ensure clear line of sight Refer to pairing instructions in the full manual |
| Light flickers or dims unexpectedly | Unstable power supply Loose wiring Incompatible dimmer switch (if not using remote/app dimming) | Consult an electrician to check power supply Verify wiring connections (with power off) Ensure only compatible dimming methods (remote/app) are used |
| Memory function not working | Light turned off via remote/app instead of wall switch | The memory function activates when the light is turned off and on using the wall switch. Ensure the light is powered off via the wall switch for the memory function to retain settings. |
If the problem persists after attempting these solutions, please contact DELIPOP customer support for further assistance.
10. Recycling Information
Proper disposal of electrical and electronic equipment is important for environmental protection.
- This product should not be disposed of with household waste. It contains electronic components and should be taken to a designated collection point for recycling.
- For information on recycling this and other types of lamps, please consult local regulations or recycling centers.
- Learn more about how to clean up and dispose of broken or damaged lamps by checking local guidelines for hazardous waste.
11. Warranty and Support
DELIPOP products are manufactured with quality and reliability in mind. For warranty information, technical support, or any questions regarding your product, please refer to the contact details provided in your purchase documentation or visit the official DELIPOP website.
DELIPOP Customer Service: Please refer to your purchase platform or the DELIPOP brand store for contact information.


