Namvo CP096710
Namvo Chronograph Arc and Ball Speed Meter User Manual
Model: CP096710
Introduction
This manual provides detailed instructions for the safe and effective use of your Namvo Chronograph Arc and Ball Speed Meter, Model CP096710. Please read this manual thoroughly before operating the device to ensure proper function and to prevent damage. Keep this manual for future reference.
Safety Information
Always observe the following safety precautions:
- Ensure the device is placed on a stable, level surface during operation.
- Do not expose the device to extreme temperatures, direct sunlight for prolonged periods, or moisture.
- Avoid dropping or subjecting the device to strong impacts.
- The internal battery features protection against overcharge, over-discharge, and short-circuits. However, use only the specified charging voltage (4.2 V).
- Do not attempt to disassemble or modify the device. This will void the warranty and may cause damage or injury.
- Keep the measurement area clear of obstructions to ensure accurate readings.
Package Contents
Verify that all items are present in the package:
- Namvo Chronograph Speed Meter Unit
- Mounting Bracket (Clamp-style)
- USB Charging Cable
- Mounting Screws and Accessories

Image 1.1: The Namvo Chronograph Speed Meter with its included mounting bracket, USB charging cable, and assembly hardware.
Product Overview
Familiarize yourself with the components of your Namvo Chronograph.

Image 2.1: Side view of the chronograph unit, highlighting the main measurement module and the attached clamp-style mounting bracket.
- Main Unit: Contains the sensors, display, and control electronics.
- Mounting Bracket: Used to securely attach the chronograph to various surfaces or equipment.
- Display Screen: Shows measurement results and operational status.
- Control Buttons: For navigating menus and initiating measurements (specific button functions will be detailed in the Operation section).
- Charging Port: For connecting the USB charging cable.
Setup
1. Charging the Device
Before first use, fully charge the chronograph. Connect the provided USB charging cable to the charging port on the device and to a standard USB power source (e.g., computer USB port, wall adapter). The charging indicator will show the charging status.
2. Assembling the Mounting Bracket
- Attach the clamp-style mounting bracket to the base of the chronograph unit using the provided screws. Ensure it is securely fastened.
- The bracket allows for flexible positioning. Adjust the angle and position as needed for your specific measurement setup.

Image 3.1: The chronograph unit with the mounting bracket securely attached, ready for deployment.
3. Positioning for Measurement
Position the chronograph so that the projectile will pass directly through the measurement area (between the sensors) without striking any part of the device. Ensure the device is stable and level to obtain accurate readings.
Operation
1. Powering On/Off
Press and hold the power button (usually located on the side or front) for a few seconds to turn the device on or off. The display will illuminate upon power-on.
2. Navigating the Interface
The chronograph features a clear display and intuitive controls. Use the designated buttons to navigate through menus, select measurement modes, and view stored data. Refer to the on-screen prompts for specific button functions.

Image 4.1: A detailed view of the chronograph's display screen and control buttons, which are used for mode selection and data review.
3. Taking a Measurement
- Ensure the chronograph is powered on and in the correct measurement mode (e.g., velocity measurement).
- Position the projectile source (e.g., bow, air rifle) so that the projectile will pass cleanly through the sensor area of the chronograph.
- Fire the projectile. The device will automatically detect the projectile's passage and display the velocity reading.
- The measurement range is 1-2000 m/s, providing precise readings for various projectiles.
4. Reviewing Data
The device may store previous measurements. Use the navigation buttons to scroll through historical data if this feature is available.
Maintenance
Cleaning
Wipe the device with a soft, dry cloth. Do not use abrasive cleaners or solvents. Ensure the sensor areas are free from dust and debris for optimal performance.
Storage
Store the chronograph in a cool, dry place away from direct sunlight and extreme temperatures when not in use. Ensure the battery is partially charged (around 50%) for long-term storage to prolong battery life.
Troubleshooting
| Problem | Possible Cause | Solution |
|---|---|---|
| Device does not power on. | Battery is depleted. | Charge the device using the provided USB cable. |
| Inaccurate or inconsistent readings. |
|
|
| Display is blank or frozen. | Software glitch or low battery. | Try restarting the device. If the issue persists, ensure it is fully charged. |
Specifications
| Brand | Namvo |
| Model Number | CP096710 |
| Measurement Range | 1 - 2000 m/s |
| Charger Voltage | 4.2 V |
| Item Weight | 90 g |
| Dimensions (Approx.) | 13 cm (length) x 5 cm (width of base) x 7.4 cm (height) |
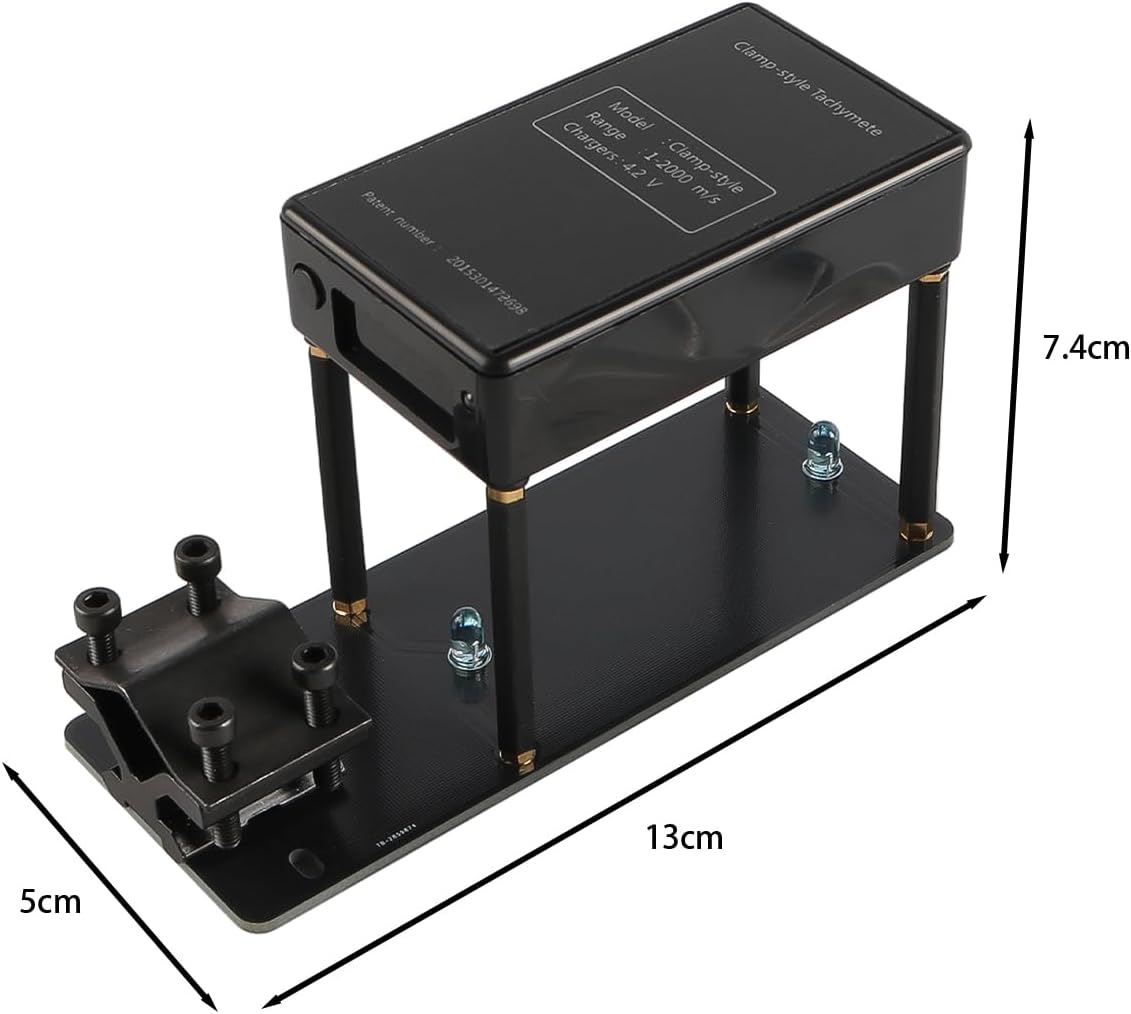
Image 5.1: Diagram showing the approximate dimensions of the Namvo Chronograph for reference.
Warranty and Support
For warranty information or technical support, please refer to the documentation provided with your purchase or contact Namvo customer service through their official website or your retailer. Please have your model number (CP096710) and purchase date available when contacting support.
Ask a question about this manual
Ask about setup, troubleshooting, compatibility, parts, safety, or missing instructions. Manuals+ will review the question and use this page’s manual context to help answer it.