1. Introduction
This manual provides essential information for the safe operation, setup, and maintenance of your YU Xiang F07 Bell UH-1 Huey RC Helicopter. Please read this manual thoroughly before operating the helicopter to ensure proper function and to prevent damage or injury. The F07 is a 1:34 scale model of the iconic Bell UH-1 Huey, featuring advanced flight stabilization and control systems.

Figure 1.1: The YU Xiang F07 Bell UH-1 Huey RC Helicopter, remote control, and battery. This image displays the complete Ready-to-Fly package components.
2. Safety Precautions
Operating an RC helicopter requires caution. Failure to follow these safety guidelines may result in injury or property damage.
- Age Recommendation: This product is recommended for users aged 14 years and older.
- Flight Environment: Always operate in open, clear areas, away from people, animals, buildings, and power lines. Avoid flying in strong winds.
- Battery Safety: Use only the provided charger and battery. Do not overcharge or puncture the battery. Discontinue use if the battery shows signs of swelling or damage.
- Propeller Safety: Keep hands, face, and loose clothing away from rotating propellers. Always disconnect the battery when not in use or during maintenance.
- Water Exposure: Do not expose the helicopter or remote control to water or moisture.
- Supervision: Younger users should always be supervised by an adult.
3. Package Contents
Verify that all items are present in your package:
- YU Xiang F07 Bell UH-1 Huey RC Helicopter (Aircraft) x 1
- 2.4G Remote Control (Transmitter) x 1
- 7.4V 1200mAh 25C Li-Po Smart Battery x 1
- Specialized USB Charging Cable x 1
- Main Propeller Blades x 4 (2 pairs)
- Tail Propeller Blades x 1
- User Manual x 1
4. Product Overview
The F07 helicopter is designed with several key features for enhanced flight performance and user experience.
4.1 Key Features
- Scale Model: 1:34 replica of the Bell UH-1 Huey with detailed, realistic features and lighting.
- Optical Flow Positioning: High-precision optical flow and barometer altitude hold for stable indoor and outdoor flight.
- 6-Axis Gyroscope: Provides stable, quick, and precise flight posture, ideal for beginners.
- Flybarless Design: Dual-axis driven motor system with electronic stabilization for precise control.
- Brushless Motor: 2511 1200KV brushless motor for low noise, high torque, and efficiency.
- Durable Construction: Blades made from nylon + carbon fiber composite for high strength and impact resistance.
- One-Key Inverted Flight: Simplifies mastering inverted flight.

Figure 4.1: Visual representation of the helicopter's core features, including its 6-axis gyroscope, brushless motor, and optical flow localization.

Figure 4.2: The 6-axis gyroscope ensures stable, fast, and accurate flight, making it suitable for beginners.
5. Setup Guide
5.1 Charging the Battery
- Connect the specialized USB charging cable to a USB power source (e.g., computer USB port, USB wall adapter).
- Connect the battery to the charging cable.
- The charging indicator light will show the charging status (refer to charger instructions for specific light patterns).
- Charging time is approximately 60-70 minutes. Do not leave the battery unattended while charging.
5.2 Installing the Helicopter Battery
- Ensure the helicopter's power switch is in the OFF position.
- Locate the battery compartment on the helicopter.
- Carefully insert the fully charged 7.4V 1200mAh Li-Po battery into the compartment.
- Connect the battery connector to the helicopter's power port. Ensure a secure connection.
- Close the battery compartment cover.
5.3 Remote Control Setup
- Install 4x AA batteries (not included) into the remote control's battery compartment, observing correct polarity.
- Turn on the remote control.
- Binding Procedure:
- Ensure the helicopter is OFF.
- Turn on the remote control.
- Turn on the helicopter.
- Move the throttle stick (left stick) to the highest position, then quickly pull it down to the lowest position. The helicopter and remote control should bind automatically, indicated by a solid light on the helicopter.
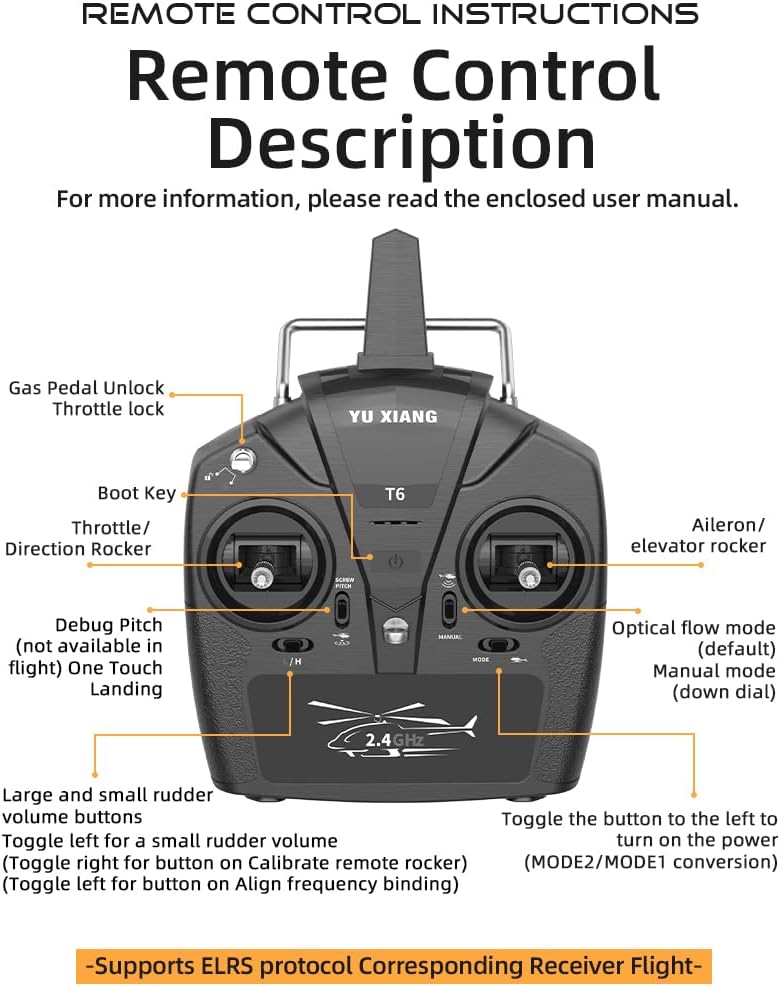
Figure 5.1: Remote Control Description. This diagram labels the various controls on the T6 remote, including the throttle/direction rocker, aileron/elevator rocker, boot key, gas pedal unlock, throttle lock, debug pitch, one-touch landing, large and small rudder volume buttons, and mode toggle.
6. Operating Instructions
6.1 Basic Flight Controls
Familiarize yourself with the remote control layout (refer to Figure 5.1).
- Throttle/Direction Rocker (Left Stick):
- Up/Down: Controls altitude (throttle).
- Left/Right: Controls yaw (rotation around vertical axis).
- Aileron/Elevator Rocker (Right Stick):
- Up/Down: Controls pitch (forward/backward movement).
- Left/Right: Controls roll (sideways movement).
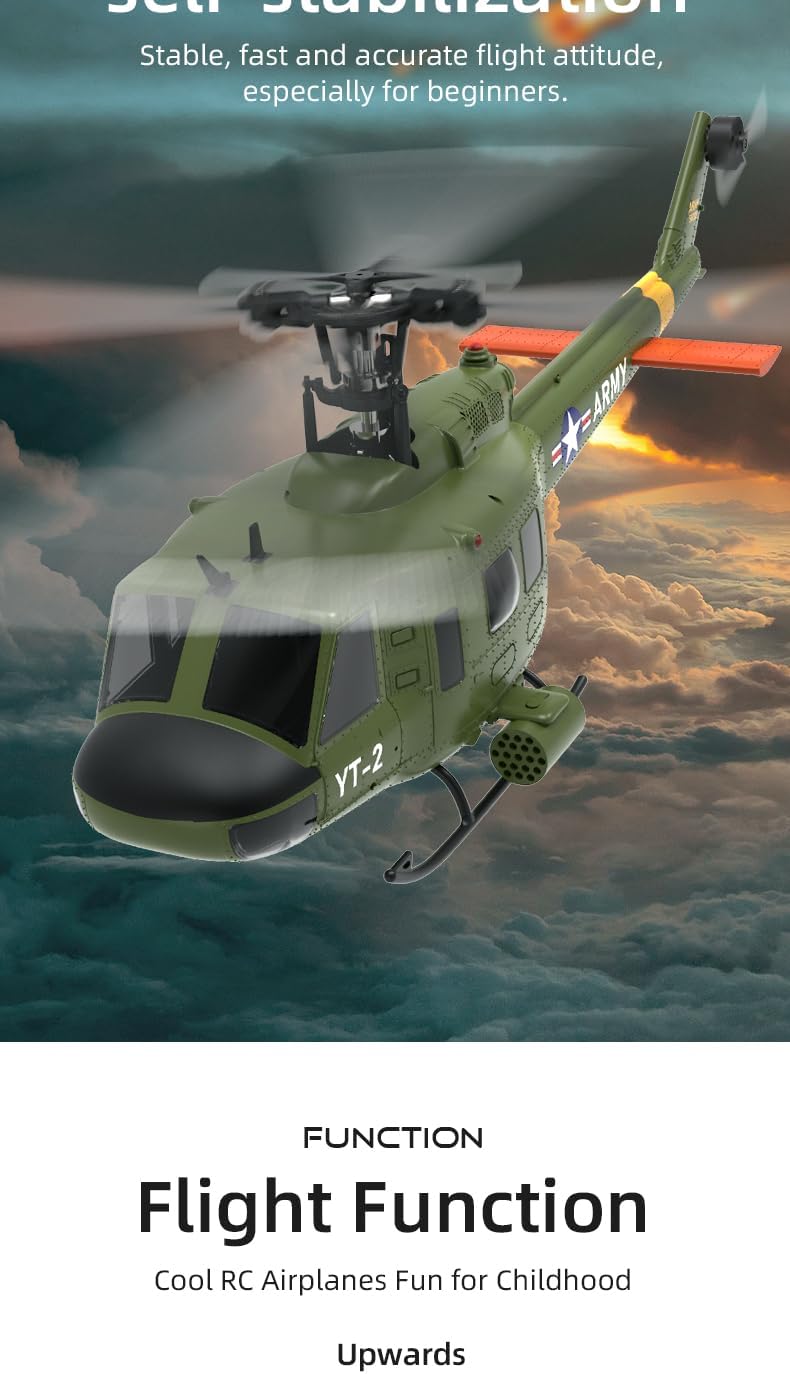
Figure 6.1: Illustration of basic flight functions and corresponding helicopter movements.
6.2 Flight Modes (3D/6G)
The F07 helicopter supports both 3D and 6G flight modes. The 6G mode (6-axis gyroscope) provides enhanced stability, making it ideal for beginners. The 3D mode offers more agile control for advanced maneuvers.
- 6G Mode (Default): Provides self-stabilization and altitude hold, making it easier to learn and control.
- 3D Mode: Disables some stabilization for full acrobatic control. Switch to this mode only after mastering 6G flight.
Refer to your remote control diagram (Figure 5.1) for the mode switch location.
6.3 Optical Flow Positioning
The helicopter utilizes high-precision optical flow positioning and a barometer for altitude hold, allowing for stable flight both indoors and outdoors, even in light wind conditions.

Figure 6.2: The helicopter's optical flow mode enables stable flight in various environments, and the one-touch inverted flight feature simplifies advanced maneuvers.
6.4 One-Key Inverted Flight
The F07 features a one-key inverted flight function. This allows the helicopter to perform inverted flight with a single command, simplifying the process for users. It is recommended to practice this feature in an open field with no wind.
6.5 Take-off and Landing
- Take-off: Place the helicopter on a flat, level surface. Slowly increase the throttle until the helicopter lifts off.
- Landing: Slowly decrease the throttle until the helicopter gently descends. Use the one-touch landing button for an automated landing sequence.
7. Maintenance
Regular maintenance ensures the longevity and optimal performance of your helicopter.
7.1 Cleaning
Wipe the helicopter with a soft, dry cloth after each use to remove dust and debris. Avoid using water or chemical cleaners.
7.2 Propeller Replacement
If propellers are damaged or bent, they should be replaced immediately to maintain flight stability. Use only genuine replacement parts.
- Ensure the helicopter is powered off and the battery is disconnected.
- Carefully remove the damaged propeller(s).
- Install new propellers, ensuring they are correctly oriented (refer to the markings on the propellers and rotor head).

Figure 7.1: The helicopter's paddles are made from a durable nylon and carbon fiber composite, designed for high strength and impact resistance.
7.3 Battery Care
- Store batteries in a cool, dry place away from direct sunlight.
- Do not fully discharge Li-Po batteries. Charge them to storage voltage if not used for extended periods.
- The smart battery includes protection against overcharging and over-discharging.
8. Troubleshooting
| Problem | Possible Cause | Solution |
|---|---|---|
| Helicopter does not respond to remote control. | Not bound, low battery (helicopter or remote), power switch off. | Perform binding procedure. Charge/replace batteries. Ensure power switches are ON. |
| Helicopter flies erratically or is unstable. | Damaged propellers, incorrect propeller installation, gyroscope calibration needed. | Inspect and replace damaged propellers. Ensure correct propeller orientation. Recalibrate gyroscope (refer to remote control instructions). |
| Short flight time. | Battery not fully charged, aging battery. | Ensure battery is fully charged. Consider replacing the battery if it's old or damaged. |
| Helicopter does not lift off. | Low battery, throttle not high enough, propellers blocked. | Charge battery. Increase throttle slowly. Check for obstructions around propellers. |
9. Specifications
| Feature | Detail |
|---|---|
| Product Model | F07 (UH-1 six-channel intelligent 6G aileronless simulation Huey helicopter) |
| Product Dimensions | 15 x 14.7 x 4.7 inches (385mm x 373mm x 120mm) |
| Item Weight | 8 ounces (228g) |
| Remote Control Mode | 2.4G Remote Control |
| Remote Control Distance | Greater than 120 meters |
| Product Material | High-strength composite materials (Nylon + Carbon Fiber) |
| Recommended Age | 14+ years |
| Body Battery | LI-POLY Smart Battery 7.4V (1200mAh) 25C |
| Charging Time | About 60-70 minutes |
| Usage Time | 10-12 minutes |
| Motor Type | 2511 1200KV Brushless Motor |
| Gyroscope | 6-axis Gyroscope |
| Positioning System | Optical Flow Positioning, Barometer Altitude Hold |

Figure 9.1: Detailed product information sheet outlining key specifications.
10. Warranty and Support
This product comes with a standard manufacturer's warranty against defects in materials and workmanship. For specific warranty terms and conditions, please refer to the documentation included with your purchase or contact OYDL customer support.
Customer Support:
For technical assistance, troubleshooting, or replacement parts, please contact OYDL customer service through the retailer's platform or visit the official OYDL store page on Amazon: OYDL Store.


