Cuisinart FR-16
Cuisinart Hot and Cold Milk Frother User Manual
Model: FR-16 | Brand: Cuisinart
Introduction
The Cuisinart Hot and Cold Milk Frother is designed to enhance your coffee and beverage experience by creating rich, creamy foam for lattes, cappuccinos, macchiatos, and more. This versatile appliance can produce up to 4 ounces of hot or cold froth, or heat up to 8 ounces of milk for warm beverages. Its user-friendly design, featuring an easy-grip handle and integrated spout, simplifies pouring and even allows for creative latte art. The nonstick milk tank, wipe-off exterior, and dishwasher-safe lid ensure effortless cleaning and maintenance.
Important Safeguards
When using electrical appliances, basic safety precautions should always be followed to reduce the risk of fire, electric shock, and/or injury to persons, including the following:
- Read all instructions before operating the frother.
- Do not touch hot surfaces. Use handles or knobs.
- To protect against electrical hazards, do not immerse the cord, plug, or frother base in water or other liquids.
- Close supervision is necessary when any appliance is used by or near children.
- Unplug from outlet when not in use and before cleaning. Allow to cool before putting on or taking off parts, and before cleaning the appliance.
- Do not operate any appliance with a damaged cord or plug, or after the appliance malfunctions or has been dropped or damaged in any manner.
- The use of accessory attachments not recommended by Cuisinart may cause injuries.
- Do not use outdoors.
- Do not let cord hang over edge of table or counter, or touch hot surfaces.
- Do not place on or near a hot gas or electric burner, or in a heated oven.
- Always attach plug to appliance first, then plug cord into the wall outlet. To disconnect, turn any control to "off", then remove plug from wall outlet.
- Do not use appliance for other than intended use.
- Extreme caution must be used when moving an appliance containing hot liquids.
Parts and Features

Figure 1: Front view of the Cuisinart Hot and Cold Milk Frother, showcasing its sleek black design and control button.
- Frother Pitcher: The main body of the frother with a nonstick interior.
- Lid: Transparent lid with a removable cap for adding ingredients.
- Frothing Whisk: Used for creating thick, creamy foam.
- Milk-Warming Stirrer: Used for heating milk without frothing.
- Power Base: Detachable base that provides power to the frother.
- Control Button: Single button for starting and stopping operations, with indicators for hot and cold settings.
- Easy-Grip Handle and Spout: Ergonomically designed for comfortable handling and precise pouring.
Setup
Before first use, clean all parts of the frother as described in the "Cleaning and Maintenance" section.
- Place the power base on a clean, dry, flat surface.
- Ensure the frother pitcher is clean and dry before placing it on the power base.
- Select the appropriate whisk:
- For frothing (hot or cold), insert the frothing whisk onto the post at the bottom of the pitcher.
- For heating milk only, insert the milk-warming stirrer onto the post at the bottom of the pitcher.
- Plug the power cord into a standard electrical outlet.

Figure 2: Interior of the frother pitcher, indicating the 'Warm Max' and 'Froth Max' fill lines for proper operation.
Operating Instructions
For Hot Froth:
- Ensure the frothing whisk is installed in the pitcher.
- Pour cold milk into the pitcher, ensuring it does not exceed the "Froth Max" fill line (approximately 4 oz.).
- Place the lid securely on the pitcher.
- Press the control button once. The indicator light will illuminate, and the frother will begin heating and frothing the milk.
- The frother will automatically stop when the desired temperature and froth consistency are achieved.
- Carefully remove the pitcher from the base and pour the frothed milk.

Figure 3: The frother ready to create barista-worthy froth for various specialty drinks, hot or cold.
For Cold Froth:
- Ensure the frothing whisk is installed in the pitcher.
- Pour cold milk into the pitcher, ensuring it does not exceed the "Froth Max" fill line (approximately 4 oz.).
- Place the lid securely on the pitcher.
- Press and hold the control button for 3 seconds. The indicator light will flash, and the frother will begin frothing the milk without heating.
- The frother will automatically stop when the desired froth consistency is achieved.
- Carefully remove the pitcher from the base and pour the frothed milk.
For Heating Milk (No Froth):
- Remove the frothing whisk and install the milk-warming stirrer in the pitcher.
- Pour cold milk into the pitcher, ensuring it does not exceed the "Warm Max" fill line (approximately 8 oz.).
- Place the lid securely on the pitcher.
- Press the control button once. The indicator light will illuminate, and the frother will begin heating the milk.
- The frother will automatically stop when the desired temperature is reached.
- Carefully remove the pitcher from the base and pour the heated milk.

Figure 4: Demonstrating the easy pouring and control for creating latte art with the frother's integrated spout.
Cleaning and Maintenance
Regular cleaning will ensure optimal performance and longevity of your Cuisinart Milk Frother.
- Always unplug the frother from the power outlet and allow it to cool completely before cleaning.
- Frother Pitcher: The nonstick interior of the pitcher can be easily wiped clean with a damp cloth. For thorough cleaning, wash the pitcher by hand with warm, soapy water. Do not immerse the exterior of the pitcher or the electrical components in water.
- Lid: The lid is dishwasher-safe (top rack recommended). Alternatively, wash by hand with warm, soapy water.
- Frothing Whisk and Milk-Warming Stirrer: Remove the whisk/stirrer from the pitcher and rinse under warm water immediately after use. If milk has dried, soak in warm, soapy water before cleaning. These are also dishwasher-safe.
- Exterior: Wipe the exterior of the frother pitcher and the power base with a damp cloth. Do not use abrasive cleaners or scouring pads, as they may damage the finish.
- Storage: Ensure all parts are completely dry before storing the frother. Store the frother in a clean, dry place.
Figure 5: The frother's interior, designed for easy cleaning with its nonstick surface and clear fill lines.
Troubleshooting
| Problem | Possible Cause | Solution |
|---|---|---|
| Frother does not turn on. | Not plugged in; power outage; frother not properly seated on base. | Ensure unit is securely plugged into a working outlet. Check circuit breaker. Ensure pitcher is correctly placed on the power base. |
| Milk is not frothing or froth is thin. | Incorrect whisk used; milk level too high/low; type of milk; milk too warm. | Ensure frothing whisk is installed. Do not exceed "Froth Max" line. Use cold, fresh milk (dairy or non-dairy alternatives may vary in frothing ability). |
| Milk is not heating. | Incorrect stirrer used; milk level too high/low. | Ensure milk-warming stirrer is installed. Do not exceed "Warm Max" line. |
| Unit stops prematurely. | Overheating protection; insufficient liquid. | Allow unit to cool down. Ensure minimum liquid level is met. |
Specifications
- Model Name: Hot/Cold Foam Milk Frother
- Model Number: FR-16
- Brand: Cuisinart
- Color: Black
- Material: Stainless Steel
- Capacity: 4 oz. (froth), 8 oz. (warm milk)
- Special Feature: Cool-Touch Casing
- Included Components: Lid, Milk Frother, Frothing Whisk, Milk-Warming Stirrer
- Product Care: Dishwasher Safe Lid, Hand Wash Only (pitcher interior)
- Item Weight: 2.99 pounds
- Package Dimensions: 10.67 x 7.56 x 7.56 inches
- UPC: 086279235084, 068459320421
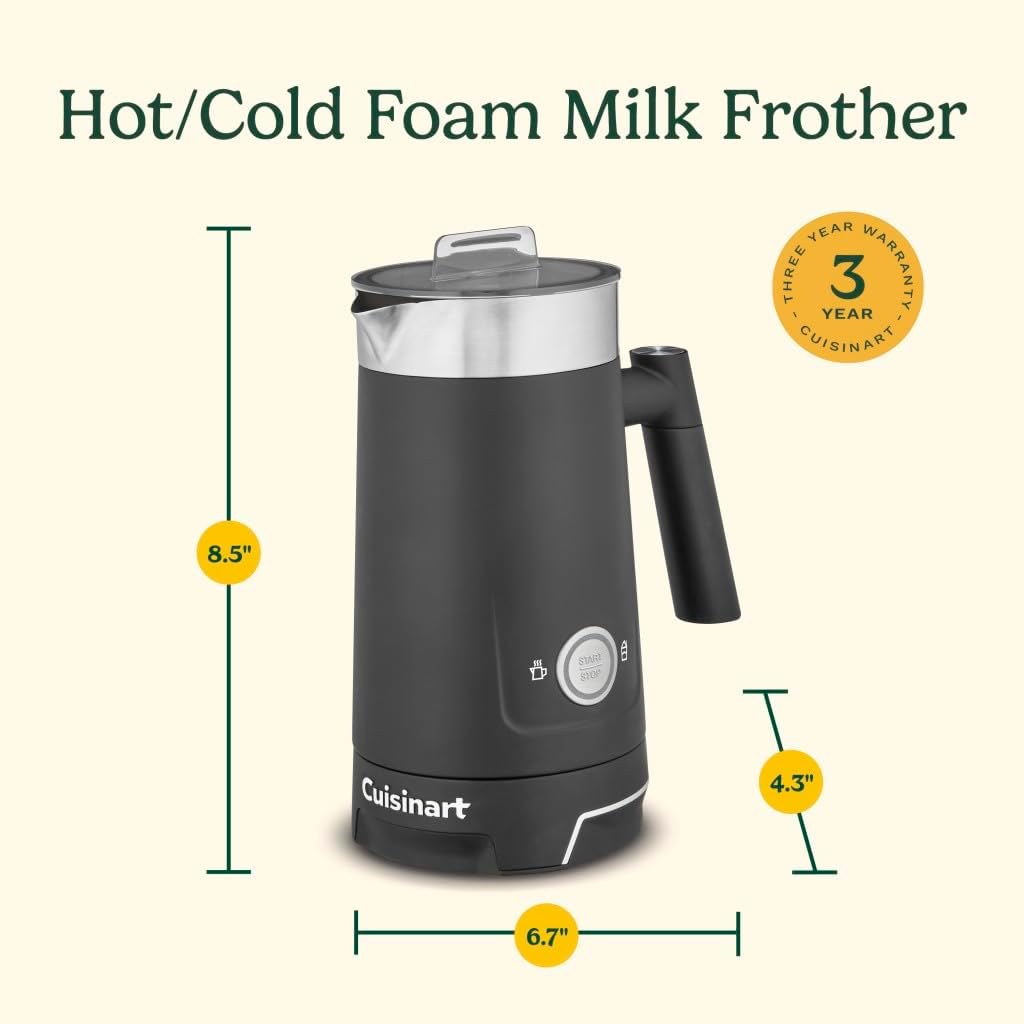
Figure 6: Key dimensions of the Cuisinart Hot and Cold Milk Frother for placement and storage reference.
Warranty and Support
This Cuisinart Hot and Cold Milk Frother (Model FR-16) comes with a Limited 3-Year Warranty from the date of original purchase. This warranty covers defects in materials and workmanship under normal household use.
For warranty claims, technical support, or product inquiries, please contact Cuisinart Customer Service. Keep your purchase receipt as proof of purchase for warranty validation.
Cuisinart Customer Service:
- Website: www.cuisinart.com/support/ (Example link, actual link may vary)
- Phone: Refer to Cuisinart's official website for current contact numbers.
Do not return the product to the store. For assistance, contact Cuisinart directly.
Ask a question about this manual
Ask about setup, troubleshooting, compatibility, parts, safety, or missing instructions. Manuals+ will review the question and use this page’s manual context to help answer it.