1. Introduction
Thank you for choosing the GILLAS Ironing Board with 2-Tier Storage Basket. This versatile and durable ironing solution is designed to provide a stable surface for ironing while offering convenient storage for your laundry essentials. Its movable design and integrated storage make it an ideal addition to any home, especially for optimizing space.
This manual provides detailed instructions for the assembly, operation, maintenance, and troubleshooting of your new ironing board. Please read it thoroughly before use to ensure safe and efficient operation.
2. Safety Information
To prevent injury or damage to the product, please observe the following safety precautions:
- Always place the ironing board on a stable, level surface before use.
- Do not overload the storage baskets. Refer to specifications for weight limits.
- Keep children and pets away from the ironing board during use, especially when an iron is hot.
- Ensure the iron is placed securely on the designated iron rest when not in use.
- Do not leave a hot iron unattended on the board.
- Avoid direct contact of hot iron with the wooden or metal parts of the board. The padded cover is heat-resistant, but prolonged direct contact with extreme heat should be avoided.
- Exercise caution when moving the board, especially on uneven surfaces, to prevent tipping.
- Inspect the board regularly for any signs of damage or wear. Do not use if damaged.
3. Package Contents
Please verify that all components are present before beginning assembly. If any parts are missing or damaged, contact customer support.
- Ironing Board Top with Padded Cover
- Main Frame Components (Metal)
- 2 x Storage Shelves (Metal Mesh)
- 4 x Swivel Wheels (2 with locking mechanism)
- Integrated Iron Rest/Hanger Rack
- Assembly Hardware (Screws, etc. - pre-attached or minimal)
4. Setup and Assembly
The GILLAS Ironing Board is designed for quick and frustration-free setup. Each wooden panel and metal component is clearly labeled to simplify the process. No specialized tools are required for assembly.
- Unpack Components: Carefully remove all parts from the packaging and lay them out on a clean, flat surface. Verify against the "Package Contents" list.
- Assemble Main Frame: Connect the vertical metal frame components according to the labeled instructions. Ensure all connections are secure.
- Attach Storage Shelves: Slide or secure the two metal mesh storage shelves into their designated slots on the frame. Ensure they are level and stable.
- Install Wheels: Screw or snap the four swivel wheels into the base of the frame. Ensure the two wheels with locking mechanisms are placed on the same side for easier access.
- Mount Ironing Board Top: Secure the ironing board top to the assembled frame. The board features a foldable design; ensure it is correctly aligned and can pivot smoothly if applicable. Some models allow for customization of the board's position.
- Attach Iron Rest: Secure the integrated iron rest/hanger rack to the side of the frame as indicated.
- Final Check: Once assembled, gently shake the board to ensure all connections are tight and the structure is stable.
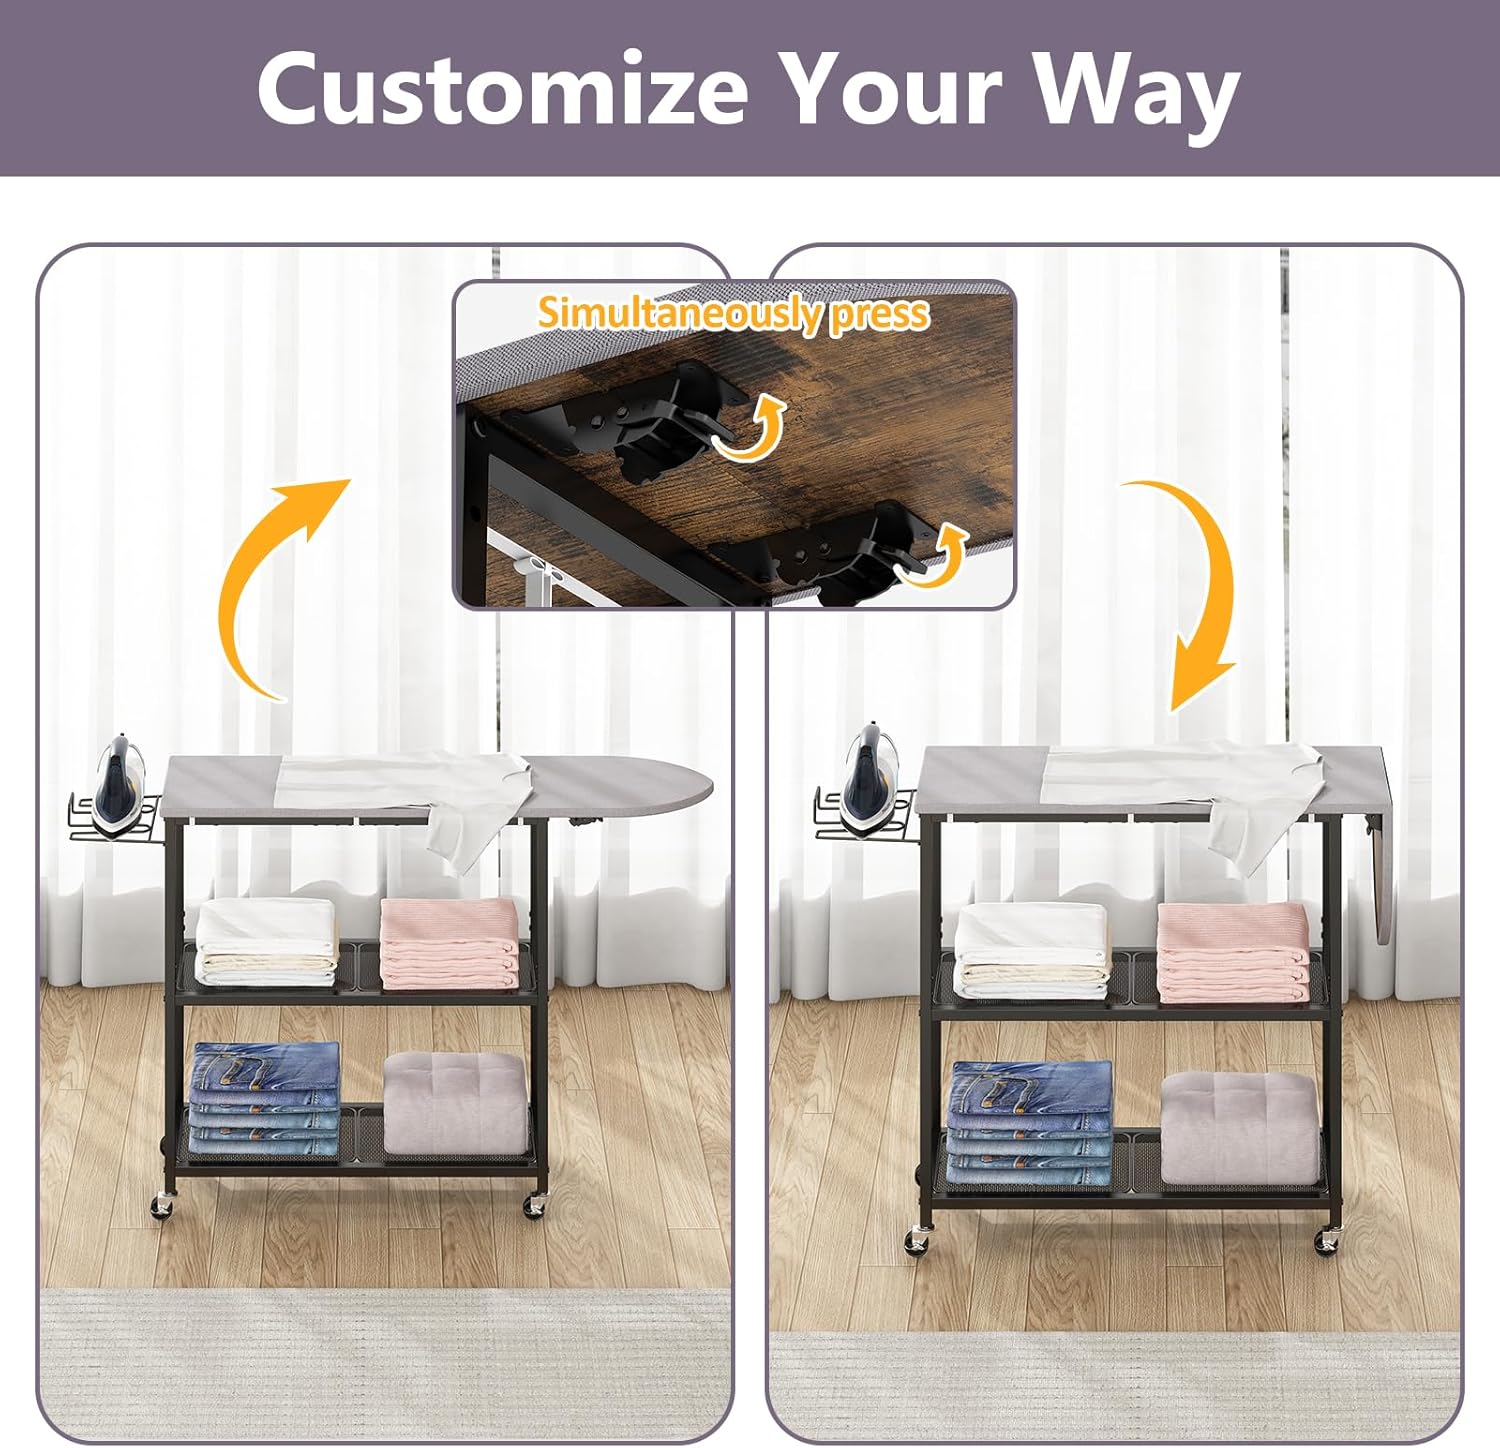
Figure 4.1: Assembly Diagram. This image illustrates the various components of the ironing board and how they fit together during the assembly process, with some parts potentially labeled for easy identification.

Figure 4.2: Customizable Board Position. This image demonstrates how the ironing board surface can be adjusted or folded, highlighting its adaptability for different ironing needs or storage configurations.
5. Operating Instructions
Using your GILLAS Ironing Board is straightforward. Follow these steps for optimal performance:
- Prepare for Ironing: Ensure the ironing board is on a stable, level surface. If using the wheels, engage the locking mechanisms on two of the wheels to prevent unintended movement during ironing.
- Place Garment: Lay the garment smoothly on the ironing surface, ensuring it is flat and wrinkle-free before applying the iron. The wide and ergonomic panel provides ample space for various clothing items.
- Use Iron Rest: Utilize the integrated iron rest for safely placing your hot iron when not actively ironing. This feature also provides heat dissipation and can serve as a temporary hanger for freshly ironed clothes.
- Utilize Storage: The two-tier storage baskets are ideal for organizing your iron, spray bottles, starch, and folded clothes. Keep frequently used items within easy reach.
- Mobility: When you need to move the ironing board, disengage the wheel locks and gently push or pull the board to your desired location. The smooth-rolling wheels allow for effortless movement between rooms.
- Folding for Storage: If your model features a folding mechanism, follow the instructions to fold the board into a compact stand for space-saving storage. This allows it to function as both an ironing stand and a storage shelf.

Figure 5.1: Ironing Board in Use. This image displays the ironing board set up for use, with an iron on the rest and clothes being ironed, demonstrating its primary function and the utility of its storage shelves.

Figure 5.2: Multifunctional Iron Rest. This image provides a detailed view of the iron rest, illustrating its capabilities for secure iron placement, heat dissipation, and as a convenient spot for hanging clothes temporarily.

Figure 5.3: Easy Mobility. This image highlights the ironing board's smooth-rolling wheels, demonstrating how easily it can be moved around a room, emphasizing its portability.
6. Maintenance and Care
Proper maintenance will extend the life of your GILLAS Ironing Board:
- Cleaning the Surface: The padded cover can be wiped clean with a damp cloth. For stubborn stains, a mild detergent can be used, but ensure to rinse thoroughly and allow to air dry completely before use.
- Frame and Shelves: Wipe down the metal and wood components with a soft, dry or slightly damp cloth to remove dust and dirt. Avoid abrasive cleaners that could damage the finish.
- Wheel Maintenance: Periodically check the wheels for any lint or debris that might hinder smooth movement. Clean as necessary.
- Storage: When not in use, store the ironing board in a dry place away from direct sunlight or extreme temperatures. If folding, ensure it is securely latched.
- Inspection: Regularly inspect all screws and connections to ensure they remain tight. Tighten if necessary.
7. Troubleshooting
If you encounter any issues with your ironing board, refer to the following common problems and solutions:
| Problem | Possible Cause | Solution |
|---|---|---|
| Board wobbles or is unstable. | Loose assembly screws; uneven floor; wheels not locked. | Ensure all assembly screws are tightened. Move to a level surface. Engage wheel locking mechanisms. |
| Difficulty moving the board. | Wheel locks engaged; debris in wheels; damaged wheels. | Disengage wheel locks. Clean any debris from the wheels. If wheels are damaged, contact support for replacement. |
| Ironing surface feels uneven. | Padded cover shifted; underlying board damage. | Adjust the padded cover to ensure it is smooth and evenly distributed. Inspect the board for any structural damage. |
| Storage shelves are loose. | Shelves not properly seated in frame. | Ensure shelves are fully inserted and secured into their designated slots on the frame. |
8. Specifications
| Feature | Detail |
|---|---|
| Model Number | A01 |
| Brand | GILLAS |
| Material | Iron, Wood |
| Frame Material | Wood, Metal |
| Color | Gray |
| Product Dimensions (L x W x H) | 42.6" x 31.4" x 11.2" |
| Item Weight | 17.95 pounds |
| Mounting Type | Floor Mount |
| Foldable | Yes |
| UPC | 781238493818 |

Figure 8.1: Product Dimensions. This image provides a visual representation of the ironing board's measurements, including length, width, and height, to help users understand its physical size.
9. Warranty and Support
For warranty information, please refer to the documentation included with your purchase or contact the retailer from whom you purchased the GILLAS Ironing Board. Warranty terms and conditions may vary.
If you require further assistance, have questions about assembly, operation, or need to report a missing or damaged part, please contact GILLAS customer support through the retailer's platform or the official GILLAS website. Please have your model number (A01) and purchase details ready when contacting support.
You can visit the official GILLAS store for more information: GILLAS Store on Amazon