1. Introduction
This manual provides essential information for the safe and efficient operation, installation, and maintenance of your RATTMMOTOR JN400S Z-Axis Milling Table Power Feed. This device is designed to automate the Z-axis movement on Bridgeport and similar knee-type milling machines, offering precise control and enhanced operational efficiency. Please read this manual thoroughly before installation and use to ensure proper function and safety.
2. Safety Information
Always prioritize safety when operating machinery. Failure to follow these safety guidelines may result in injury or damage to the equipment.
- Power Supply: The unit operates on 220V. Ensure your power source matches this requirement. Always connect to a grounded outlet.
- Emergency Stop: Familiarize yourself with the milling machine's emergency stop procedure before operating the power feed.
- Workpiece Security: Ensure the workpiece is securely clamped before initiating any movement.
- Clearance: Maintain a safe distance from moving parts. Do not wear loose clothing or jewelry that could get caught in the machinery.
- Overload Protection: The power feed is equipped with a safety device to prevent damage in case of tool collision or sudden direction changes. However, avoid intentional overloading.
- Maintenance: Disconnect power before performing any maintenance or adjustments.
- Environment: Operate the machine in a clean, well-lit, and dry environment.
Refer to the safety warning labels on the unit for additional precautions.
3. Product Overview and Components
The RATTMMOTOR JN400S Z-Axis Power Feed is designed for robust performance and ease of use. Below are the key components and their functions.
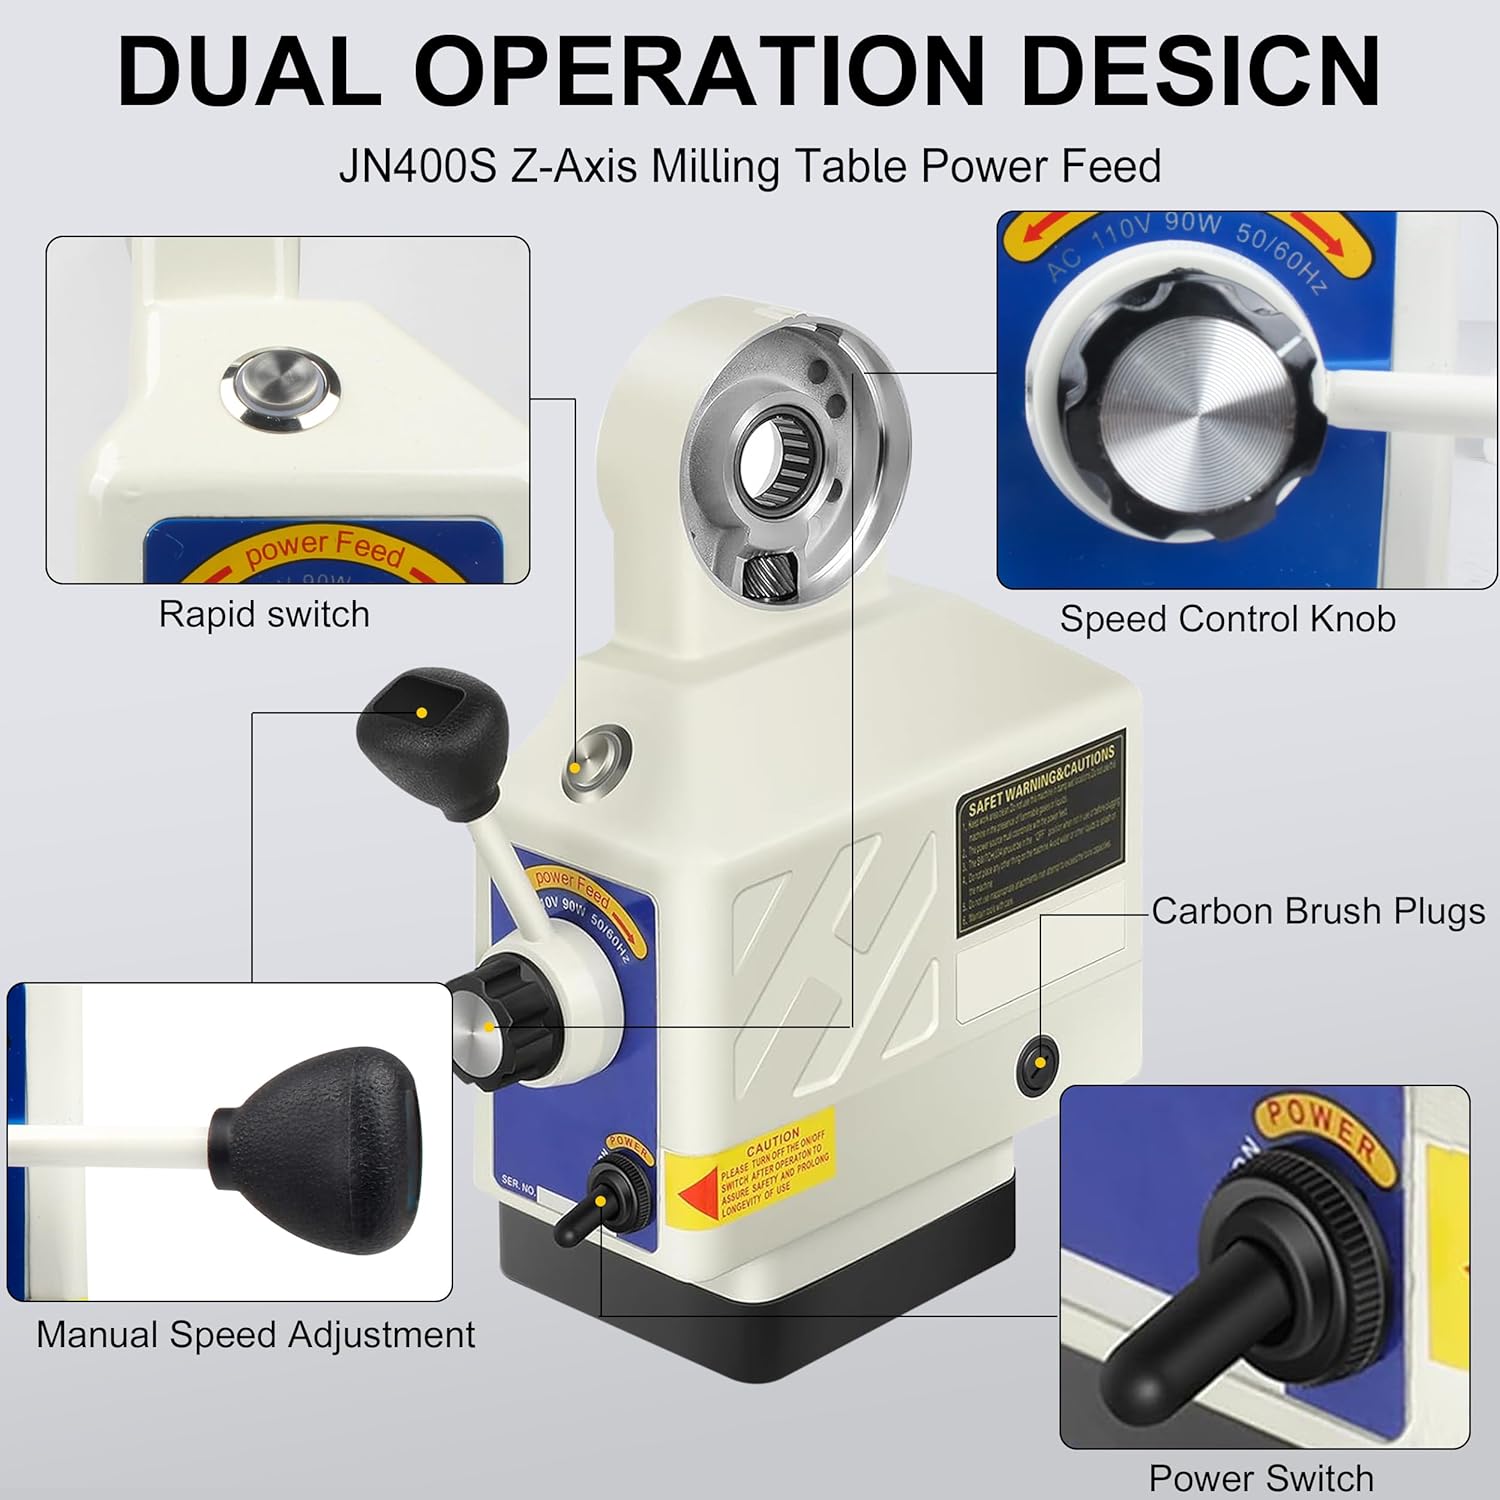
Figure 3.1: Front view of the JN400S Z-Axis Power Feed, highlighting the main controls and features.
Key Components:
- Rapid Switch: Engages rapid traverse for quick positioning.
- Speed Control Knob: Adjusts the feed rate from 0 to 200 RPM.
- Carbon Brush Plugs: Access points for replacing motor carbon brushes.
- Manual Speed Adjustment: Provides fine-tuning of the feed rate.
- Power Switch: Turns the unit ON/OFF.

Figure 3.2: Included accessories for the JN400S Z-Axis Power Feed.
Included Components:
The package includes the JN400S Z-Axis Power Feed unit and necessary accessories for installation and operation:
- JN400S Z-Axis Power Feed Unit
- Mounting hardware
- Limit switches
- Gears and associated components
- Power cable
4. Specifications
The following table details the technical specifications of the RATTMMOTOR JN400S Z-Axis Power Feed.
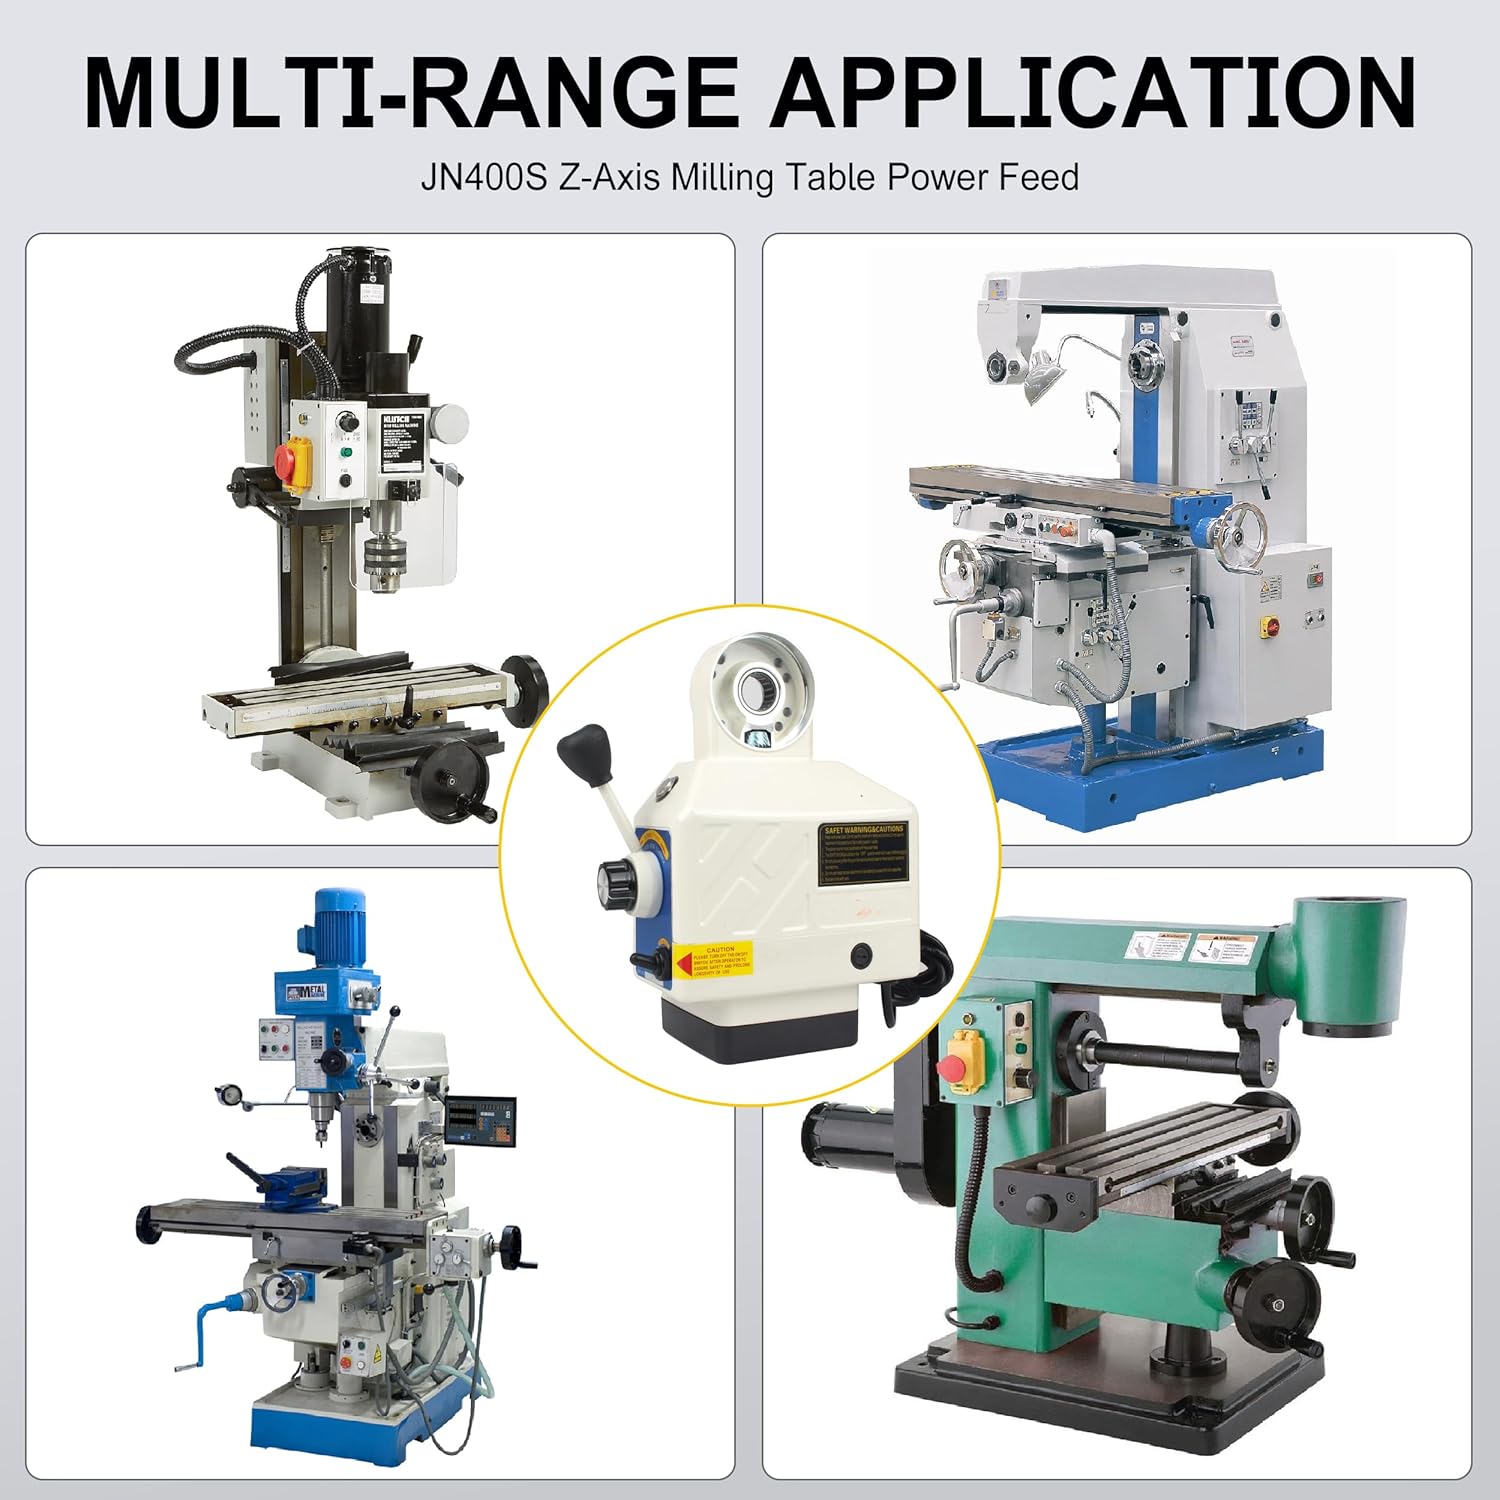
Figure 4.1: Key specifications of the JN400S Z-Axis Power Feed.
| Parameter | Value |
|---|---|
| Model | JN400S (Z-Axis) |
| Power | 90W |
| Voltage | 220V |
| Current | 2.8AMP |
| Speed Range | 0-200 RPM |
| Torque | 650 IN-LB |
| Weight | 6 KG (13.2 lbs) |
| Dimensions (Package) | 15.35 x 12.99 x 7.09 inches |
| Power Source | AC |
5. Setup
Proper installation is crucial for the performance and longevity of your power feed. Follow these general steps for mounting the unit on your milling machine's Z-axis.
Installation Steps:
- Prepare the Milling Machine: Ensure the milling machine is powered off and secured. Clean the Z-axis mounting area thoroughly.
- Mount the Fixed Bracket: Attach the Z-axis fixed mount bracket to the designated area on your milling machine's Z-axis. Ensure it is aligned correctly and securely fastened.
- Install Drive Gear: Install the appropriate drive gear onto the Z-axis lead screw of your milling machine.
- Attach Power Feed Unit: Carefully position the RATTMMOTOR JN400S power feed unit onto the fixed bracket, ensuring the internal gear meshes correctly with the drive gear on the lead screw.
- Secure the Unit: Fasten the power feed unit to the fixed bracket using the provided bolts and washers. Ensure all connections are tight and secure, but do not overtighten.
- Connect Limit Switches: Install and connect the limit switches according to your milling machine's requirements. These prevent over-travel.
- Power Connection: Connect the power cable to the unit and then to a suitable 220V grounded power outlet.
- Initial Test: Before full operation, perform a slow, controlled test run to ensure all movements are smooth and the limit switches function correctly.
Consult your milling machine's manual for specific mounting points and procedures if necessary.
6. Operating Instructions
The RATTMMOTOR JN400S Z-Axis Power Feed offers precise and variable speed control for your milling operations.
Basic Operation:
- Power On: Flip the Power Switch to the 'ON' position. The unit should power up.
- Speed Adjustment: Use the Speed Control Knob to set the desired feed rate. Rotate clockwise to increase speed and counter-clockwise to decrease. The manual speed adjustment lever can be used for finer control.
- Direction Control: The power feed allows for both upward and downward movement along the Z-axis. Use the main lever to select the direction of travel.
- Rapid Traverse: For quick positioning, engage the Rapid Switch. This will move the Z-axis at its maximum speed. Always ensure clear path before using rapid traverse.
- Braking: The unit features a 0.2-second extreme brake design, allowing for quick forward and reverse operation, which can save machining time.
- Power Off: When finished, return the Power Switch to the 'OFF' position.
Always monitor the milling process and adjust the feed rate as needed for optimal results and to prevent tool or workpiece damage.
7. Maintenance
Regular maintenance ensures the longevity and reliable performance of your RATTMMOTOR JN400S Z-Axis Power Feed.
Maintenance Schedule:
- Daily: Clean the exterior of the unit to remove dust, chips, and debris. Ensure the control panel is free from obstructions.
- Weekly/Monthly: Inspect the power cable for any signs of damage. Check all mounting bolts for tightness.
- Periodically: Inspect the carbon brushes for wear. If they are significantly worn, replace them using the Carbon Brush Plugs. Refer to the safety section before performing this task.
- Lubrication: Ensure the milling machine's lead screw and other moving parts are adequately lubricated as per the milling machine's manual. The power feed itself is largely maintenance-free internally, but external gears should be kept clean.
Always disconnect the power feed from the main power supply before performing any cleaning, inspection, or maintenance tasks.
8. Troubleshooting
This section addresses common issues you might encounter with your power feed.
| Problem | Possible Cause | Solution |
|---|---|---|
| Unit does not power on | No power supply; Faulty power switch; Blown fuse | Check power connection and outlet; Inspect power switch; Check and replace fuse if necessary (consult qualified technician). |
| Inconsistent speed or no movement | Worn carbon brushes; Motor issue; Mechanical obstruction | Inspect and replace carbon brushes; Check for any physical obstructions; Contact support if motor issue is suspected. |
| Unusual noise during operation | Loose mounting; Worn gears; Lack of lubrication | Check all mounting bolts for tightness; Inspect gears for wear; Ensure lead screw is lubricated. |
| Unit stops during operation (collision) | Overload protection activated | Remove obstruction; Reduce cutting load; Restart operation. The unit is designed to protect itself from damage during such events. |
If you encounter problems not listed here or if the suggested solutions do not resolve the issue, please contact customer support.
9. Warranty and Support
For warranty information, please refer to the documentation provided at the time of purchase or contact your retailer. RATTMMOTOR is committed to providing quality products and customer satisfaction.
Customer Support:
If you require technical assistance, have questions about your RATTMMOTOR JN400S Z-Axis Power Feed, or need to report an issue, please contact RATTMMOTOR customer service through the retailer where the product was purchased or visit the official RATTMMOTOR website for contact details.
Please have your model number (JN400S) and purchase information ready when contacting support.


