Introduction
Thank you for choosing the CAPXSNOB Warriors1 Coffee Maker. This innovative machine offers unparalleled versatility, allowing you to enjoy a wide range of coffee experiences from various pod types and ground coffee. Its modular design, high-pressure brewing, and user-friendly features are designed to simplify your coffee routine and deliver delicious results every time. Please read this manual thoroughly before first use to ensure proper operation and maintenance.

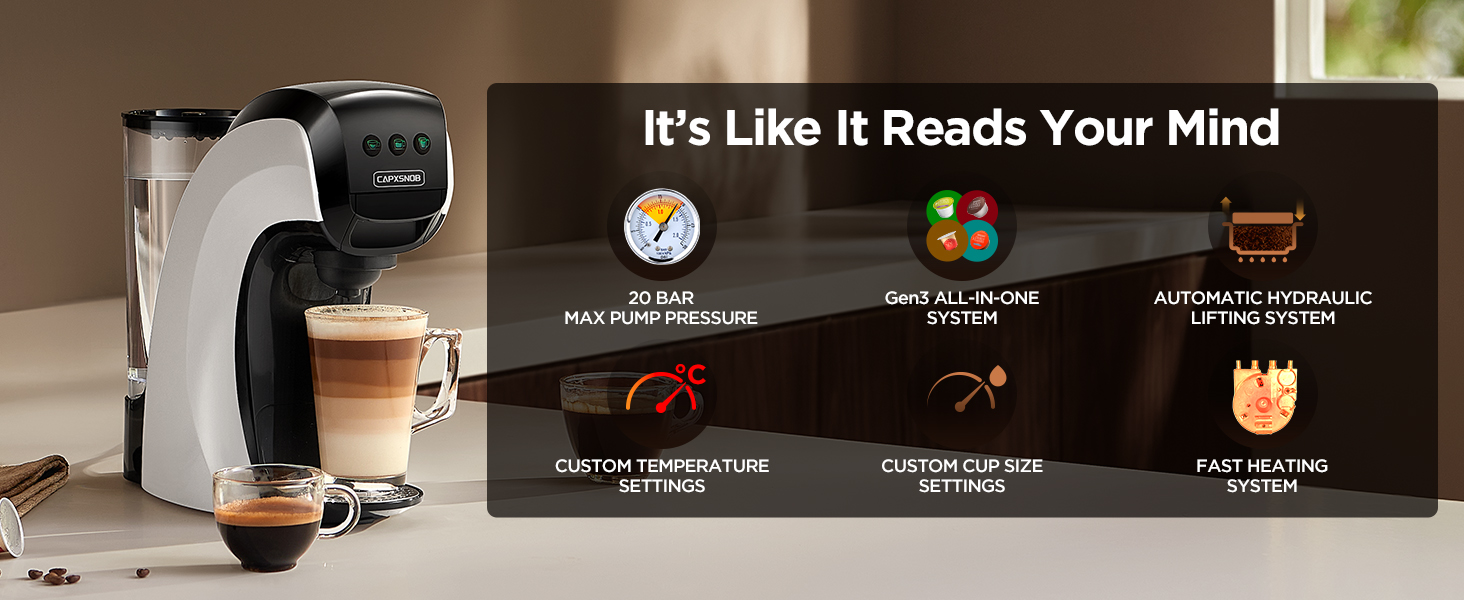
The Warriors1 Coffee Maker, featuring the Gen3 All-in-One System, offers extensive compatibility and adaptability for a convenient coffee experience.
Safety Instructions
Please observe the following safety precautions to prevent injury or damage to the appliance:
- Always connect the appliance to a grounded power outlet.
- Do not immerse the machine, cord, or plug in water or other liquids.
- Keep hands and cords away from hot surfaces during operation.
- Unplug the machine when not in use and before cleaning.
- Do not operate the machine if the cord or plug is damaged, or if the machine malfunctions or has been damaged in any way.
- Use only clean, fresh water in the water tank.
- Do not open the brewing chamber during operation.
- Keep out of reach of children.
What's Included
Your Warriors1 Coffee Maker package includes the following components:
- Warriors1 Coffee Maker Main Unit
- 28 oz Removable Water Reservoir
- Adapter for Nespresso Original Pods
- Adapter for Dolce Gusto Pods
- Adapter for K-Cup Pods
- Adapter for Ground Coffee
- Coffee Scoop
- Water Catch Tray (Drip Tray)
- Coffee Dosing Funnel

An overview of the included components: 28 oz Removable Reservoir, Coffee Scoop, Water Catch Tray, K-Cup Pod Adapter, Nespresso Original Adapter, Dolce Gusto Pod Adapter, Ground Coffee Adapter, and Coffee Dosing Funnel.
Setup
Follow these steps for initial setup before first use:
- Unpack: Remove all packaging materials and place the coffee maker on a stable, flat surface.
- Clean Components: Wash the water tank, drip tray, and all adapters with warm, soapy water. Rinse thoroughly and dry.
- Fill Water Tank: Fill the 28 oz removable water reservoir with fresh, clean water up to the MAX line. Place it back securely on the machine.
- First Use / Priming: Before brewing coffee, perform a cleansing cycle. Insert any adapter (without a coffee pod/grounds) and place a cup under the dispenser. Press any brew button to run a full cycle of hot water through the machine. Repeat this process 2-3 times to flush out any manufacturing residue and prime the system.
Operating Instructions
The Warriors1 Coffee Maker is designed for simple, one-touch operation. It features an Automatic Hydraulic Lifting System for easy brewing and an Intelligent Detection System to prevent leaks if an adapter is inserted incorrectly.
General Brewing Steps
- Ensure the water tank is filled with fresh water.
- Select the appropriate adapter for your chosen coffee type (Keurig K-Cup, Nespresso Original, Dolce Gusto, or Ground Coffee).
- Insert your coffee pod or prepared ground coffee into the adapter.
- Place the filled adapter into the machine's brewing chamber. The automatic hydraulic lifting system will engage.
- Place your coffee cup on the drip tray. The machine accommodates mugs up to 5.5 inches tall.
- Select your desired cup size (Espresso, Lungo, or Americano) by pressing the corresponding button. The machine will begin brewing.
- Once brewing is complete, remove your cup and enjoy.
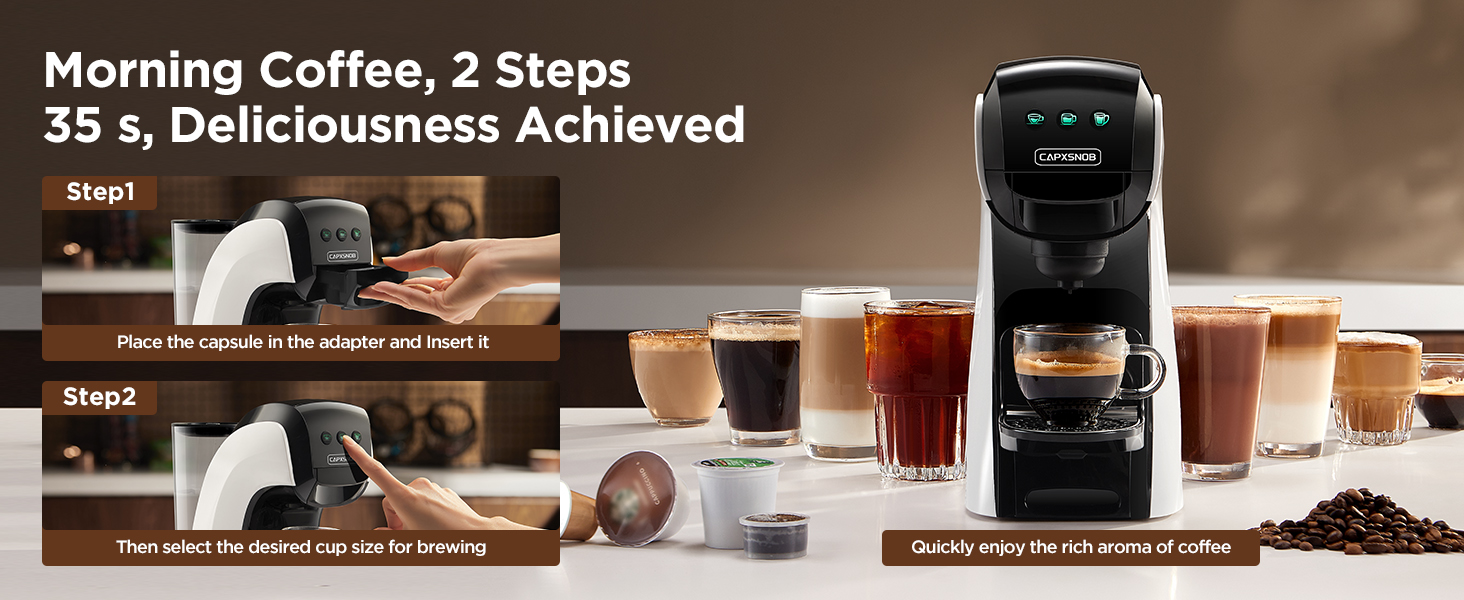
Brewing is simplified to two steps: placing the capsule in the adapter and inserting it, then selecting the desired cup size for brewing.
Coffee Type Compatibility
The Warriors1 Coffee Maker supports a wide range of coffee types:
- For K-Cup* Capsules: Use the K-Cup adapter.
- For Dolce Gusto* Capsules: Use the DG adapter.
- For Nespresso* Original Capsules: Use the Nespresso Original adapter.
- For Ground Coffee: Use the Ground Coffee adapter. Fill with 7-10g of medium-fine ground coffee and press with the tamper.

This coffee machine offers freedom of choice, being compatible with NES* Original, DG* Coffee, DG* Milk, Keurig* K-Cup capsules, and Ground Coffee.

Explore endless possibilities with one coffee machine, tasting a world of flavors from every capsule type.
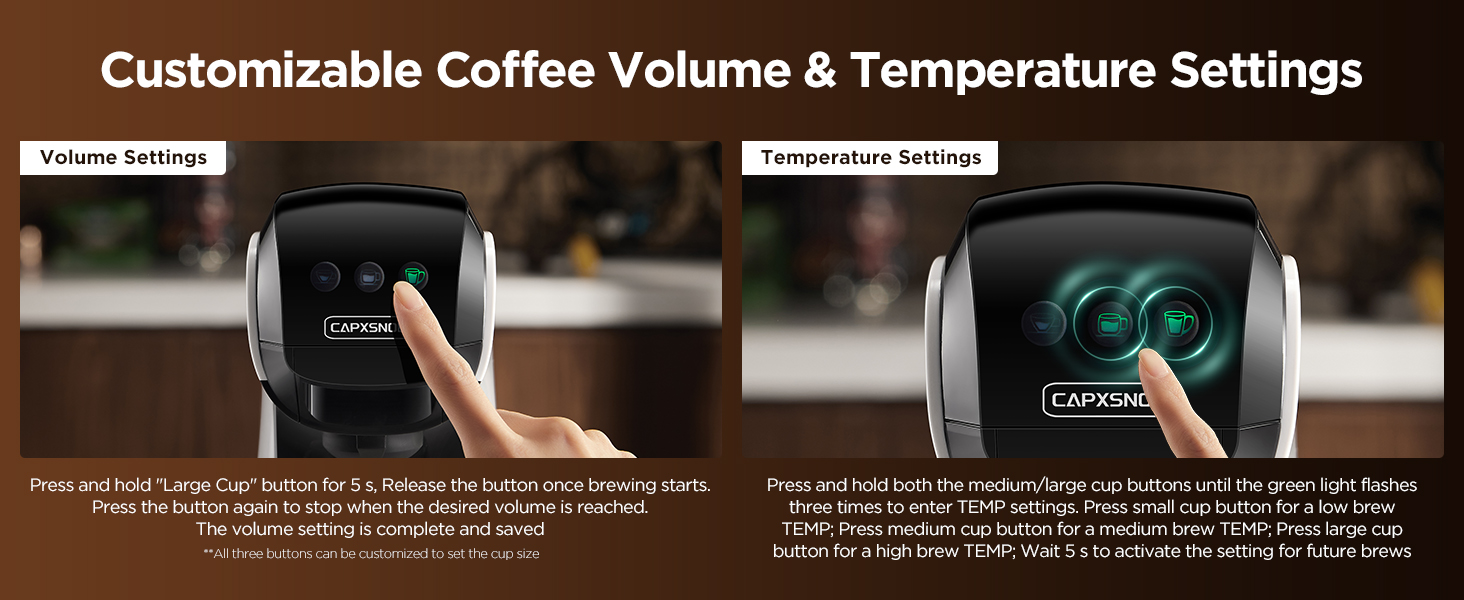
Customizing Cup Volume
You can customize the volume for each of the three brew buttons (Small, Medium, Large) to your preference (10-180 seconds brew time).
- Place a 300 ml large cup under the outlet.
- Insert any adapter (with or without a pod/grounds). Using an empty adapter ensures more accurate volume setting.
- Press and hold the button you wish to customize (e.g., Large Cup button) for 5 seconds, then release. The button will flash rapidly, and brewing will begin.
- When the cup reaches your desired volume, press the same button again to stop. The machine saves this setting even if turned off or unplugged. Other buttons remain unchanged.
- For future brews, simply press the customized button once to brew the saved volume.

Detailed steps for setting your custom coffee volume, allowing you to adjust brew time from 10 to 180 seconds.
Customizing Temperature Settings
The machine offers three temperature levels: Low, Medium, and High, corresponding to the Small, Medium, and Large Cup buttons.
- Enter Temperature Setting: When all three green lights are on, press and hold the Medium Cup and Large Cup buttons simultaneously until the lights flash, then release. The lights will flash three times and turn off.
- Set Low Temperature: Within 5 seconds, press the Small Cup button. If the small cup light flashes once and then turns off, the low-temperature brewing mode is set.
- Set Medium Temperature: Within 5 seconds, press the Medium Cup button. If the medium cup light flashes once and then turns off, the medium-temperature brewing mode is set.
- Set High Temperature: Within 5 seconds, press the Large Cup button. If the large cup light flashes once and then turns off, the high-temperature brewing mode is set.
The machine saves the temperature setting even after power-off or unplugging.
Detailed steps for setting your custom temperature: Low, Medium, or High, corresponding to the Small, Medium, and Large Cup buttons.
Tips for Increasing Temperature
For a hotter brew, before each brew, insert the adapter (without a capsule) and run a cup of hot water to flush out any residual condensation in the pipes. Then, start brewing your coffee. Additionally, you can set the temperature to the highest level according to the instructions above.
Important Brewing Notes
- Brew instant or milk pods with Medium or Large Cup settings only.
- Never interrupt brewing to prevent leaks.

Reminder to brew instant or milk pods with Medium or Large Cup settings only, and to never interrupt brewing to prevent leaks.
Maintenance and Cleaning
Regular cleaning and maintenance ensure optimal performance and longevity of your coffee maker.
Daily Cleaning
- Automatic Cleaning: The coffee maker features an automatic cleaning system. Simply insert an empty adapter (without a coffee pod) and start brewing to clean the water path, brewing chamber, and adapter.
- Detachable Parts: The water tank, drip tray, and adapters are detachable and easy to clean. Wash them with warm, soapy water after each use and rinse thoroughly.
Ground Coffee Adapter Maintenance
For the ground coffee adapter, regular cleaning is crucial to prevent blockages:
- Automatic: Insert the empty adapter into the machine and rinse it.
- Manual: Disassemble the adapter and clean the top filter holes and bottom stainless steel filters to prevent blockages and ensure smooth coffee flow.

Detailed maintenance tips for the ground coffee adapter, including disassembly, flushing, and mounting steps.
Descaling Reminder
After approximately 200 cups, the machine will alert you when it's time to descale. This is indicated by all three brew buttons slowly flashing green. This is a friendly reminder and not a malfunction; you can still make coffee. Descaling removes built-up calcium deposits, ensuring the best-tasting brew possible.
Refer to the full descaling guide in the manual (or product page) for detailed instructions. Do not use vinegar for descaling; use recommended descaling solutions.
When all three buttons flash green slowly, it's a friendly descaling reminder, not a malfunction. Follow the descaling guide to maintain your machine.
Troubleshooting
Here are solutions to common issues you might encounter:
| Problem | Possible Cause | Solution |
|---|---|---|
| Machine is leaking. | Seal ring on K-Cup lid is damaged/missing; coffee grind is too fine/too much. | Check if the seal ring on the K-Cup lid is intact. Use 7-10g of medium-fine ground coffee (400-600 µm). |
| Coffee is not hot enough. | Default temperature setting; residual condensation in pipes. | Set temperature to the highest level (refer to Customizing Temperature Settings). Run a hot water flush before brewing. |
| Machine not brewing. | Adapter inserted incorrectly; water tank empty. | Ensure adapter is correctly inserted (Intelligent Detection System). Check water level in the tank. |
| Descaling reminder (flashing green lights). | Machine needs descaling after 200 cups. | This is normal. Follow the descaling procedure in the manual to remove calcium deposits. |

If experiencing leaks, check the seal ring on the K-Cup lid and ensure proper coffee grind size and quantity.
Specifications
| Feature | Detail |
|---|---|
| Brand | CAPXSNOB |
| Model Name | Warriors 1 (SV835L) |
| Color | White |
| Product Dimensions (D x W x H) | 11.22" x 5.3" x 10.83" |
| Item Weight | 7.87 pounds |
| Coffee Maker Type | Espresso Machine |
| Max Pump Pressure | 20 Bar |
| Water Reservoir Capacity | 28 oz |
| Coffee Input Type | Capsule (Keurig, Nespresso Original, Dolce Gusto), Ground Coffee |
| Special Features | Adjustable Brew Strength, Auto Shut-Off, Portable, Programmable, Self-Cleaning |
| Max Mug Height | 5.5 inches |

The machine's design accommodates various cup sizes, perfect for Espresso, Latte, and Americano.
Warranty and Customer Support
CAPXSNOB is committed to providing reliable support for your product.
Official Support
For any product-related questions, concerns, or assistance, please contact our dedicated customer support team through CAPXSNOB's official channels. We strive to respond within 24 hours on business days, ensuring you can use your product with confidence, knowing reliable support is available.
Please refer to the product packaging or the official CAPXSNOB website for the most current contact information.