1. Introduction and Overview
Thank you for choosing the PawHut Pressure-Mounted Pet Gate. This manual provides essential information for the safe and correct installation, operation, and maintenance of your new pet gate. Please read all instructions carefully before assembly and use, and retain this manual for future reference.
This pet gate is designed to create a safe barrier for pets within your home, suitable for doorways, stairways, and hallways. Its pressure-mounted design allows for easy installation without drilling.
Key Features:
- Adjustable Width: Fits openings from 29.1"-31.5" (74-80cm).
- Double-Locking System: Features a top lock and two rotatable locks at the bottom for enhanced security.
- One-Hand Operation: The top lock can be opened with a single hand by sliding both ends simultaneously and lifting.
- Opens Both Ways: The gate swings open in both directions for convenient passage.
- Auto-Close Function: The gate automatically closes when its opening angle is less than 90 degrees. It remains open when pushed past 90 degrees.
- Robust Material: Constructed from spray-treated metal with a lead-free surface for durability and pet safety.
- Easy Assembly: Pressure-mounted installation simplifies setup for various openings.

Image 1.1: PawHut Pet Gate with a Beagle.
2. Safety Information
WARNING: Improper installation or use can result in serious injury. Always follow these instructions carefully.
- This safety barrier is for domestic use only.
- Regularly check that the safety barrier is correctly installed and secure.
- Do not use the safety barrier if any components are damaged or missing.
- Never climb over the gate.
- Ensure the gate is securely closed and locked after each passage.
- This gate is designed for pets. Do not use it as a child safety gate without verifying it meets relevant child safety standards.
- Keep small children away from the gate during installation.
- Always measure your opening accurately before purchasing to ensure proper fit.
3. Package Contents
Upon opening the package, verify that all components are present and undamaged. If any parts are missing or damaged, do not proceed with assembly and contact customer support.
- 1 x Main Gate Frame
- 4 x Pressure Adjustment Bolts
- 4 x Wall Cups (optional for added stability)
- Instruction Manual

Image 3.1: Example of PawHut Pet Gate components.
4. Specifications
| Feature | Detail |
|---|---|
| Brand | PawHut |
| Model | 29.1"-31.5"W x 30.3"H |
| Product Dimensions | 80W x 77H Centimetres (approx. 31.5"W x 30.3"H) |
| Adjustable Width Range | 29.1"-31.5" (74-80cm) |
| Material | Metal |
| Colour | Black |
| Item Weight | 8 Pounds (approx. 3.6 kg) |
| Mounting Type | Pressure Mount |
| Unit Count | 1 Count |
| UPC | 673986305331 |
| ASIN | B0DLWNL32V |

Image 4.1: Product Dimensions and Pet Shoulder Height Guide.
5. Setup and Installation
The PawHut Pet Gate is designed for pressure-mounted installation, which means it uses tension to secure itself in an opening. No drilling is typically required.
Installation Steps:
- Unpack and Inspect: Remove all components from the packaging and ensure all parts listed in Section 3 are present and undamaged.
- Initial Placement: Position the main gate frame within the desired opening (doorway, hallway, or stair opening). The gate will appear slightly bent or misaligned before tension is applied; this is normal.
- Insert Pressure Bolts: Insert the four pressure adjustment bolts into the holes at each corner of the gate frame.
- Adjust Tension: Hand-tighten each pressure bolt until the gate is snug against the walls. Ensure the gate is level and centered in the opening.
- Fine-Tune Adjustment: Continue to tighten the pressure bolts evenly, turning each bolt a few rotations at a time. The gap between the gate frame and the locking mechanism should reduce to approximately 2-3mm. This indicates sufficient tension for secure installation.
- Test Security: Once tightened, firmly push and pull on the gate to ensure it is securely mounted and does not move. If it moves, tighten the bolts further until stable.
- Optional Wall Cups: For added stability or to protect wall surfaces, the included wall cups can be placed between the pressure bolts and the wall.

Image 5.1: Pet gate installed in various locations.
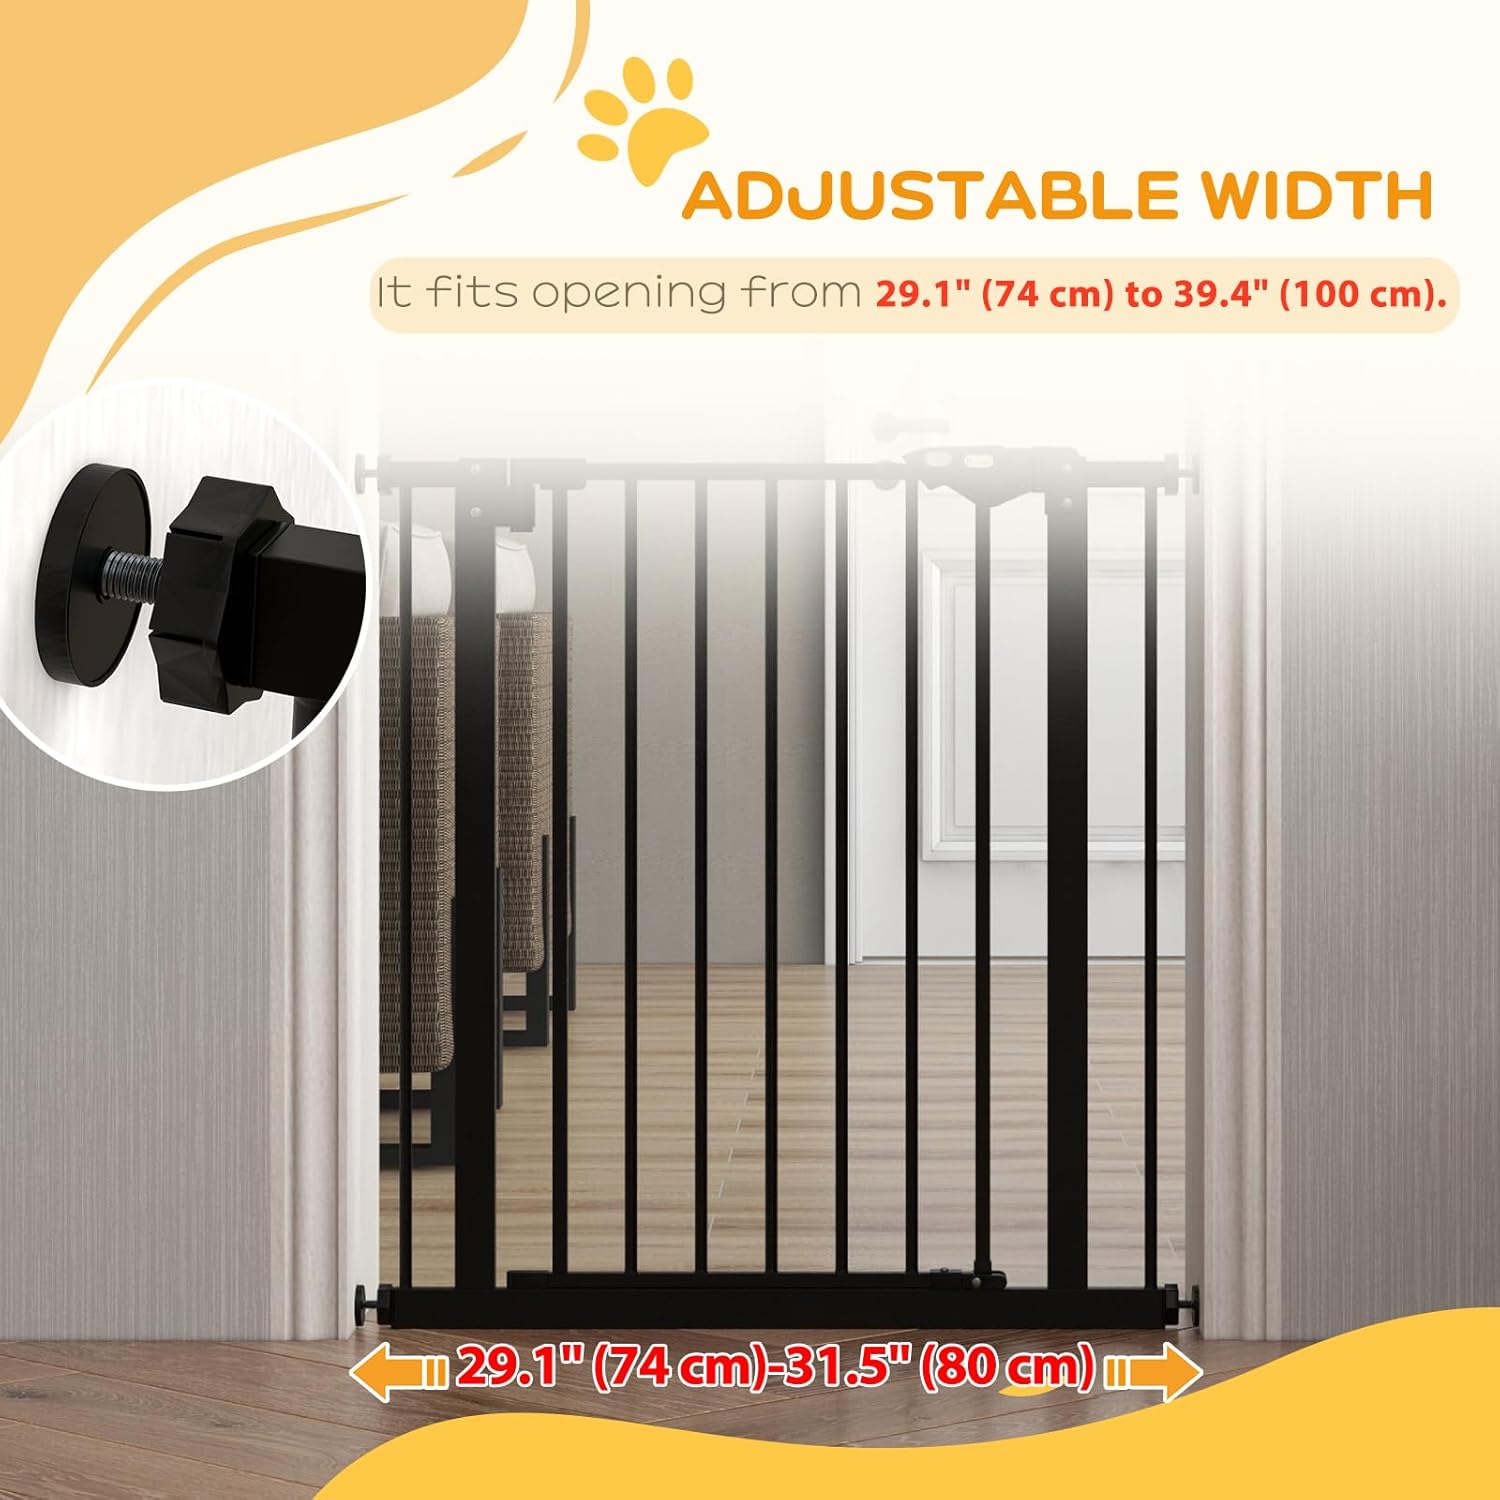
Image 5.2: Adjustable width mechanism.

Image 5.3: Detail of the pressure mount.
6. Operating Instructions
Opening the Gate:
- Top Lock: Locate the top locking mechanism. Slide both ends of the lock simultaneously towards the center, then lift the gate door to open. This can typically be done with one hand.
- Bottom Rotatable Locks: The gate also features two rotatable locks at the bottom. These provide additional security and can be used to restrict the gate from swinging in a specific direction if desired.
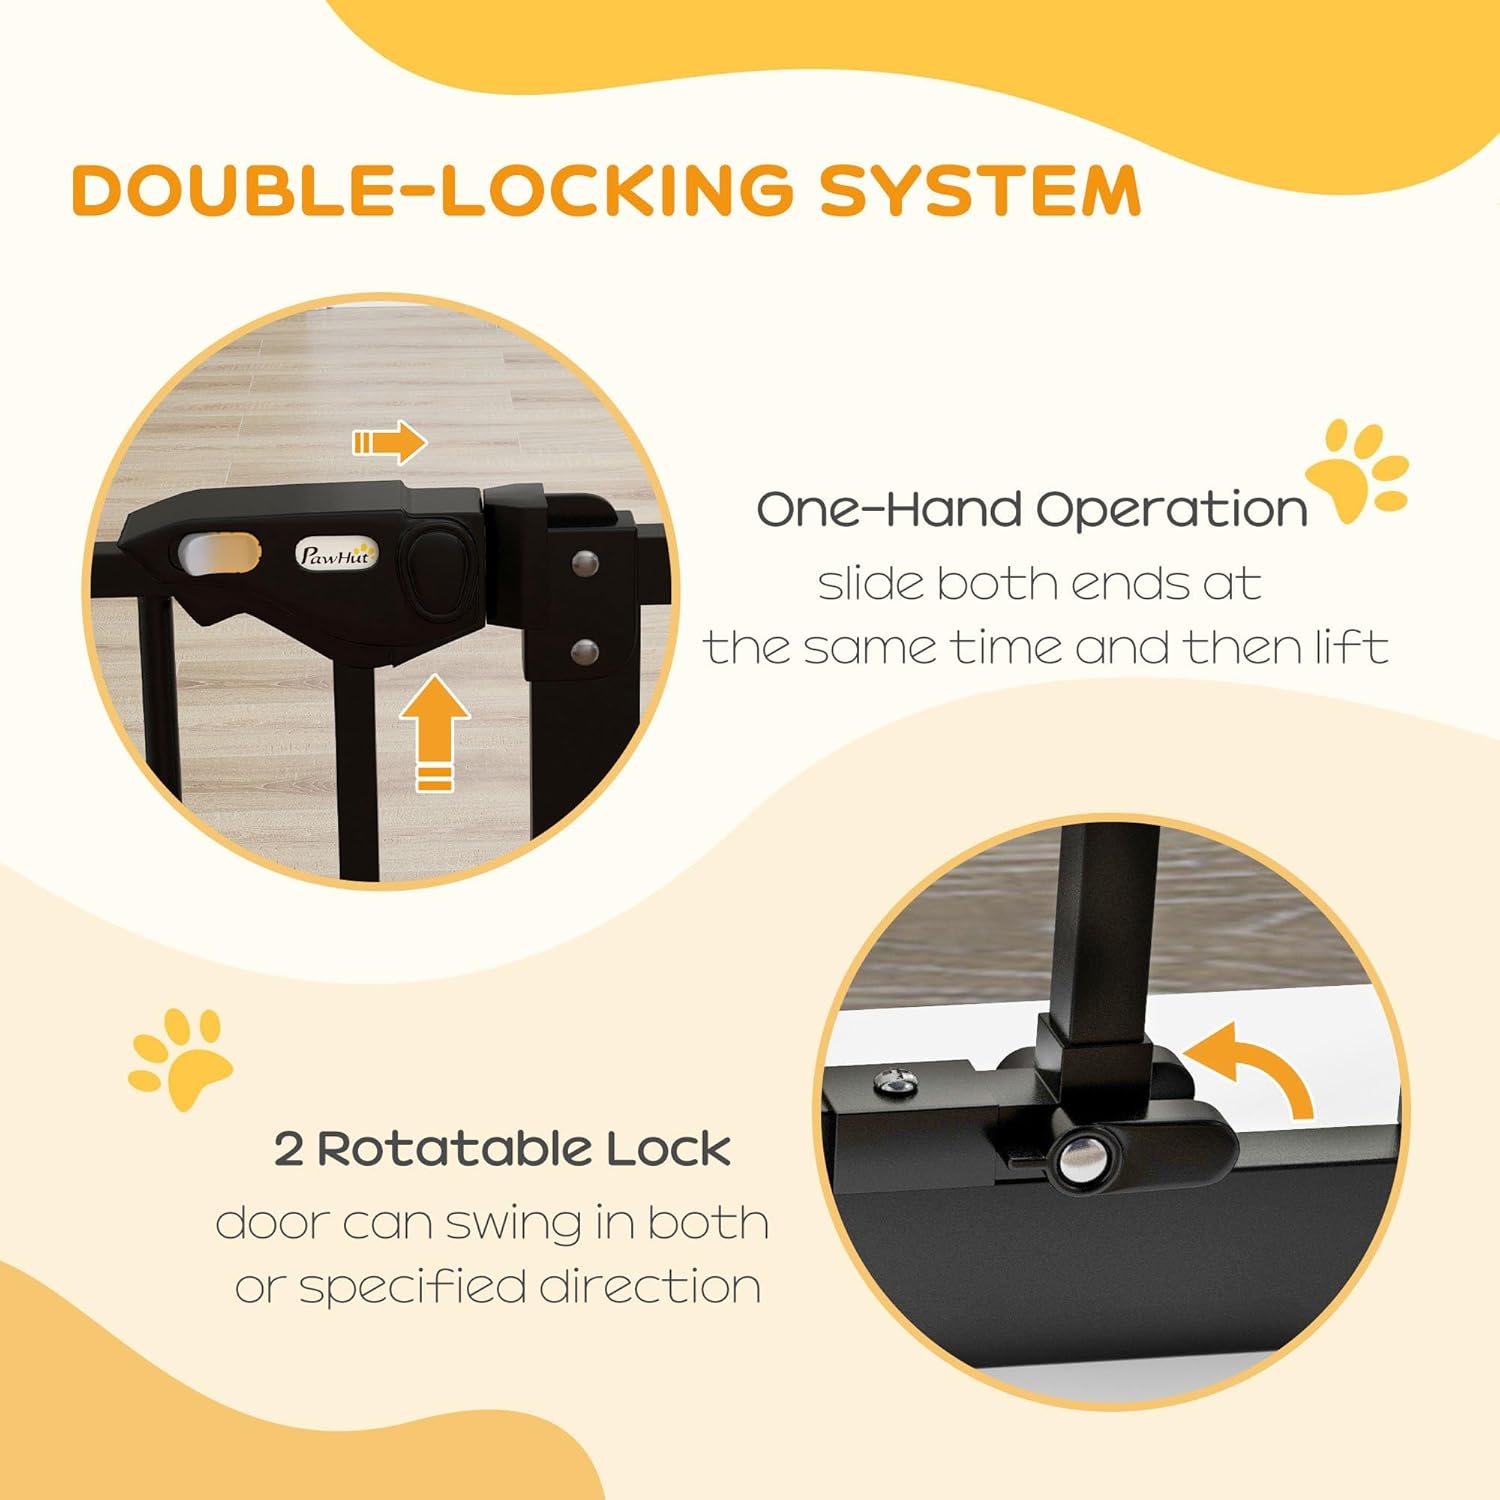
Image 6.1: Double-Locking System and One-Hand Operation.
Closing the Gate:
- Auto-Close Feature: When the gate is opened to an angle less than 90 degrees, it will automatically swing back and close itself.
- Manual Close: If the gate is opened beyond 90 degrees, it will remain open. To close it, gently push the gate door until it latches securely.
- Always ensure the gate is fully latched and secure after passing through.

Image 6.2: Auto-Close Functionality.
7. Maintenance
Regular maintenance will help ensure the longevity and safe operation of your pet gate.
- Cleaning: Wipe the gate with a soft, damp cloth and mild soap. Avoid abrasive cleaners or harsh chemicals, as these can damage the finish.
- Inspection: Periodically check all parts for wear, damage, or loose connections. Ensure the pressure bolts remain tight and the gate is securely mounted.
- Lubrication: If the hinge mechanism becomes stiff, apply a small amount of silicone-based lubricant to the moving parts.
8. Troubleshooting
- Gate does not fit the opening:
a. Ensure your opening width is within the specified range of 29.1"-31.5" (74-80cm).
b. Re-adjust the pressure bolts to extend or retract as needed. - Gate is not secure/wobbles:
a. Tighten all four pressure bolts evenly until the gate is firm in the opening. The gap at the latch should be minimal (2-3mm).
b. Ensure the mounting surface is flat and stable. - Gate does not latch properly:
a. Check if the gate is level. Uneven installation can prevent proper latching.
b. Ensure sufficient tension is applied via the pressure bolts. The gate frame should be slightly compressed. - Gate is difficult to open/close:
a. Check for any obstructions in the hinge or latch mechanism.
b. Apply a small amount of silicone lubricant to the hinges if they are stiff.
9. Warranty and Support
This PawHut Pet Gate comes with a 90-Day Warranty Against Manufacturer Defects from the date of purchase. This warranty covers defects in materials and workmanship under normal use.
The warranty does not cover damage caused by improper installation, misuse, abuse, accidents, modifications, or normal wear and tear.
Customer Support:
For warranty claims, technical assistance, or missing parts, please contact the manufacturer:
Manufacturer: Aosom Canada
Place of Business: Markham, Ontario, CA
Telephone: 1-416-792-6088
Please have your product model number (29.1"-31.5"W x 30.3"H) and proof of purchase available when contacting support.