
Replacement Remote Control
User Manual for Generic Replacement Remote Control
Brand: Generic | Model: Replacement Remote Control
1. Introduction
This document serves as a comprehensive user manual for the Generic replacement remote control, designed for compatibility with various Iiyama Prolite 4K HD Creative Touch Interactive Flat Panel LED Displays. This remote is an infrared (IR) replacement and is intended to function similarly to your original remote control. Please ensure your current remote matches the appearance of the remote shown in this manual for proper compatibility.
Important Note: This replacement remote control does not require any setup or programming. It is ready for use upon battery installation. If your specific display model is not listed in the compatibility section, please contact the seller for assistance before purchase to confirm compatibility, as full functionality cannot be guaranteed for unlisted models.
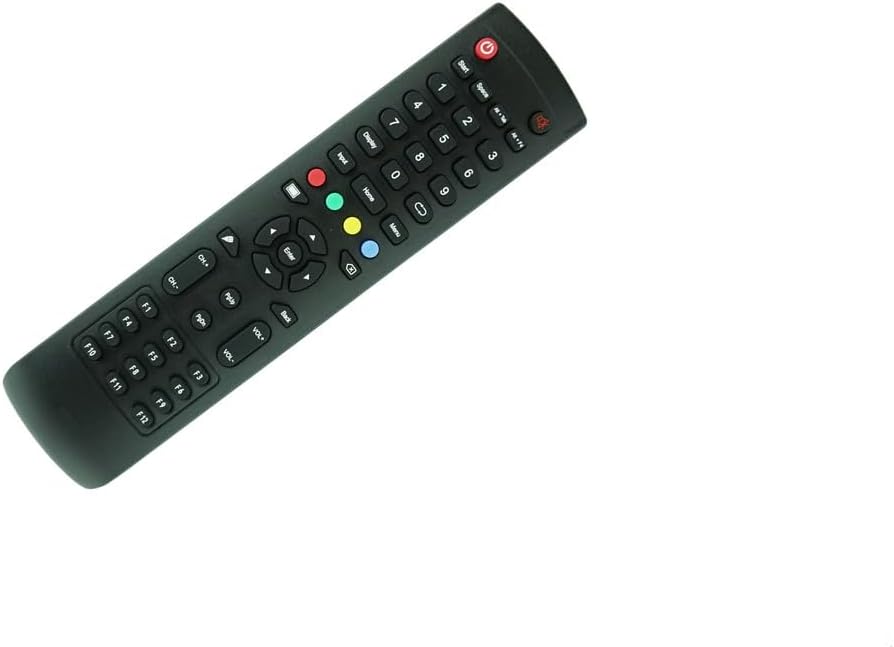
Figure 1.1: Front view of the Generic Replacement Remote Control. This image displays the full layout of the remote, including the power button, number pad, navigation controls, and various function keys.
2. Setup and Battery Installation
The Generic replacement remote control is designed for immediate use without complex setup or programming. The primary setup involves installing the batteries.
2.1 Battery Requirements
- Requires two (2) AAA batteries (not included).
- Use new, high-quality alkaline batteries for optimal performance and longevity.
2.2 Installing Batteries
- Locate the battery compartment on the back of the remote control.
- Press down on the latch and slide the battery compartment cover downwards to open it.
- Insert two AAA batteries, ensuring the positive (+) and negative (-) terminals align correctly with the markings inside the compartment.
- Slide the battery compartment cover back into place until it clicks securely.

Figure 2.1: Rear view of the remote control with the battery cover detached, illustrating the battery insertion slots. This image helps in correctly identifying the battery compartment and polarity markings.
Once batteries are installed, the remote control is ready for operation.
3. Operating the Remote Control
This section outlines the general functions of the buttons on your replacement remote control. While the remote is designed to be compatible, some advanced or specific functions of your original remote may not be fully replicated. Refer to your display's original manual for detailed functions of each button if needed.
3.1 Button Functions Overview
- Power Button (●): Turns the display ON or OFF.
- Number Pad (0-9): Used for direct channel input or numerical selections.
- Input: Selects the input source (e.g., HDMI 1, HDMI 2, VGA).
- Display: Shows on-screen display information.
- Home: Navigates to the main menu or home screen of the display.
- Menu: Accesses the display's settings menu.
- Navigation Buttons (Up, Down, Left, Right): Used to navigate through menus and options.
- Enter: Confirms a selection or enters a menu.
- Back: Returns to the previous screen or menu.
- VOL+/-: Adjusts the volume level.
- CH+/-: Changes the channel up or down.
- Mute: Mutes or unmutes the audio.
- F1-F12: Function keys, their specific use depends on the display model and software.
- Colored Buttons (Red, Green, Yellow, Blue): Often used for specific functions within menus or applications, as indicated on the display's interface.

Figure 3.1: Detailed view of the remote control's front face, highlighting the arrangement and labeling of all operational buttons. This image assists users in identifying specific buttons for their intended functions.
3.2 General Usage Tips
- Point the remote control directly at the infrared receiver on your Iiyama Prolite display.
- Ensure there are no obstructions between the remote and the display.
- Maintain a reasonable distance from the display for optimal signal transmission.
4. Care and Maintenance
Proper care will extend the life of your remote control.
- Cleaning: Wipe the remote with a soft, dry cloth. For stubborn dirt, slightly dampen the cloth with water or a mild, non-abrasive cleaner. Do not use harsh chemicals or abrasive materials.
- Battery Replacement: Replace batteries when the remote's response becomes sluggish or stops working. Always replace both batteries at the same time.
- Storage: Store the remote in a cool, dry place away from direct sunlight and extreme temperatures.
- Avoid Damage: Do not drop the remote, expose it to water, or place heavy objects on it.
5. Troubleshooting
If you experience issues with your remote control, try the following troubleshooting steps:
- Remote Not Responding:
- Check if the batteries are inserted correctly with the correct polarity (+/-).
- Replace old batteries with new ones.
- Ensure there is a clear line of sight between the remote's IR emitter and the display's IR receiver.
- Move closer to the display.
- Certain Functions Not Working:
- As a replacement remote, it may not replicate all functions of your original remote. Verify if the function is supported by this specific replacement model.
- Consult your display's original manual to confirm the expected behavior of the button.
- Compatibility Issues:
- Ensure your display model is listed in the compatibility section of this manual.
- Visually compare your original remote with the images provided in this manual to confirm they are identical. If they differ, full compatibility cannot be guaranteed.
- If you are unsure about compatibility, contact the seller for clarification.
6. Specifications
| Feature | Detail |
|---|---|
| Product Type | Infrared (IR) Replacement Remote Control |
| Brand | Generic |
| Manufacturer | Easytry |
| Color | Black |
| Batteries Required | 2 x AAA (not included) |
| Max Number of Supported Devices | 1 (Specific Iiyama Prolite Display) |
| Special Feature | No setup or programming needed; direct replacement. |
7. Compatible Display Models
This replacement remote control is compatible with the following Iiyama Prolite 4K HD Creative Touch Interactive Flat Panel LED Display models:
- Iiyama Prolite TE5503MIS
- Iiyama Prolite TE5512MIS
- Iiyama Prolite TE8614MIS
- Iiyama Prolite TE6504MIS
- Iiyama Prolite TE6568MIS
- Iiyama Prolite TE6512MIS
- Iiyama Prolite TE7512MIS
Note: Compatibility is based on the remote's physical appearance matching your original remote. If your model is not listed or your original remote looks different, please verify compatibility with the seller before purchase.
Ask a question about this manual
Ask about setup, troubleshooting, compatibility, parts, safety, or missing instructions. Manuals+ will review the question and use this page’s manual context to help answer it.