Important Safety Instructions
Please read all instructions carefully before using your new air fryer. Keep this manual for future reference.
- Do not immerse the appliance, cord, or plug in water or other liquids.
- Ensure the voltage indicated on the appliance corresponds to your local mains voltage before connecting.
- Always unplug the appliance when not in use and before cleaning. Allow it to cool down completely before handling.
- Do not operate any appliance with a damaged cord or plug, or after the appliance malfunctions or has been damaged in any manner.
- Keep the appliance and its cord out of reach of children.
- Do not place the appliance against a wall or against other appliances. Leave at least 10 cm free space on the back and sides and 10 cm free space above the appliance.
- Do not cover the air inlet and air outlet openings while the appliance is operating.
- Do not fill the basket with oil, as this may cause a fire hazard.
- The appliance operates at high temperatures. Be careful when removing the basket or handling hot surfaces.
Product Overview
The Generic 6L 1800W Digital Air Fryer is designed for healthy cooking with minimal oil. It features a digital display for precise temperature and time control, and a non-stick basket for easy cleaning.
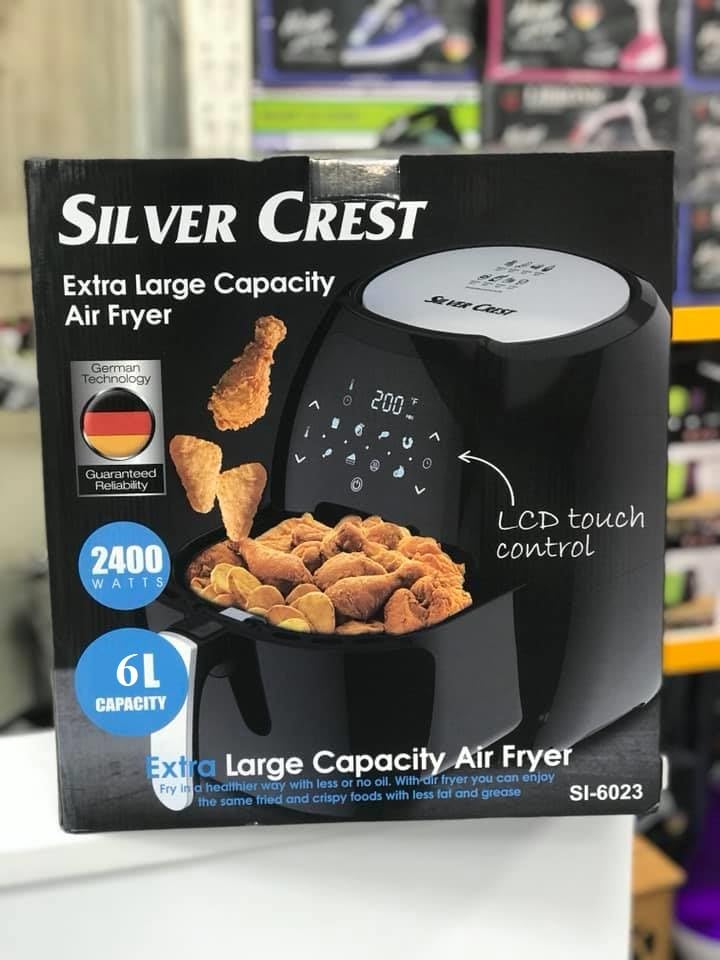
Image: Front view of the Generic 6L 1800W Digital Air Fryer, showcasing its sleek black design and digital control panel.
Components:
- Main Unit with Digital Display
- Removable Non-Stick Frying Basket
- Air Inlet and Outlet Vents
- Power Cord
Initial Setup
Follow these steps before using your air fryer for the first time:
- Unpack: Remove all packaging materials and stickers from the appliance.
- Clean: Wipe the exterior of the appliance with a damp cloth. Wash the frying basket and pan thoroughly with hot water, dish soap, and a non-abrasive sponge. Rinse and dry completely.
- Placement: Place the air fryer on a stable, horizontal, and heat-resistant surface. Ensure there is adequate air circulation around the unit.
- First Use (Burn-in): It is recommended to run the air fryer empty for about 10-15 minutes at 180°C (350°F) to eliminate any manufacturing odors. A slight smell or smoke may occur, which is normal. Ensure good ventilation during this process.
Operating Your Air Fryer
Control Panel:
The digital display allows you to set and monitor cooking time and temperature. It typically includes buttons for power, temperature adjustment, time adjustment, and pre-set cooking programs.
- Power Button: Turns the appliance on/off.
- Temperature Control: Adjusts cooking temperature (e.g., 80°C - 200°C).
- Time Control: Adjusts cooking time (e.g., 1 - 60 minutes).
- Pre-set Programs: Some models include pre-programmed settings for common foods.
Cooking Process:
- Prepare Food: Place your ingredients in the air fryer basket. Do not overfill the basket to ensure even cooking.
- Insert Basket: Slide the basket back into the air fryer until it clicks into place.
- Set Temperature and Time: Use the digital controls to set the desired cooking temperature and time. Refer to a recipe or the general cooking guide below.
- Start Cooking: Press the power/start button to begin the cooking cycle.
- Shake/Flip (Optional): For some foods, shaking or flipping ingredients halfway through cooking can ensure even browning. Carefully remove the basket, shake, and reinsert.
- Check Doneness: Once the timer sounds, carefully pull out the basket and check if the food is cooked to your preference.
- Serve: Remove the food from the basket using tongs. Be cautious of hot oil or juices.
General Cooking Guide:
| Food Item | Temperature | Time | Notes |
|---|---|---|---|
| Frozen Fries (thin) | 200°C (390°F) | 15-20 min | Shake halfway |
| Chicken Wings | 180°C (350°F) | 20-25 min | Flip halfway |
| Vegetables (mixed) | 180°C (350°F) | 10-15 min | Toss with a little oil |
| Fish Fillet | 160°C (320°F) | 10-12 min |
Note: Cooking times and temperatures are approximate and may vary based on food quantity, size, and desired crispness. Always ensure food is cooked thoroughly.
Care and Maintenance
Proper cleaning and maintenance will extend the life of your air fryer.
- Unplug and Cool: Always unplug the air fryer and allow it to cool completely before cleaning.
- Clean Basket and Pan: Wash the non-stick frying basket and pan with hot water, dish soap, and a non-abrasive sponge. For stubborn food residue, soak them in hot water for about 10 minutes. They may be dishwasher safe (check product specifications if available).
- Clean Interior: Wipe the interior of the appliance with a damp cloth. Do not use abrasive cleaners or steel wool.
- Clean Exterior: Wipe the exterior with a damp cloth.
- Storage: Ensure all parts are clean and dry before storing the air fryer in a cool, dry place.
Troubleshooting Guide
If you encounter issues with your air fryer, consult this guide before contacting support.
| Problem | Possible Cause | Solution |
|---|---|---|
| Air fryer does not turn on | Not plugged in; Power outlet malfunction; Appliance fault | Ensure plug is securely in outlet; Test outlet with another appliance; Contact customer support if issue persists. |
| Food is not cooked evenly | Basket overcrowded; Food not shaken/flipped | Cook in smaller batches; Shake or flip food halfway through cooking. |
| White smoke coming from appliance | Grease residue from previous use; Fatty ingredients | Clean the basket and pan thoroughly; Remove excess oil from food before air frying. |
| Food is not crispy | Too much moisture; Not enough oil (for some foods) | Pat food dry before cooking; Lightly brush or spray with oil for crispier results. |
Technical Specifications
- Brand: Generic
- Model: 6L 1800W Digital Air Fryer
- Capacity: 6 Liters
- Power: 1800 Watts
- Material: Stainless Steel
- Color: Black
- Dimensions (D x W x H): 30 x 25 x 30 cm
- Weight: 2 Kilograms
- Special Features: Temperature Control, Digital Display, Non-stick Basket
Warranty and Customer Support
This Generic Air Fryer comes with a standard manufacturer's warranty against defects in materials and workmanship under normal household use. Please refer to the warranty card included with your purchase for specific terms and conditions, including the warranty period and coverage details.
For technical assistance, troubleshooting beyond this manual, or warranty claims, please contact the retailer or the manufacturer's customer support. Keep your proof of purchase for warranty validation.
Customer Support Contact: Please refer to the contact information provided in your product packaging or on the retailer's website.


