1. Introduction
This manual provides essential information for the safe and efficient operation of your VEVOR 5-in-1 Heat Press Machine. Please read all instructions carefully before use to ensure proper setup, operation, and maintenance. Retain this manual for future reference.

Figure 1.1: VEVOR 5-in-1 Heat Press Machine with included attachments.
2. Safety Instructions
Always observe the following safety precautions to prevent injury or damage to the machine:
- Electrical Safety: Ensure the machine is connected to a grounded power outlet with the correct voltage. Do not operate with wet hands or in damp conditions. Disconnect power before cleaning or maintenance.
- High Temperature: The heating elements reach very high temperatures. Avoid direct contact with hot surfaces. Use heat-resistant gloves when handling materials near the heating plate.
- Pinch Points: Keep hands and fingers clear of moving parts, especially when lowering the heat platen.
- Ventilation: Operate the machine in a well-ventilated area to dissipate any fumes from materials being pressed.
- Stability: Place the machine on a stable, heat-resistant surface.
- Children and Pets: Keep children and pets away from the machine during operation and when cooling down.
- Emergency Stop: Familiarize yourself with the power switch location for quick shutdown in an emergency.
3. Package Contents
Verify that all components are present upon unpacking:
- Main Heat Press Unit (15x15 inch platen)
- Hat Press Attachment (6x3 inch)
- Tumbler Press Attachment (30 oz)
- Plate Press Attachments (8 inch and 10 inch)
- Power Cord
- User Manual
4. Product Overview and Components
The VEVOR 5-in-1 Heat Press Machine is designed for versatile heat transfer applications. Key components include:
- Main Heat Platen: The primary heating surface for flat items.
- Bottom Platen: The silicone pad where items are placed.
- Control Panel: Digital display for temperature and time settings.
- Pressure Adjustment Knob: Located at the top, used to adjust pressure.
- Operating Handle: For lowering and raising the heat platen.
- Swing-Away Arm: Allows the heat platen to rotate 360 degrees for safe item placement.
- Slide-Out Drawer: Provides additional space for easier and safer material placement.
- Interchangeable Attachments: Hat, tumbler, and plate presses.

Figure 4.1: Key features of the heat press machine.

Figure 4.2: Overview of the machine's multi-functional capabilities.
5. Setup
- Unpack: Carefully remove all components from the packaging.
- Placement: Position the main unit on a sturdy, level, and heat-resistant surface. Ensure adequate clearance around the machine for ventilation and operation.
- Attach Components: Depending on your project, attach the desired press (T-shirt, hat, tumbler, or plate) to the main unit. Follow the specific instructions for each attachment to ensure it is securely fastened.
- Power Connection: Plug the power cord into the machine and then into a grounded electrical outlet.
- Initial Check: Before first use, ensure the thermocouple (temperature sensor wire) is securely plugged into the control panel. Some units may require this to be connected during setup.
6. Operating Instructions
6.1 General Operation
- Power On: Flip the main power switch (usually located on the side or back of the control panel). The digital display will illuminate.
- Set Temperature: Press the 'SET' button. Use the '+' and '-' buttons to adjust the desired temperature. Press 'SET' again to confirm. The machine will begin heating.
- Set Time: After setting the temperature, press 'SET' again to enter time setting mode. Use '+' and '-' to adjust the desired pressing time in seconds. Press 'SET' to confirm.
- Temperature Unit: To switch between Celsius (℃) and Fahrenheit (°F), press the '+/-' button on the control panel.
- Pre-heat: Allow the machine to reach the set temperature. The 'WORK' indicator will typically turn off or change color when the target temperature is reached.
6.2 T-Shirt and Flat Item Pressing
- Prepare Item: Place your T-shirt or flat item on the silicone pad of the bottom platen. Ensure it is smooth and free of wrinkles.
- Position Design: Place your transfer design onto the item.
- Adjust Pressure: Use the pressure adjustment knob to set the appropriate pressure. For most flat items, medium to firm pressure is required. Test on a scrap piece if unsure.
- Swing Away/Slide Out: Utilize the 360° swing-away arm or the slide-out drawer to safely position your item without contact with the hot platen.
- Press: Swing the heat platen back over the item or slide the drawer in. Lower the operating handle firmly until it locks into place. The timer will start automatically.
- Release: Once the timer alarms, raise the operating handle and swing the heat platen away or slide the drawer out. Carefully remove your item.
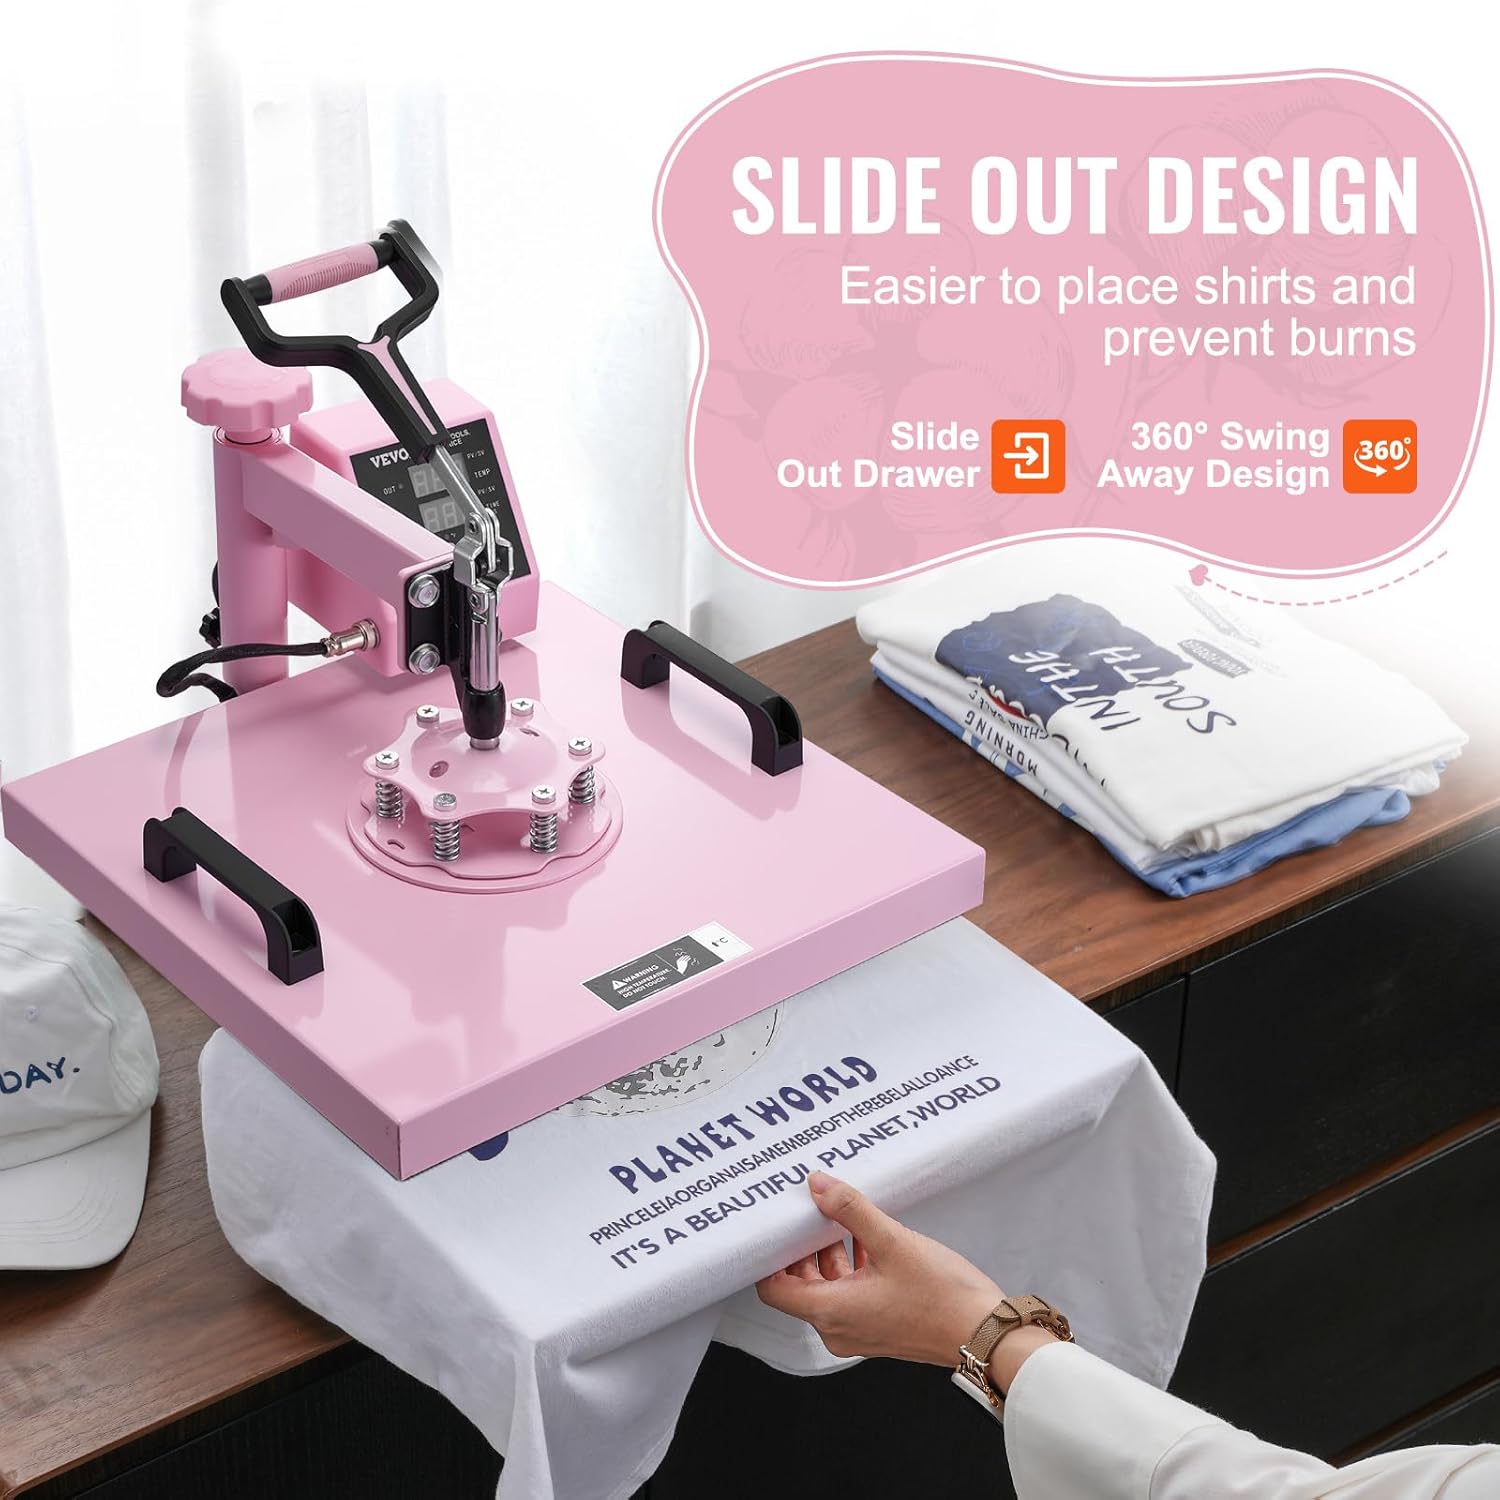
Figure 6.1: Using the slide-out design for T-shirt pressing.
6.3 Hat Pressing
- Attach Hat Press: Securely attach the hat press attachment to the main unit.
- Prepare Hat: Place the hat onto the curved platen, ensuring it fits snugly.
- Position Design: Place your transfer design onto the hat.
- Adjust Pressure: Adjust the pressure knob to achieve firm contact between the heating element and the hat.
- Press: Lower the heating element onto the hat. The timer will start.
- Release: After the timer, raise the heating element and carefully remove the hat.

Figure 6.2: Hat press attachment in use.
6.4 Tumbler/Mug Pressing
- Attach Tumbler Press: Securely attach the 30 oz tumbler press attachment.
- Prepare Tumbler/Mug: Wrap your transfer design around the tumbler or mug. Secure with heat-resistant tape.
- Insert Item: Carefully insert the tumbler or mug into the heating element of the tumbler press.
- Adjust Pressure: Adjust the pressure mechanism on the tumbler press to ensure firm, even contact around the entire surface of the item.
- Press: Close the tumbler press. The timer will start.
- Rotate (Optional): For optimal results, especially with larger tumblers, you may rotate the item halfway through the pressing time and press again.
- Release: After the timer, open the press and carefully remove the hot tumbler/mug using heat-resistant gloves.

Figure 6.3: 30 oz tumbler press attachment.
6.5 Plate Pressing
- Attach Plate Press: Securely attach the appropriate size plate press (8-inch or 10-inch) to the main unit.
- Prepare Plate: Place your plate onto the silicone pad of the plate press.
- Position Design: Place your transfer design onto the plate.
- Adjust Pressure: Adjust the pressure knob to ensure firm contact with the plate.
- Press: Lower the heating element onto the plate. The timer will start.
- Release: After the timer, raise the heating element and carefully remove the hot plate using heat-resistant gloves.

Figure 6.4: Plate press attachments are included (shown in the bottom left of the image).
7. Maintenance
- Cleaning: Allow the machine to cool completely before cleaning. Wipe down exterior surfaces with a damp cloth. For the heat platen, use a non-abrasive cleaner specifically designed for heat press platens. Do not use harsh chemicals or abrasive pads.
- Storage: Store the machine in a dry, dust-free environment.
- Inspection: Regularly inspect the power cord for any damage. Check all attachments and connections for security.
8. Troubleshooting
| Problem | Possible Cause | Solution |
|---|---|---|
| Machine does not power on. | Power cord unplugged, power switch off, faulty outlet. | Check power connections, ensure switch is on, test outlet with another device. |
| Uneven heat distribution. | Faulty heating element, incorrect pressure. | Ensure even pressure across the platen. Contact support if problem persists. |
| Temperature drops during pressing. | Thermocouple not properly connected, machine malfunction. | Verify thermocouple connection. Allow machine to recover temperature between presses. |
| Timer not working. | Incorrect setting, internal fault. | Ensure timer is set correctly. If issue persists, contact support. |
| Insufficient pressure for tumblers. | Tumbler press not adjusted correctly, incompatible tumbler size. | Adjust the tumbler press mechanism for tighter fit. Ensure tumbler diameter is within specified range (2.6-3.4 inches). |
| Wire issues when switching attachments. | Loose connection, wear and tear. | Ensure all wires are securely connected. Handle attachments carefully during changes. |
9. Specifications
| Feature | Detail |
|---|---|
| Model Number | HJ21A |
| Heat Plate Size | 15 x 15 inches (380 x 380 mm) |
| Tumbler Press Capacity | 30 oz (suitable for 2.6-3.4 inch diameter items) |
| Hat Press Size | 6 x 3 inches |
| Plate Press Sizes | 8 inch, 10 inch |
| Temperature Range | 32-480°F / 0-250°C |
| Time Range | 0-999 seconds |
| Power | 1400W (US) / 1250W (AU/EU) |
| Material | Aluminum, Metal, Silicone |
| Product Dimensions (LxWxH) | 19.3 x 15.4 x 18.1 inches (490 x 390 x 460 mm) |
| Item Weight | 31 pounds (17.5 kg) |
| Color | Pink |
Figure 9.1: Product dimensions and key specifications.
10. Warranty and Support
The VEVOR 5-in-1 Heat Press Machine comes with a 2-year manufacturer's warranty. For technical support, warranty claims, or any operational questions not covered in this manual, please contact VEVOR customer service through their official website or the retailer where the product was purchased.
Please have your model number (HJ21A) and purchase information ready when contacting support.


