1. Introduction
Thank you for choosing the SKP Pro Audio Q1 PRO Portable Active Loudspeaker. This manual provides essential information for the safe and efficient operation of your device. Please read it thoroughly before use and retain it for future reference.
The Q1 PRO is a versatile portable active loudspeaker designed for various applications, featuring a powerful 900W output, Bluetooth connectivity, a rechargeable battery, and multiple input options including XLR and AUX. Its robust design and intuitive controls make it suitable for both indoor and outdoor use.

Image 1.1: The SKP Pro Audio Q1 PRO Portable Active Loudspeaker, showcasing its sleek design.
2. Safety Instructions
Please observe the following safety precautions to prevent damage to the device or injury to yourself:
- Do not expose the unit to rain or moisture to avoid fire or electric shock.
- Do not open the casing. There are no user-serviceable parts inside. Refer all servicing to qualified personnel.
- Ensure the power supply voltage matches the requirements specified on the unit.
- Protect the power cord from being walked on or pinched, particularly at plugs, convenience receptacles, and the point where they exit from the apparatus.
- Unplug the unit during lightning storms or when unused for long periods.
- Avoid placing the unit near heat sources such as radiators, heat registers, stoves, or other apparatus (including amplifiers) that produce heat.
- Use only attachments/accessories specified by the manufacturer.
- Do not block any ventilation openings. Install in accordance with the manufacturer's instructions.
3. Package Contents
Verify that all items are present in your package:
- SKP Pro Audio Q1 PRO Portable Active Loudspeaker
- Power Cable
- User Manual (this document)
4. Product Overview: Controls and Features
Familiarize yourself with the various controls and features of your Q1 PRO loudspeaker.
4.1 Rear Panel Controls
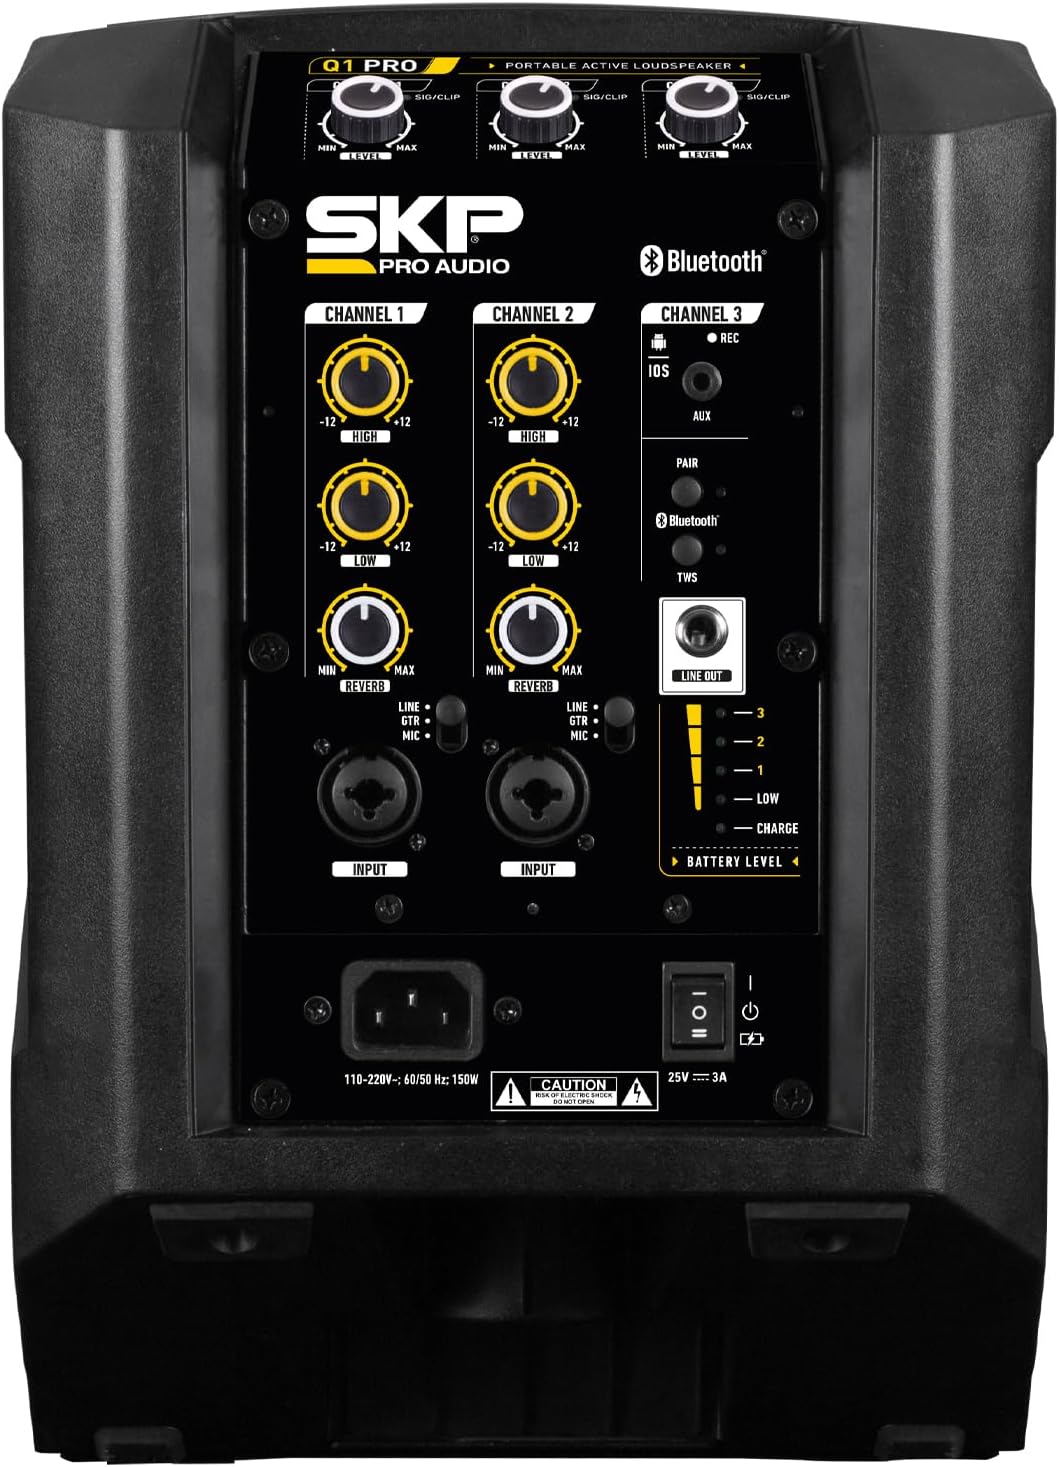
Image 4.1: Detailed view of the Q1 PRO rear control panel.
- CHANNEL 1 & 2 Inputs: XLR/TRS combo jacks for microphones or line-level instruments. Each channel includes:
- LEVEL Knob: Adjusts the input volume for the respective channel.
- HIGH Knob: Adjusts the treble frequencies (EQ).
- LOW Knob: Adjusts the bass frequencies (EQ).
- REVERB Knob: Controls the amount of reverb effect applied to the channel.
- CHANNEL 3 (Bluetooth/AUX/REC):
- AUX Input: 3.5mm stereo jack for connecting external audio devices.
- Bluetooth Pairing Button: Initiates Bluetooth pairing mode.
- REC Output: For recording the mixed audio output.
- MASTER LEVEL Knob: Controls the overall output volume of the loudspeaker.
- BATTERY LEVEL Indicator: Displays the current charge level of the internal battery.
- POWER Switch: Turns the unit ON or OFF.
- AC Input: For connecting the power cable to an electrical outlet.

Image 4.2: Key features of the Q1 PRO, including 3-channel input, reverb, EQ, and built-in battery.
4.2 Top Panel Controls (Touch Screen)

Image 4.3: The Q1 PRO features touch screen controls for various modes.
The top panel features touch-sensitive buttons to select the loudspeaker's operational mode, optimizing sound dispersion for different placements:
- FLOOR Mode: Optimizes sound for when the loudspeaker is placed on the floor, angled upwards.
- MONITOR Mode: Optimizes sound for use as a stage monitor, typically angled towards the performer.
- POLE Mode: Optimizes sound for when the loudspeaker is mounted on a pole stand, projecting sound outwards.
4.3 Internal Components

Image 4.4: Diagram showing the internal speaker components of the Q1 PRO.
- 6.5" Woofer: Provides robust low-frequency reproduction.
- 2.2" Neodymium Tweeter: Delivers clear and crisp high-frequency sound.
5. Setup
Follow these steps to set up your Q1 PRO loudspeaker.
5.1 Power Connection
- Ensure the Q1 PRO's power switch is in the OFF position.
- Connect the supplied power cable to the AC input on the rear panel of the loudspeaker.
- Plug the other end of the power cable into a suitable electrical outlet.
- The internal battery will begin charging automatically.
5.2 Placement Options
The Q1 PRO offers flexible placement options to optimize sound projection for different scenarios. Select the appropriate mode using the touch controls on the top panel.

Image 5.1: Floor Mode (90°H x 40°V)
For placement directly on the floor, angled upwards towards the audience or performer. Select 'FLOOR' on the top panel.

Image 5.2: Pole Mode (90°H x 40°V)
For mounting on a standard speaker pole stand. This projects sound broadly across a horizontal plane. Select 'POLE' on the top panel.

Image 5.3: Monitor Mode (40°H x 90°V)
For use as a stage monitor, typically placed on its side and angled towards the performer. Select 'MONITOR' on the top panel.
6. Operating Instructions
6.1 Powering On/Off
- Ensure all volume knobs (CHANNEL 1, 2, 3, and MASTER) are set to their minimum position before powering on.
- Flip the POWER switch on the rear panel to the ON position.
- To power off, set all volume knobs to minimum, then flip the POWER switch to OFF.
6.2 Connecting Audio Sources
6.2.1 Microphones/Instruments (Channels 1 & 2)
- Connect your microphone or instrument to the XLR/TRS combo jack of CHANNEL 1 or CHANNEL 2.
- Slowly increase the LEVEL knob for the connected channel until the desired volume is reached.
- Adjust the HIGH and LOW EQ knobs to shape the tone.
- Use the REVERB knob to add a reverb effect if desired.
6.2.2 AUX Input (Channel 3)
- Connect your external audio device (e.g., smartphone, MP3 player) to the 3.5mm AUX input on CHANNEL 3.
- Ensure the volume on your external device is at a moderate level.
- Adjust the LEVEL knob for CHANNEL 3 to control the volume.
6.2.3 Bluetooth Pairing (Channel 3)
- Turn on the Q1 PRO.
- Press the Bluetooth PAIR button on CHANNEL 3. The Bluetooth indicator light will flash, indicating it is in pairing mode.
- On your Bluetooth-enabled device, search for available devices and select "SKP Q1 PRO" (or similar).
- Once paired, the Bluetooth indicator light will become solid.
- Play audio from your device and adjust the LEVEL knob for CHANNEL 3 on the Q1 PRO.
6.3 Adjusting Master Volume
After setting individual channel levels, use the MASTER LEVEL knob to control the overall output volume of the loudspeaker.
7. Maintenance
Proper maintenance ensures the longevity and optimal performance of your Q1 PRO loudspeaker.
- Cleaning: Use a soft, dry cloth to clean the exterior of the unit. Do not use abrasive cleaners, waxes, or solvents.
- Battery Care: For optimal battery life, avoid fully discharging the battery frequently. If storing the unit for an extended period, ensure the battery is charged to approximately 50-70% and recharge it every few months.
- Storage: Store the loudspeaker in a cool, dry place away from direct sunlight and extreme temperatures.
- Ventilation: Ensure ventilation openings are clear of dust and debris to prevent overheating.
8. Troubleshooting
If you encounter issues with your Q1 PRO, refer to the following common problems and solutions:
| Problem | Possible Cause | Solution |
|---|---|---|
| No sound output |
|
|
| Bluetooth not connecting |
|
|
| Battery not charging |
|
|
If the problem persists after trying these solutions, please contact SKP Pro Audio customer support.
9. Specifications
Technical specifications for the SKP Pro Audio Q1 PRO Portable Active Loudspeaker:
- Model Name: Q1 PRO
- Speaker Type: Built-In, Active Loudspeaker
- Mounting Type: Speaker (Floor, Pole, Monitor)
- Speaker Maximum Output Power: 300 Watts (RMS), 900 Watts (Peak)
- Frequency Response: 50.19 Hz
- Wireless Communication Technology: Bluetooth
- Connectivity Technology: Bluetooth, XLR, AUX
- Audio Output Mode: Stereo
- Special Feature: Built-In Microphone (implied by reverb control for mic channels), Rechargeable Battery
- Recommended Uses: Indoor/Outdoor
- Product Dimensions: 14"D x 13"W x 16"H
- Unit Count: 320.0 Ounce (approx. 20 lbs)
- Manufacturer: SKP PRO AUDIO
- ASIN: B0DLQ8QJXP
- Date First Available: November 1, 2024
10. Warranty and Support
For warranty information, please refer to the documentation provided at the time of purchase or contact your retailer. SKP Pro Audio products typically come with a limited warranty covering manufacturing defects.
For technical support, troubleshooting assistance, or service inquiries, please visit the official SKP Pro Audio website or contact their customer service department. You can also visit the SKP Pro Audio Store on Amazon for more information.


