MINDKEEP F07 UH-1D
YUXIANG F07 UH-1D RC Helicopter User Manual
Model: F07 UH-1D
1. Introduction
This manual provides essential information for the safe operation, setup, and maintenance of your YUXIANG F07 UH-1D RC Helicopter. Please read this manual thoroughly before operating the aircraft to ensure proper function and to prevent damage or injury. This model is a scaled-down replica of the Bell UH-1 Huey helicopter, designed for hobbyists and collectors, featuring advanced stabilization and control systems.

Figure 1: YUXIANG F07 UH-1D RC Helicopter and Remote Control.
2. Safety Information
- Always operate the helicopter in an open area, away from people, animals, and obstacles.
- Do not fly near power lines, buildings, or busy roads.
- Ensure the battery is fully charged before each flight.
- Never touch the rotating blades during operation.
- Keep the helicopter and remote control away from water and moisture.
- Adult supervision is recommended for users under 15 years of age.
- Disconnect the battery from the helicopter when not in use.
- Use only original or approved replacement parts.
3. Package Contents
Verify that all items are present in the package:
- YUXIANG F07 UH-1D RC Helicopter (1)
- Remote Control (1)
- LI-POLY 7.4V 1200MAH 25C Battery (1)
- Special USB Charger (1)
- Main Blades (4)
- Tail Blade (1)
- User Manual (1)
4. Components Overview
4.1 Helicopter Components
The F07 UH-1D helicopter features a flybar-less design with a high-efficiency brushless main motor (2511 1200KV) and a 1204 brushless tail motor for stable and precise flight. It incorporates optical flow positioning and a barometer for altitude hold.

Figure 2: Key features and technologies of the F07 UH-1D helicopter.
4.2 Remote Control Description
The remote control operates on a 2.4G frequency, allowing for multiple units to be used simultaneously without interference. It features various controls for precise flight maneuvers and includes bi-directional feedback for low battery alerts.
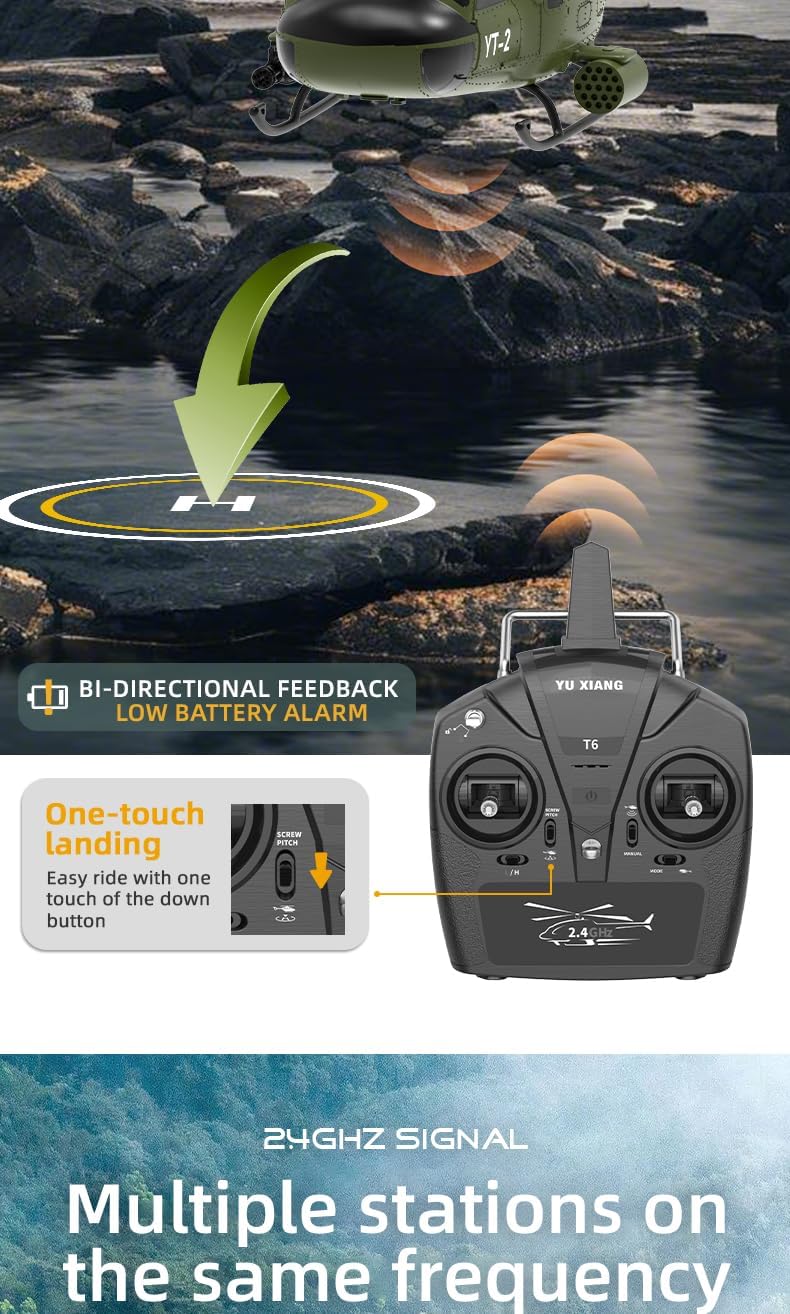
Figure 3: Remote control with bi-directional feedback and low battery alarm.
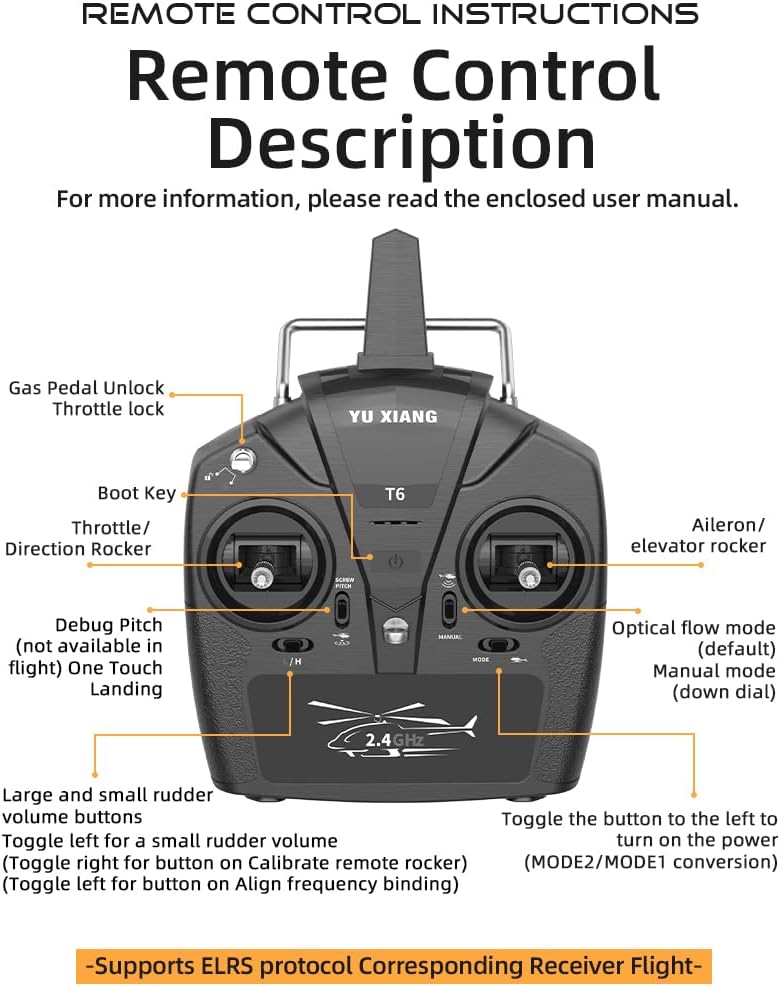
Figure 4: Illustration of helicopter flight controls and directions.

Figure 5: Detailed remote control layout and functions.
5. Setup
5.1 Battery Charging
The helicopter uses a LI-POLY 7.4V 1200MAH 25C battery. Use the provided Special USB Charger only. Connect the battery to the charger, then plug the charger into a USB power source. The charging time is approximately 60 minutes. The charger indicator light will change when charging is complete.
5.2 Helicopter Battery Installation
Carefully insert the charged battery into the helicopter's battery compartment. Ensure the battery is securely seated and the connector is properly plugged in. Do not force the connection.
5.3 Remote Control Battery Installation
Open the battery compartment on the back of the remote control. Insert the required batteries (not included, typically AA batteries) according to the polarity markings. Close the compartment securely.
5.4 Binding Procedure (Pairing Helicopter and Remote Control)
- Ensure both the helicopter and remote control are powered off.
- Place the helicopter on a flat, stable surface.
- Power on the helicopter. The indicator light will flash.
- Power on the remote control.
- Move the throttle stick (left stick) all the way up, then all the way down.
- The indicator light on the helicopter will become solid, indicating successful binding.
- If binding fails, repeat the steps.
6. Operating Instructions
6.1 Pre-Flight Check
- Check battery levels of both helicopter and remote control.
- Inspect blades for any damage.
- Ensure the flight area is clear of obstacles and people.
6.2 Basic Flight Controls
Familiarize yourself with the remote control sticks and their functions:
- Left Stick (Throttle/Direction Rocker):
- Up/Down: Controls altitude (throttle).
- Left/Right: Controls yaw (rotation around vertical axis).
- Right Stick (Aileron/Elevator Rocker):
- Up/Down: Controls pitch (forward/backward movement).
- Left/Right: Controls roll (sideways movement).
Figure 6: Visual guide to flight controls.
6.3 Take-off and Landing
- Take-off: Place the helicopter on a flat surface. Slowly push the left stick (throttle) upwards. The helicopter will ascend.
- One-Touch Landing: The remote control features a dedicated "One Touch Landing" button. Press this button to initiate an automatic, controlled descent and landing.

Figure 7: One-touch landing feature.
6.4 Advanced Flight Features
- 6-Axis Gyro Stabilization: The integrated 6-axis gyroscope provides stable, fast, and precise flight attitude, making it easier for beginners to control.
- Optical Flow Positioning & Barometer Altitude Hold: These features contribute to stable hovering and precise altitude control, especially useful for indoor flight or in calm outdoor conditions.
- One-Key Inverted Flight: This function allows the helicopter to perform an inverted flight. After activation, the control directions remain intuitive (e.g., pushing forward on the stick still moves the helicopter forward, even when inverted). Practice this feature outdoors in an open field with no or light wind.

Figure 8: One-key inverted flight mode and related controls.
Figure 9: Self-stabilization for stable flight.
6.5 Flight Environment
For optimal performance and safety, operate the helicopter in a spacious, open environment. Avoid flying in strong winds, rain, or near obstacles such as trees, buildings, or power lines. The 2.4G signal allows multiple helicopters to fly in the same area without interference.

Figure 10: Multiple helicopters can operate simultaneously without interference.
7. Maintenance
- Cleaning: Use a soft, dry cloth to clean the helicopter and remote control after each use. Do not use water or chemical cleaners.
- Storage: Store the helicopter and remote control in a cool, dry place, away from direct sunlight and extreme temperatures. Remove batteries from the remote control if storing for extended periods.
- Blade Inspection: Regularly check the main and tail blades for any cracks, bends, or damage. Replace damaged blades immediately to ensure safe flight. Spare blades are included in the package.
- Motor Care: The helicopter is equipped with brushless motors (2511 main, 1204 tail) which require minimal maintenance. Keep them free from dust and debris.

Figure 11: Brushless motor for efficient and stable flight.
8. Troubleshooting
| Problem | Possible Cause | Solution |
|---|---|---|
| Helicopter does not respond to remote control. | Not bound, low battery in helicopter or remote, remote control off. | Perform binding procedure, charge helicopter battery, replace remote control batteries, ensure both are powered on. |
| Helicopter flies erratically or is unstable. | Damaged blades, strong wind, gyroscope calibration needed. | Inspect and replace damaged blades, fly in calm conditions, recalibrate gyroscope (refer to remote control manual for specific steps). |
| Short flight time. | Battery not fully charged, aging battery. | Ensure battery is fully charged (60 minutes), consider replacing battery if performance degrades significantly. |
| Helicopter does not take off. | Throttle not advanced enough, low battery, blades obstructed. | Push throttle stick up fully, charge battery, clear any obstructions from blades. |
9. Specifications
| Feature | Detail |
|---|---|
| Blade Diameter | 375mm |
| Body Length | 385mm |
| Height | 120mm |
| Main Motor | 2511 Brushless Motor |
| Tail Motor | 1204 Brushless Motor |
| Battery Model | LI-POLY 7.4V 1200MAH 25C |
| Frequency | 2.4G |
| Remote Control Distance | 120 meters |
| Flying Weight | 295g |
| Battery Usage Time | 10-12 minutes |
| Charging Time | 60 minutes |
| Charger | USB |
| Gyroscope | 6-Axis Gyro |
| Positioning | Optical Flow Positioning, Barometer Altitude Hold |
| Recommended Age | 15 years and up |
10. Warranty and Support
For warranty information and technical support, please refer to the contact details provided by your retailer or visit the official MINDKEEP website. Keep your purchase receipt as proof of purchase for any warranty claims.
Manufacturer: MINDKEEP
Model Number: 055018442VK