1. Safety Information
Always follow the assembly instructions carefully to ensure stability. Be aware of potential pinch points during assembly, and handle slats with care. This bed frame is designed for a maximum weight capacity of 900 pounds, and exceeding this weight capacity could result in damage or injury. Always use caution when using this product, and consult the manufacturer for any additional safety information.
2. Package Contents
Before beginning assembly, ensure all parts are present and undamaged. Refer to the included parts list in your packaging. If any parts are missing or damaged, contact customer support.

Figure 2.1: Product dimensions and individual components of the bed frame.
3. Assembly Instructions
Assembly is required. It is recommended to have two people for assembly. Follow the step-by-step instructions provided in your product packaging. Ensure all connections are secure before use.
3.1 Frame Assembly
- Unpack all components and lay them out on a clean, soft surface to prevent scratches.
- Connect the main frame sections using the provided hardware. Ensure all bolts are tightened securely.
- Attach the headboard and footboard to the assembled frame.
- Install the heavy-duty metal slats. The bolt-free quick-lock assembly system ensures stability and ease of installation. Ensure slats are evenly spaced at 5.8 inches.

Figure 3.1: Illustration of the bolt-free quick-lock assembly for metal slats.
3.2 Headboard and Storage Shelf Installation
- Secure the upholstered headboard panels to the frame.
- Attach the storage shelf to the top of the headboard.

Figure 3.2: Detailed view of the headboard assembly.
3.3 Drawer Assembly
- Assemble the four storage drawers according to the instructions.
- Ensure the wheels are properly attached for smooth operation.
- Slide the assembled drawers under the bed frame.

Figure 3.3: Assembly steps for the storage drawers.
Video 3.1: This video demonstrates the assembly process for the bed frame, including the charging station and drawers. It provides a visual guide to complement the written instructions.
4. Operating Instructions
4.1 LED Lights Operation
The headboard features RGB LED lights. The controller is integrated into the headboard for easy access.
- Power Button: Press to turn the LED lights on or off.
- Scene Modes: Cycle through 12 different scene modes to adjust the lighting ambiance.
- Speed Adjustment: Adjust the speed of dynamic light effects with 3 available levels.
- Brightness Control: Select from 3 brightness modes to suit your preference.

Figure 4.1: The bed frame with its RGB LED lights active, showcasing various color options.

Figure 4.2: The control panel for the LED lights, located on the headboard for convenient access.
4.2 Charging Station Usage
The headboard includes a built-in charging station with 2 USB ports and 1 Type-C port.
- Connect your mobile devices (phone, tablet, etc.) to the available USB or Type-C ports.
- Ensure the bed frame is connected to a power source for the charging station to function.
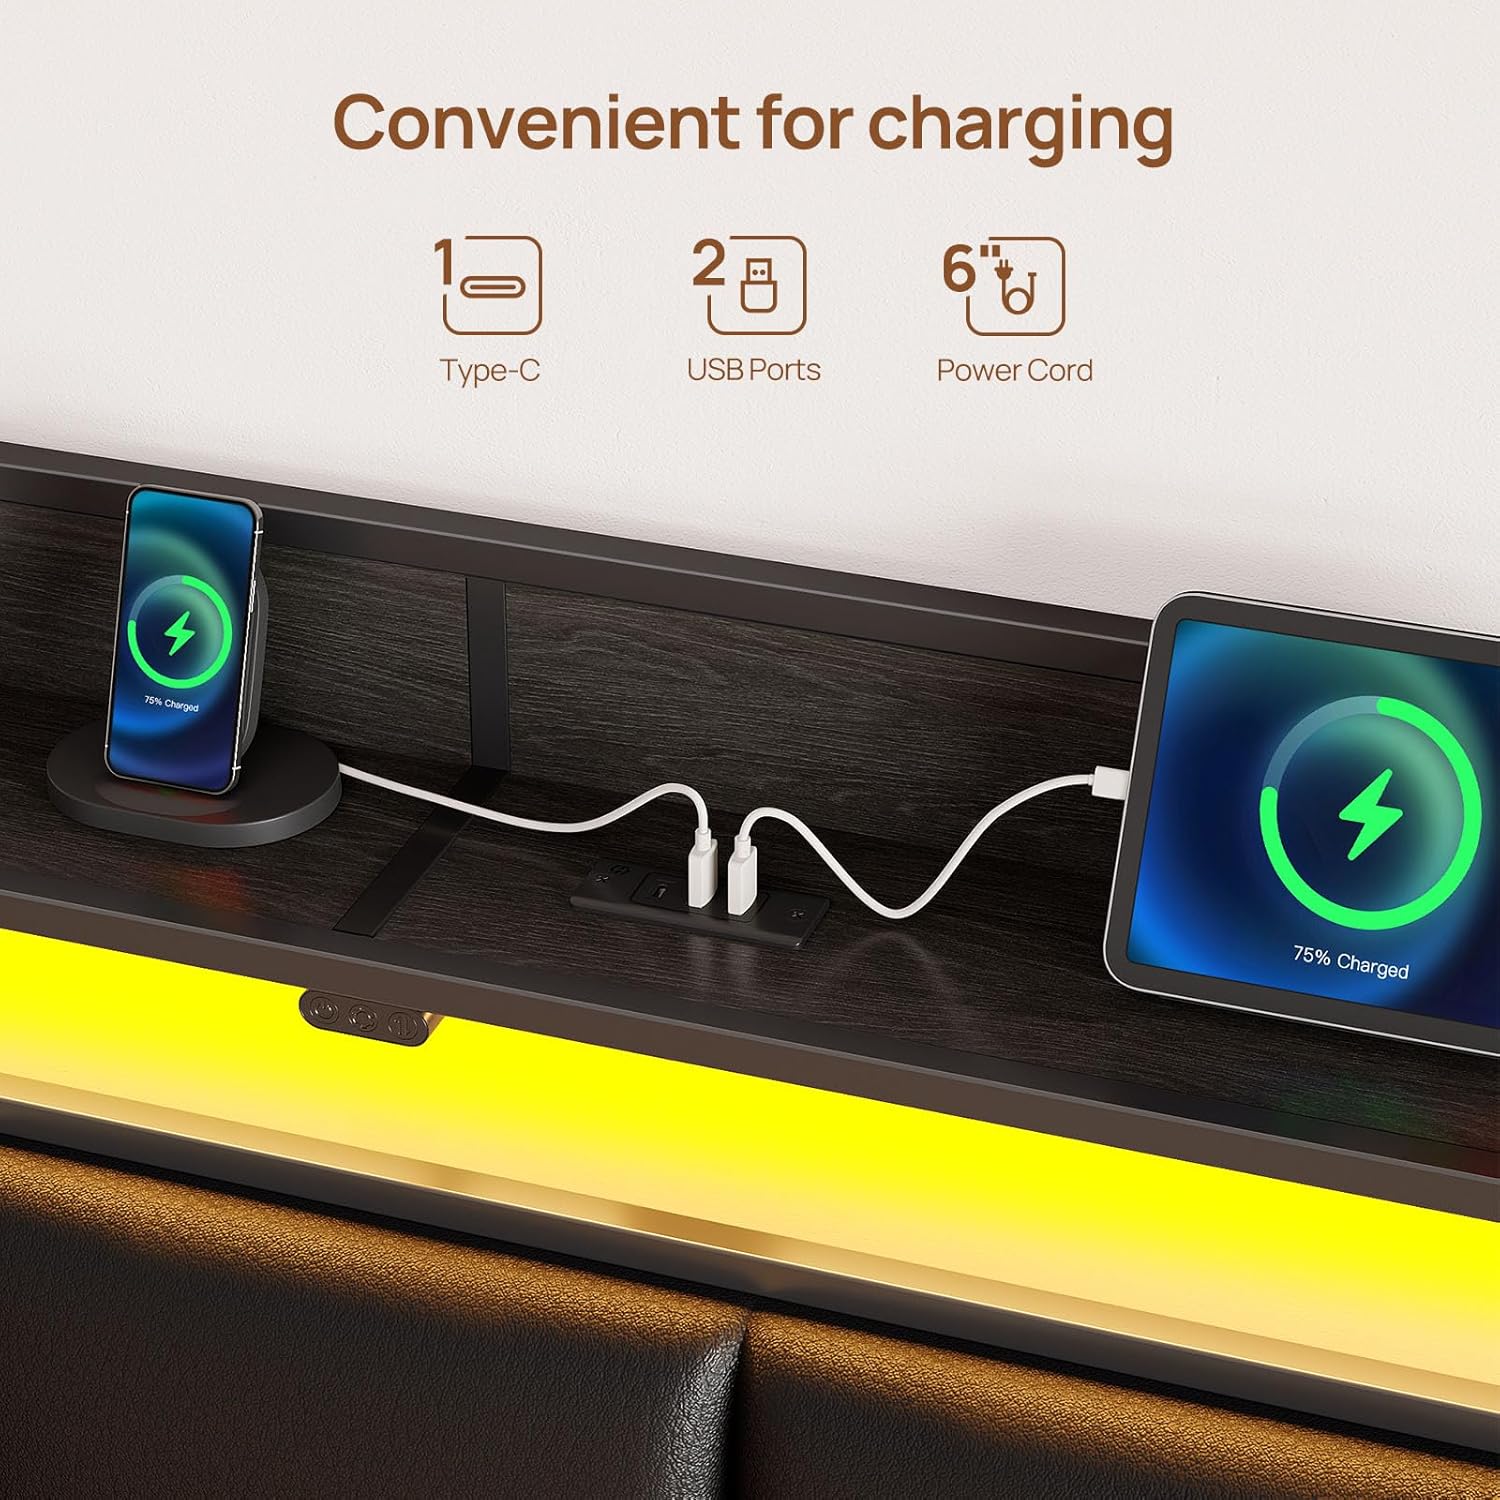
Figure 4.3: The integrated charging station with USB and Type-C ports, shown with devices charging.
Video 4.1: This short video demonstrates the functionality of the charging station and LED lights on the bed frame.
5. Maintenance
5.1 Cleaning
- For general cleaning, wipe the bed frame surfaces with a damp cloth.
- Avoid using harsh chemicals or abrasive cleaners, as these may damage the finish or upholstery.
- For the upholstered headboard, spot clean with a mild fabric cleaner if necessary.
5.2 Structural Integrity
- Periodically check all bolts and connections to ensure they remain tight. Retighten if necessary.
- Inspect the metal slats for any signs of damage or bending. Replace any damaged slats immediately to maintain structural support.
6. Troubleshooting
6.1 LED Lights Not Working
- Ensure the bed frame is properly plugged into a functional power outlet.
- Check the connection of the LED light strip to the control box and power source.
- Verify that the power button on the headboard controller is pressed.
6.2 Charging Station Not Functioning
- Confirm the bed frame is connected to a live power outlet.
- Test with different USB cables and devices to rule out cable or device issues.
- Ensure the charging station's internal connections are secure (if accessible and safe to check).
6.3 Drawers Difficult to Open/Close
- Check for obstructions under the bed or within the drawer mechanism.
- Ensure the drawer wheels are properly installed and not damaged.
- Verify that the mattress is not interfering with the drawer operation. Adjust mattress position if needed.
6.4 Squeaking Noises
- Tighten all bolts and screws on the frame, headboard, and footboard.
- Ensure all metal slats are properly seated and secured in their quick-lock positions.
7. Specifications
| Feature | Detail |
|---|---|
| Size | Twin |
| Material | Metal frame, Synthetic Leather headboard |
| Product Dimensions (L x W x H) | 82.3" x 39.4" x 39.3" |
| Weight Capacity | 900 Pounds |
| Special Features | RGB LED Lights (12 scene modes, 3 speed, 3 brightness), Charging Station (2 USB, 1 Type-C), Upholstered Storage Headboard, 4 Storage Drawers, Heavy Duty Metal Slats, No Box Spring Needed |
| Included Components | Bed Frame, Headboard, 4 Drawers |
| Assembly Required | Yes |
| Care Instructions | Wipe with Damp Cloth |
| Model Number | BF013-BK-T-RR-VC |
| UPC | 810142989824 |
8. Warranty and Support
For warranty information or technical support, please refer to the documentation included with your purchase or contact Rolanstar customer service directly. Keep your purchase receipt for warranty claims.
For further assistance, visit the official Rolanstar website or contact their customer support team.