1. Introduction
The Ortis New 2024! Humidity Sensor Switch is an advanced in-wall control system designed to automate the operation of your bathroom fan or other ventilation systems based on ambient humidity levels. Featuring a separate wireless sensor, it provides accurate and flexible moisture detection to help maintain optimal indoor environments, preventing issues like mildew and odors. This manual provides comprehensive instructions for installation, operation, maintenance, and troubleshooting.
2. Safety Information
Please read all safety warnings and instructions carefully before installing or operating this device. Failure to follow these instructions may result in electric shock, fire, or property damage.
- Always turn off power at the circuit breaker before installation or servicing.
- Installation should be performed by a qualified electrician in accordance with all local and national electrical codes.
- This device is designed for indoor use only. Do not expose to water or extreme temperatures.
- Ensure the product's voltage rating (110/220V) matches your electrical system.
- A neutral wire is required for installation.
3. Package Contents
- Ortis In-Wall Humidity Sensor Switch (Controller)
- Wireless Humidity Sensor
- Wire Nuts
- User Manual
4. Product Overview
The Ortis Humidity Sensor Switch consists of two main components: the in-wall controller and the wireless humidity sensor.
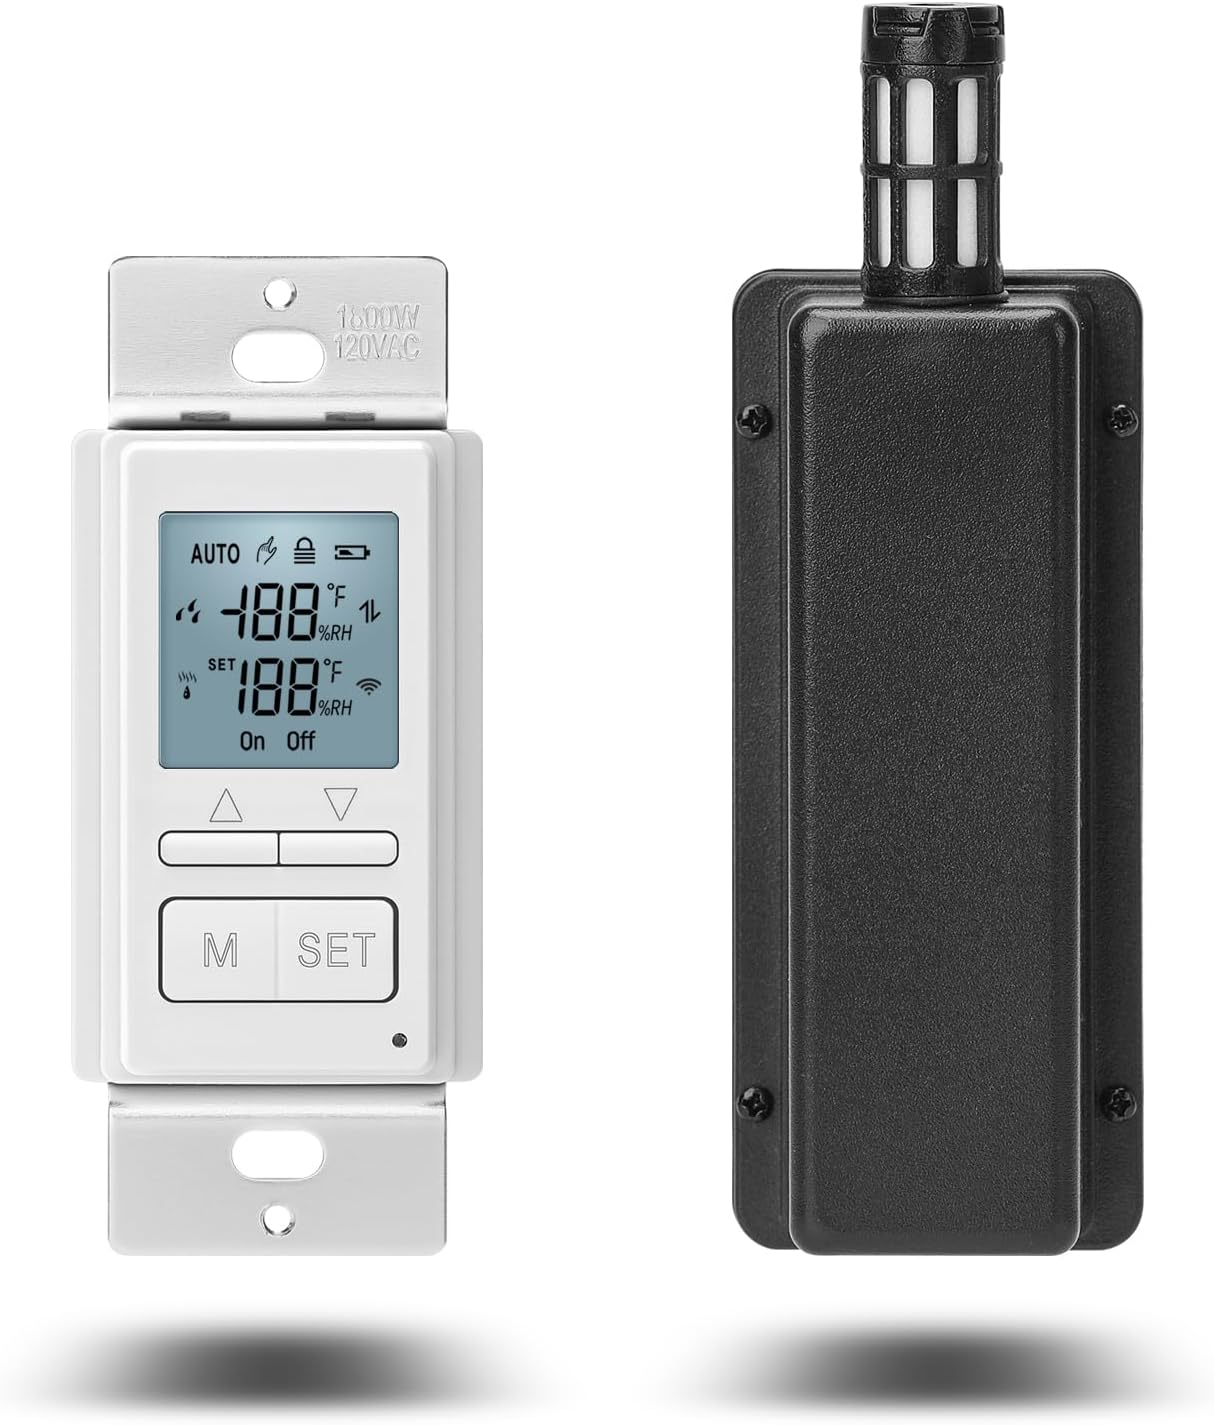
The Ortis Humidity Sensor Switch includes the in-wall controller (left) and the separate wireless humidity sensor (right).

Dimensions of the in-wall controller (4.5 x 2.1 inches) and the wireless sensor (5.6 x 2.1 x 1.5 inches).
4.1 In-Wall Controller
The controller is installed in a standard electrical wall box and features an LCD screen for real-time humidity display and settings adjustment. It has buttons for mode selection (M) and settings (SET), along with up/down arrows for value adjustment.
4.2 Wireless Humidity Sensor
The separate wireless sensor can be placed up to 328 feet away from the controller, allowing for optimal placement to detect moisture accurately. It transmits humidity data to the controller every 5 minutes.
5. Setup
5.1 Wiring Installation
Pre-installation Checklist:
- Ensure power is OFF at the circuit breaker.
- Confirm your electrical system is 110/220V.
- Verify a neutral wire is present in your wall box.
Wiring Steps:
- Turn off power at the circuit breaker.
- Remove the existing switch from the wall box.
- Connect the wires from the Ortis controller to your house wiring using the provided wire nuts according to the diagram below. Ensure all connections are secure.
- Carefully push the wired controller into the wall box and secure it with screws.
- Install the wall plate.
- Turn power back on at the circuit breaker.

Wiring diagram for the Ortis Humidity Sensor Switch. Connect White to White (Neutral), Black to Black (Line), and Blue to Blue (Load for fan). A neutral wire is required.
5.2 Sensor Pairing
The wireless sensor must be paired with the controller for proper operation. If the sensor is not pre-paired, follow these steps:
- On the controller, press and hold the M button for approximately 3 seconds.
- The pairing icon (two arrows pointing up and down) on the LCD screen will start flashing, indicating it is in pairing mode.
- Locate the small button inside the wireless sensor (you may need to open the battery compartment). Press this button once to complete the pairing process.
- Once successfully paired, the flashing icon on the controller will become solid, and the current humidity reading from the sensor will be displayed.

Visual guide for pairing the wireless sensor with the controller.
6. Operation
6.1 Operating Modes
The Ortis Humidity Sensor Switch offers two primary operating modes: Automatic and Manual.

Overview of the switch's key features and modes.

The switch operating in Automatic Mode, intelligently controlling ventilation.
- Automatic Mode (AUTO): In this mode, the switch intelligently detects room humidity using the wireless sensor. When the humidity level exceeds your preset value, the connected fan (or humidifier) automatically activates to adjust the environment. This mode is ideal for continuous humidity management.
- Manual Mode (ON/OFF): This mode allows you to manually control the connected device (e.g., turn the fan on or off) regardless of the humidity level. This is useful for specific situations, such as ensuring a quiet environment at night by manually turning off the fan.

Manual mode allows you to operate the fan switch manually, ensuring a quiet sleep environment by avoiding automatic fan activation.
6.2 Setting Humidity Levels
To set the desired humidity threshold for automatic operation:
- Ensure the switch is in AUTO mode.
- Press and hold the SET button for approximately 3 seconds. The 'SET' value on the LCD will begin to flash.
- Use the Up and Down arrow buttons to adjust the desired humidity percentage.
- Press the SET button again to confirm and save your setting, or wait a few seconds for it to save automatically.
6.3 LCD Display Indicators
The LCD screen provides real-time information and status indicators:

Detailed view of the LCD display showing current humidity, set humidity, and various icons.
- Current Humidity: Displays the real-time humidity percentage detected by the wireless sensor.
- SET Humidity: Shows the target humidity percentage you have set.
- AUTO/ON/OFF: Indicates the current operating mode.
- Fan Icon: Illuminates when the connected fan is active.
- Wireless Signal Icon: Indicates connection status with the wireless sensor.
- Battery Icon: Shows the battery level of the wireless sensor.
- Lock Icon: Indicates if the buttons are locked.
6.4 Key Lock Function
The key lock function prevents accidental changes to settings. To activate or deactivate the key lock:
- Press and hold both the Up and Down arrow buttons simultaneously for approximately 3 seconds.
- The lock icon will appear or disappear on the LCD, indicating the status of the key lock.

Activating the key lock feature to prevent unintended setting changes.
7. Maintenance
- Clean the controller and sensor regularly with a soft, dry cloth. Do not use abrasive cleaners or solvents.
- The wireless sensor requires 2 AAA batteries (not included). Replace batteries when the battery icon on the controller indicates low power. Battery life is approximately 8-10 months.
- Ensure the sensor's air vents are clear of dust and debris for accurate readings.
8. Troubleshooting
If you encounter issues with your Ortis Humidity Sensor Switch, refer to the table below for common problems and solutions.
| Problem | Possible Cause | Solution |
|---|---|---|
| Controller display is blank or not powering on. | No power to the switch; incorrect wiring; tripped circuit breaker. | Check circuit breaker. Verify wiring connections are secure and correct (neutral wire required). Consult a qualified electrician if unsure. |
| Wireless sensor not displaying humidity or showing "--". | Sensor not paired; sensor batteries low or dead; sensor out of range. | Perform sensor pairing procedure (Section 5.2). Replace sensor batteries. Move sensor closer to the controller (within 328ft). |
| Fan does not turn on/off automatically in AUTO mode. | Incorrect humidity setting; sensor not reading correctly; fan wiring issue. | Verify the set humidity level is appropriate. Ensure sensor is paired and providing readings. Check fan wiring to the controller. Note the humidity difference setting (default 10%) means the fan activates when current humidity >= (set humidity + difference/2). Adjust set humidity accordingly. |
| Buttons are unresponsive. | Key lock is activated. | Deactivate key lock by pressing and holding Up and Down arrow buttons simultaneously for 3 seconds. |
9. Specifications
| Feature | Detail |
|---|---|
| Product Dimensions (Controller) | 2.1 x 2.1 x 4.5 inches |
| Product Dimensions (Sensor) | 2.1 x 1.5 x 5.6 inches |
| Item Weight | 7.4 ounces |
| Model Number | KJ-056 |
| Voltage | 110/220V |
| Wireless Range | Up to 328 feet |
| Humidity Detection Update Rate | Every 5 minutes |
| Sensor Battery Type | 2 x AAA (not included) |
| Country of Origin | China |
10. Warranty and Support
The Ortis Humidity Sensor Switch comes with a 2-year limited warranty. For warranty claims, technical support, or further inquiries, please contact Ortis customer service through the retailer's platform or the official Ortis website. Please have your model number (KJ-056) and purchase information ready when contacting support.


