Introduction
The LNEX 500A Battery Monitor (Model: Color+) is an advanced device designed for precise, real-time monitoring of your battery's state. It features a 3.5-inch color screen that displays critical information such as voltage, current, power, and remaining capacity. This monitor is compatible with a wide range of battery types, including LiFePO4, Lithium-ion, Gel, and Flooded batteries, operating within an 8V to 120V range. This manual provides comprehensive instructions for the proper installation, operation, and maintenance of your battery monitor.

Image: The LNEX 500A Battery Monitor display unit, showing battery percentage, voltage, current, and a 24-hour voltage curve.
What's in the Box
Verify that all components are present in the package:
- Color Battery Monitor (Display Unit)
- 500A Shunt
- 16ft Shielded Wire (for connecting monitor to shunt)
- 10ft 20AWG B+ Wire
- Wrench
- Terminals
- User Manual (this document)

Image: A visual representation of all items included in the product package, such as the display, shunt, cables, and tools.
Setup and Installation
Follow these steps for proper installation of the LNEX 500A Battery Monitor:
- Mount the Shunt: Install the 500A shunt in a dry, protected location close to your battery bank. Ensure the shunt is connected in series with the negative terminal of your battery. The "BATTERY-" terminal of the shunt connects to the negative terminal of the battery, and the "LOAD-" terminal connects to the negative side of your electrical system (all loads and chargers).
- Connect the Shunt to the Monitor: Use the provided 16ft shielded wire to connect the shunt to the display monitor. Ensure the connectors are securely fastened.
- Connect Power to the Shunt: Connect the 10ft 20AWG B+ wire from the positive terminal of your battery bank to the "BATTERY+" terminal on the shunt. This provides power to the shunt and allows it to measure voltage.
- Mount the Display Unit: Choose a suitable location for the 3.5-inch color display unit. Refer to the "Hole Size" diagram in the specifications section for precise cutout dimensions if flush mounting.
- Initial Calibration: After power-up, the monitor may require initial calibration for battery capacity and voltage range. Follow the on-screen prompts or refer to the operating instructions for detailed setup.

Image: A detailed view of the 500A shunt with labeled connections for battery positive, battery negative, and load negative, illustrating the wiring process.

Image: Technical drawing showing the dimensions of the display unit and the recommended hole size for flush mounting.
Operating Instructions
The LNEX 500A Battery Monitor provides a clear interface for monitoring your battery system. Here's how to operate it:
Display Overview:
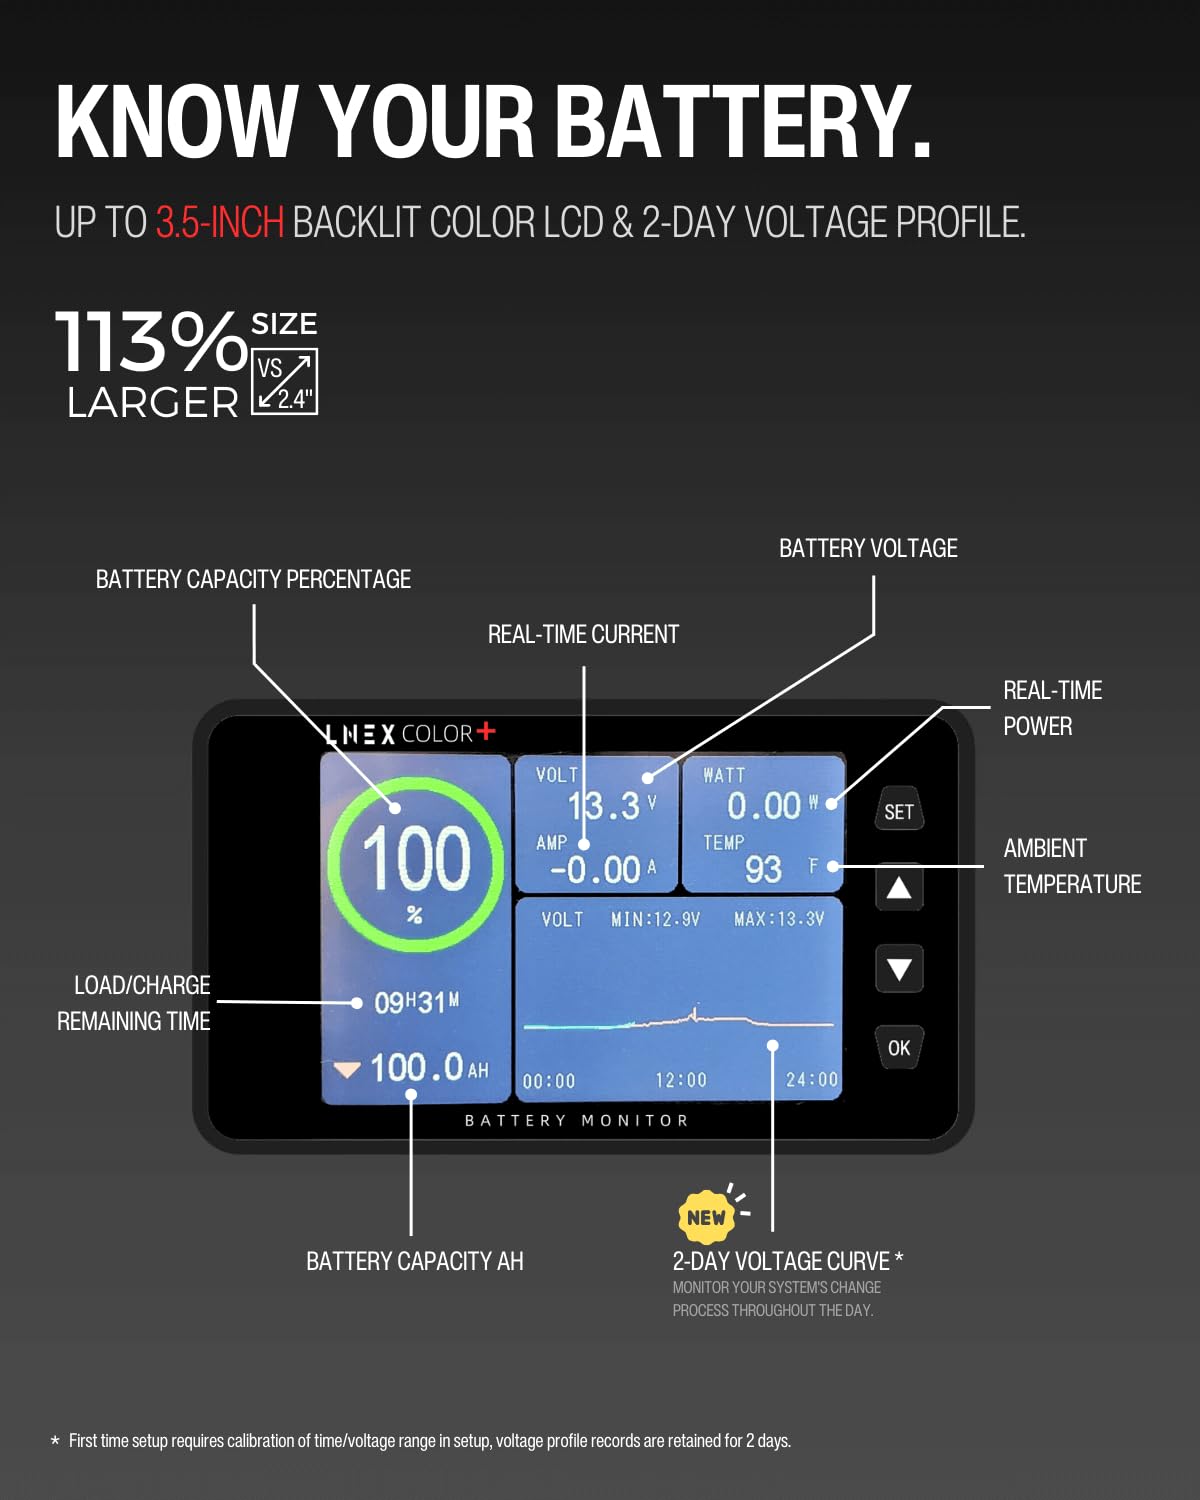
Image: Annotated display screen highlighting battery capacity percentage, real-time current, voltage, power, ambient temperature, load/charge remaining time, battery capacity in Ah, and a 2-day voltage curve.
- Battery Capacity Percentage: Shows the current state of charge.
- Real-time Current (AMP): Indicates charging (positive) or discharging (negative) current.
- Voltage (VOLT): Displays the current battery voltage, along with minimum and maximum recorded voltages.
- Power (WATT): Shows the real-time power consumption or generation.
- Ambient Temperature (TEMP): Displays the surrounding temperature.
- Load/Charge Remaining Time: Estimates the time until the battery is fully charged or discharged.
- Battery Capacity (AH): Shows the total Amp-hour capacity.
- 2-Day Voltage Curve: Provides a historical graph of voltage changes over the past 48 hours.
Button Functions:
Image: Diagram illustrating the functions of the SET, Up, Down, and OK buttons, including single press and long press actions for backlight control, capacity reset, and alarm management.
- SET Button: Enters the settings menu.
- Up Arrow Button:
- Click: Adjusts backlight brightness (increases).
- Press (3s): Sets battery capacity to 100%.
- Down Arrow Button:
- Click: Adjusts backlight brightness (decreases).
- Press (3s): Sets battery capacity to 0%.
- OK Button:
- Click: Confirms selections in menus.
- Press (3s): Turns off all alarms.
- Press (3s) LCD off: Pressing the SET button for 3 seconds will turn off the LCD display. Note that switching off the display does not affect the continued operation of the device.
Programmable Alarms:
The monitor features programmable alarms to protect your battery from over-discharge or over-charge conditions. When an alarm condition is met, the monitor will sound an alert, flash the backlight, and display the relevant voltage value.
- Low/High Voltage Alarms
- Low/High Current Alarms
- Low State of Charge (SOC) Alarms
To quickly silence all alarms, press and hold the OK button for 3 seconds.

Image: Icons representing low/high voltage alarms, low/high current alarms, and low SOC alarms, with a visual of a person interacting with an RV and an alarm siren graphic.
Maintenance
The LNEX 500A Battery Monitor is designed for durability and reliability. To ensure optimal performance:
- Cleaning: Wipe the display screen and unit with a soft, dry cloth. Avoid using abrasive cleaners or solvents.
- Connections: Periodically check all wiring connections to ensure they are secure and free from corrosion.
- Data Retention: The monitor automatically stores the latest testing data, preventing data loss during power interruptions.
Troubleshooting
If you encounter issues with your battery monitor, consider the following:
- No Display/Power:
- Check all power connections, especially the 10ft 20AWG B+ wire to the battery positive terminal and the 16ft shielded wire between the shunt and the display.
- Ensure the battery voltage is within the operating range (8V-120V).
- Inaccurate Readings:
- Verify that the shunt is correctly installed in series with the negative battery terminal and all loads/chargers pass through it.
- Ensure the battery capacity setting in the monitor matches your actual battery capacity. Recalibrate if necessary (refer to Operating Instructions).
- Alarms Sounding Unexpectedly:
- Check your alarm threshold settings in the monitor's menu. Adjust them to appropriate levels for your battery type and usage.
- Confirm actual battery conditions (voltage, current, SOC) are not genuinely triggering the alarms.
- Display Not Turning Off:
- Press and hold the SET button for 3 seconds to turn off the LCD display.
Specifications
The following table details the technical specifications of the LNEX 500A Battery Monitor:
| Feature | Value |
|---|---|
| Model Number | Color+ |
| Voltage Range | DC 8V-120V |
| Max Current | 500A |
| Battery Capacity Range | 0.01AH-9999AH |
| Display Screen | 3.5 inch Color LCD |
| Power Range | 0.00-96KW |
| Temperature Range | -4°F-302°F |
| Accuracy | ±1% |
| Operating Power Consumption | 0.8W |
| Product Dimensions | 7.48 x 7.48 x 2.56 inches |
| Item Weight | 1.5 Pounds |
| Compatible Battery Types | Lead Acid, LiFePO4, Lithium-ion, Nickel-metal hybrid, Gel, Flooded |

Image: Visual representation of the monitor's compatibility with Flooded, Lithium, AGM, and LiFePO4 batteries, and its use in vessels, off-grid systems, professional vehicles, recreational vehicles, and backup systems.
Warranty and Support
The LNEX 500A Battery Monitor comes with a 1-Year Limited Support. For technical assistance, troubleshooting, or warranty claims, please contact LNEX customer support through the retailer where the product was purchased. Please have your purchase details and product model number (Color+) available when contacting support.


