1. Introduction
Thank you for purchasing the Andoer 4K 30fps Tiny Action Camera. This compact and versatile camera is designed to capture your adventures in stunning 4K resolution. With its wide-angle lens, built-in WiFi, and various mounting options, it is ideal for a wide range of outdoor activities, including diving, surfing, and skiing.
This manual provides detailed instructions on how to set up, operate, and maintain your camera to ensure optimal performance and longevity. Please read this manual thoroughly before using the product and keep it for future reference.
2. Safety Information
Please observe the following safety precautions to prevent injury or damage to the device:
- Do not expose the camera to extreme temperatures, direct sunlight for prolonged periods, or high humidity.
- Keep the camera and its accessories out of reach of children and pets.
- Use only the specified charging cable and power adapter.
- Do not attempt to disassemble, repair, or modify the camera yourself. Contact authorized service personnel for assistance.
- Ensure the waterproof case is properly sealed before submerging the camera in water.
- Avoid dropping or subjecting the camera to strong impacts.

Warning: To avoid suffocation hazard, keep plastic bags away from babies and children.
3. Package Contents
Verify that all items listed below are included in your package:
- 1 x Andoer 4K Tiny Action Camera
- 1 x Back Clip
- 1 x Magnetic Lanyard
- 1 x Camera Frame
- 1 x Waterproof Case
- 2 x Mounting Bases
- 1 x Buckle Mount
- 1 x Long Screw Mount
- 1 x Handlebar Mount
- 1 x Mount Adapter
- 1 x Strap
- 1 x Type-C Charging Cable
- 1 x User Manual (this document)
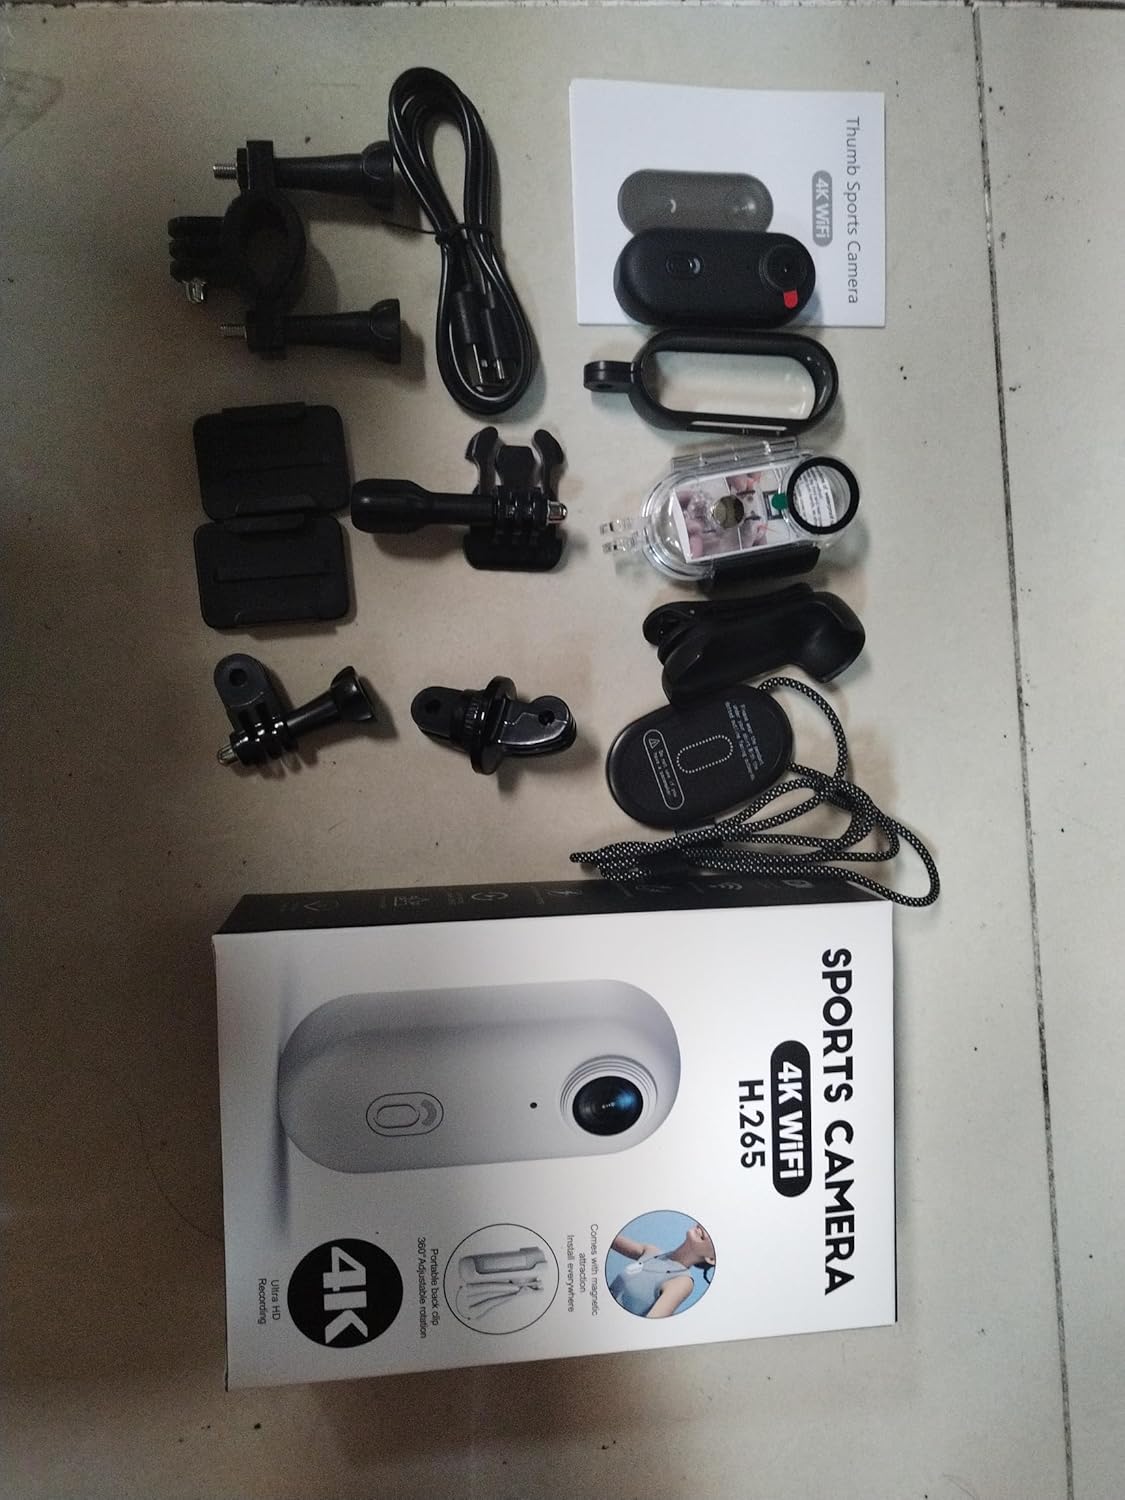
Illustration of the complete package contents.

Detailed view of the camera and its included accessories.
4. Product Overview
The Andoer Tiny Action Camera is designed for portability and ease of use. Familiarize yourself with its main components:

Front view of the Andoer Tiny Action Camera.
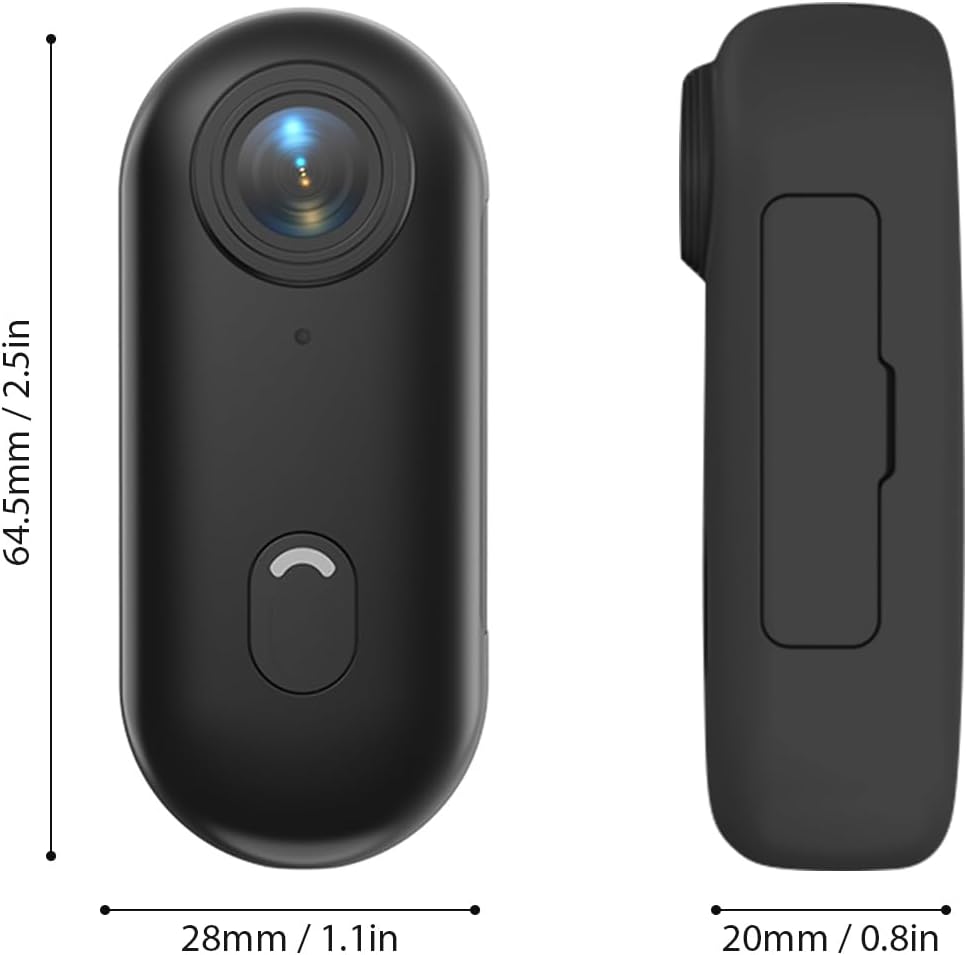
Physical dimensions of the camera.
- Lens: 120° wide-angle lens for expansive shots.
- Power/Mode Button: Used for powering on/off and switching modes.
- Indicator Light: Displays camera status (recording, charging, WiFi connection).
- Microphone: Captures audio.
- USB-C Port: For charging and data transfer.
- MicroSD Card Slot: For memory card insertion.
5. Setup
5.1 Charging the Battery
The camera has a built-in 800mAh lithium battery. Before first use, fully charge the camera.
- Connect the included Type-C charging cable to the camera's USB-C port.
- Connect the other end of the cable to a 5V/2A USB power adapter (not included) or a computer USB port.
- The indicator light will show charging status (refer to the camera's light indicator guide for specific colors/patterns).
- A full charge takes approximately 120 minutes.
5.2 Inserting a Memory Card
A MicroSD (TF) card (not included) is required for recording videos and photos. The camera supports cards up to 256GB.
- Locate the MicroSD card slot on the camera.
- Insert the MicroSD card with the contacts facing down until it clicks into place.
- To remove, gently push the card in until it springs out.
Note: It is recommended to format the MicroSD card in the camera before first use to ensure compatibility and optimal performance. Refer to the app or camera settings for formatting options.
5.3 Mounting Methods
The camera offers multiple versatile mounting options:
- Built-in Magnets: The camera has built-in magnets, allowing direct attachment to any iron surface.
- Magnetic Lanyard: Attach the camera to the magnetic lanyard to wear it around your neck for convenient hands-free recording.

Using the magnetic lanyard for hands-free recording.
- Back Clip: Use the included back clip to securely attach the camera to your collar, pocket, or backpack strap.
- Waterproof Case: For underwater activities or protection from harsh elements, enclose the camera in the waterproof case. This case allows the camera to be submerged up to 30 meters. Ensure the case is properly sealed before use.
- Mounting Accessories: Utilize the camera frame, mounting bases, buckle mount, long screw mount, handlebar mount, and mount adapter to attach the camera to helmets, bicycles, and other equipment.

Examples of multiple installation methods for the camera.
6. Operating Instructions
6.1 Power On/Off
- Power On: Press and hold the Power/Mode button for a few seconds until the indicator light illuminates.
- Power Off: Press and hold the Power/Mode button again for a few seconds until the indicator light turns off.
6.2 Video Recording
The camera records videos in 4K resolution at 30 frames per second (4K 30fps) in MP4 format.
- Ensure the camera is powered on and a MicroSD card is inserted.
- Press the Power/Mode button once to start video recording. The indicator light will change to indicate recording is in progress (e.g., flashing red).
- Press the Power/Mode button again to stop recording. The indicator light will return to standby mode.
6.3 Photo Taking
The camera captures photos at 3840x2160 resolution in JPEG format.
- Ensure the camera is powered on and a MicroSD card is inserted.
- (If in video mode, short press the Power/Mode button to switch to photo mode if applicable, or use the app).
- Press the Power/Mode button briefly to take a photo. The indicator light may flash once to confirm the capture.
6.4 WiFi Connection and App Usage
The camera supports WiFi connection, allowing you to control it and view/share content via a smartphone application.
- Download the dedicated smartphone application (refer to the product packaging or manufacturer's website for the app name and download links).
- Power on the camera.
- Activate WiFi on the camera (usually by a long press or specific button combination, refer to camera's light indicator guide). The camera will broadcast a WiFi network.
- On your smartphone, go to WiFi settings and connect to the camera's WiFi network (SSID and password typically found on the camera or in the app instructions).
- Open the app. You should now be able to see a live preview, control recording, adjust settings, and transfer files.
6.5 Loop Recording
The camera supports loop recording, which automatically overwrites the oldest files when the memory card is full, ensuring continuous recording.
- This feature is typically enabled by default or can be configured via the smartphone app.
- When the memory card reaches its capacity, the camera will automatically delete the oldest video segments to make space for new recordings.

Loop recording functionality ensures continuous capture.
7. Maintenance
- Cleaning: Use a soft, dry cloth to clean the camera body. For the lens, use a specialized lens cleaning cloth and solution. Do not use harsh chemicals or abrasive materials.
- Storage: When not in use, store the camera in a cool, dry place, away from direct sunlight and extreme temperatures.
- Battery Care: For long-term storage, charge the battery to about 50% every few months to maintain its health.
- Waterproof Case: After using the waterproof case in saltwater, rinse it thoroughly with fresh water and allow it to air dry. Check the O-ring seal regularly for any debris or damage.
8. Troubleshooting
| Problem | Possible Cause | Solution |
|---|---|---|
| Camera does not power on. | Low battery; faulty battery; power button issue. | Charge the camera fully. If issue persists, contact support. |
| Cannot connect to WiFi. | WiFi not enabled on camera; incorrect password; app issue. | Ensure camera WiFi is active. Re-enter password. Restart camera and phone. Reinstall app. |
| Recording stops unexpectedly. | Memory card full; slow memory card; battery low. | Check memory card space. Use a high-speed (Class 10 or U3) MicroSD card. Charge battery. |
| Poor video/photo quality. | Dirty lens; low light conditions; incorrect settings. | Clean the lens. Ensure adequate lighting. Check resolution settings in the app. |
| Water leakage in waterproof case. | Improperly sealed case; damaged O-ring. | Ensure case is securely latched. Check O-ring for debris or damage and replace if necessary. |
9. Specifications
| Feature | Detail |
|---|---|
| Video Resolution | 4K 30fps |
| Photo Resolution | 3840x2160 |
| Video Format | MP4 |
| Photo Format | JPEG |
| Lens Angle | 120° Wide Angle |
| Connectivity | WiFi |
| Battery Capacity | 800mAh Lithium Battery |
| Charging Time | Approx. 120 minutes |
| Charging Voltage | 5V/2A |
| Memory Card Support | TF card, up to 256GB |
| Interface Type | Type-C |
| Waterproof Depth (with case) | Up to 30M |
| Product Dimensions | 64.5 x 28 x 20mm (2.54 x 1.1 x 0.8 inches) |
| Item Weight | Approx. 11.3 ounces (camera only) |
| Operating Temperature | -10°C to 60°C (14°F to 140°F) |
| Storage Temperature | -10°C to 60°C (14°F to 140°F) |
10. Warranty and Support
Andoer products are manufactured to the highest quality standards. This product is covered by a limited warranty against defects in materials and workmanship from the date of purchase. Please retain your proof of purchase for warranty claims.
For technical support, troubleshooting assistance, or warranty inquiries, please contact Andoer customer service through the retailer where you purchased the product or visit the official Andoer website for contact information.
Website: Andoer Official Store on Amazon