symcode G2023
Symcode 2D Screen Barcode Scanner User Manual
Model: G2023
1. Introduction
This manual provides comprehensive instructions for the operation, setup, and maintenance of your Symcode 2D Screen Barcode Scanner, Model G2023. Please read this manual thoroughly before using the device to ensure proper functionality and to maximize its lifespan.

Image: The Symcode 2D Screen Barcode Scanner resting in its charging stand. The scanner features a display screen and a comfortable grip, with green accents.
2. Key Features
- Wireless Charging Stand & High Capacity Battery: Equipped with a convenient charging cradle and a 2600mAh high-capacity battery, providing up to 24 hours of continuous operation.
- Versatile Scanning Modes: Supports manual trigger, continuous scanning, and auto-sensing modes. Includes a storage mode for offline data collection.
- Dual Connectivity: Connects via 433Mhz wireless (dongle built into stand) or Bluetooth (HID/SPP/BLE modes) for compatibility with laptops, PCs, smartphones, tablets, iPhones, iPads, and POS systems.
- Extensive Symbology Support: Decodes a wide range of 1D and 2D barcodes including QR Code, Data Matrix, PDF417, Code 128, UPC-A, EAN-13, and many more.
- 1.77 Inch TFT Colorful Screen: Displays current scanned barcode, code type, scan count, wireless signal status, time, connection status, connection mode, electricity level, stored count, and total count.
- Durable Anti-shock Design: Engineered to withstand multiple drops from a height of up to 2.5 meters (approximately 8 feet) onto concrete.
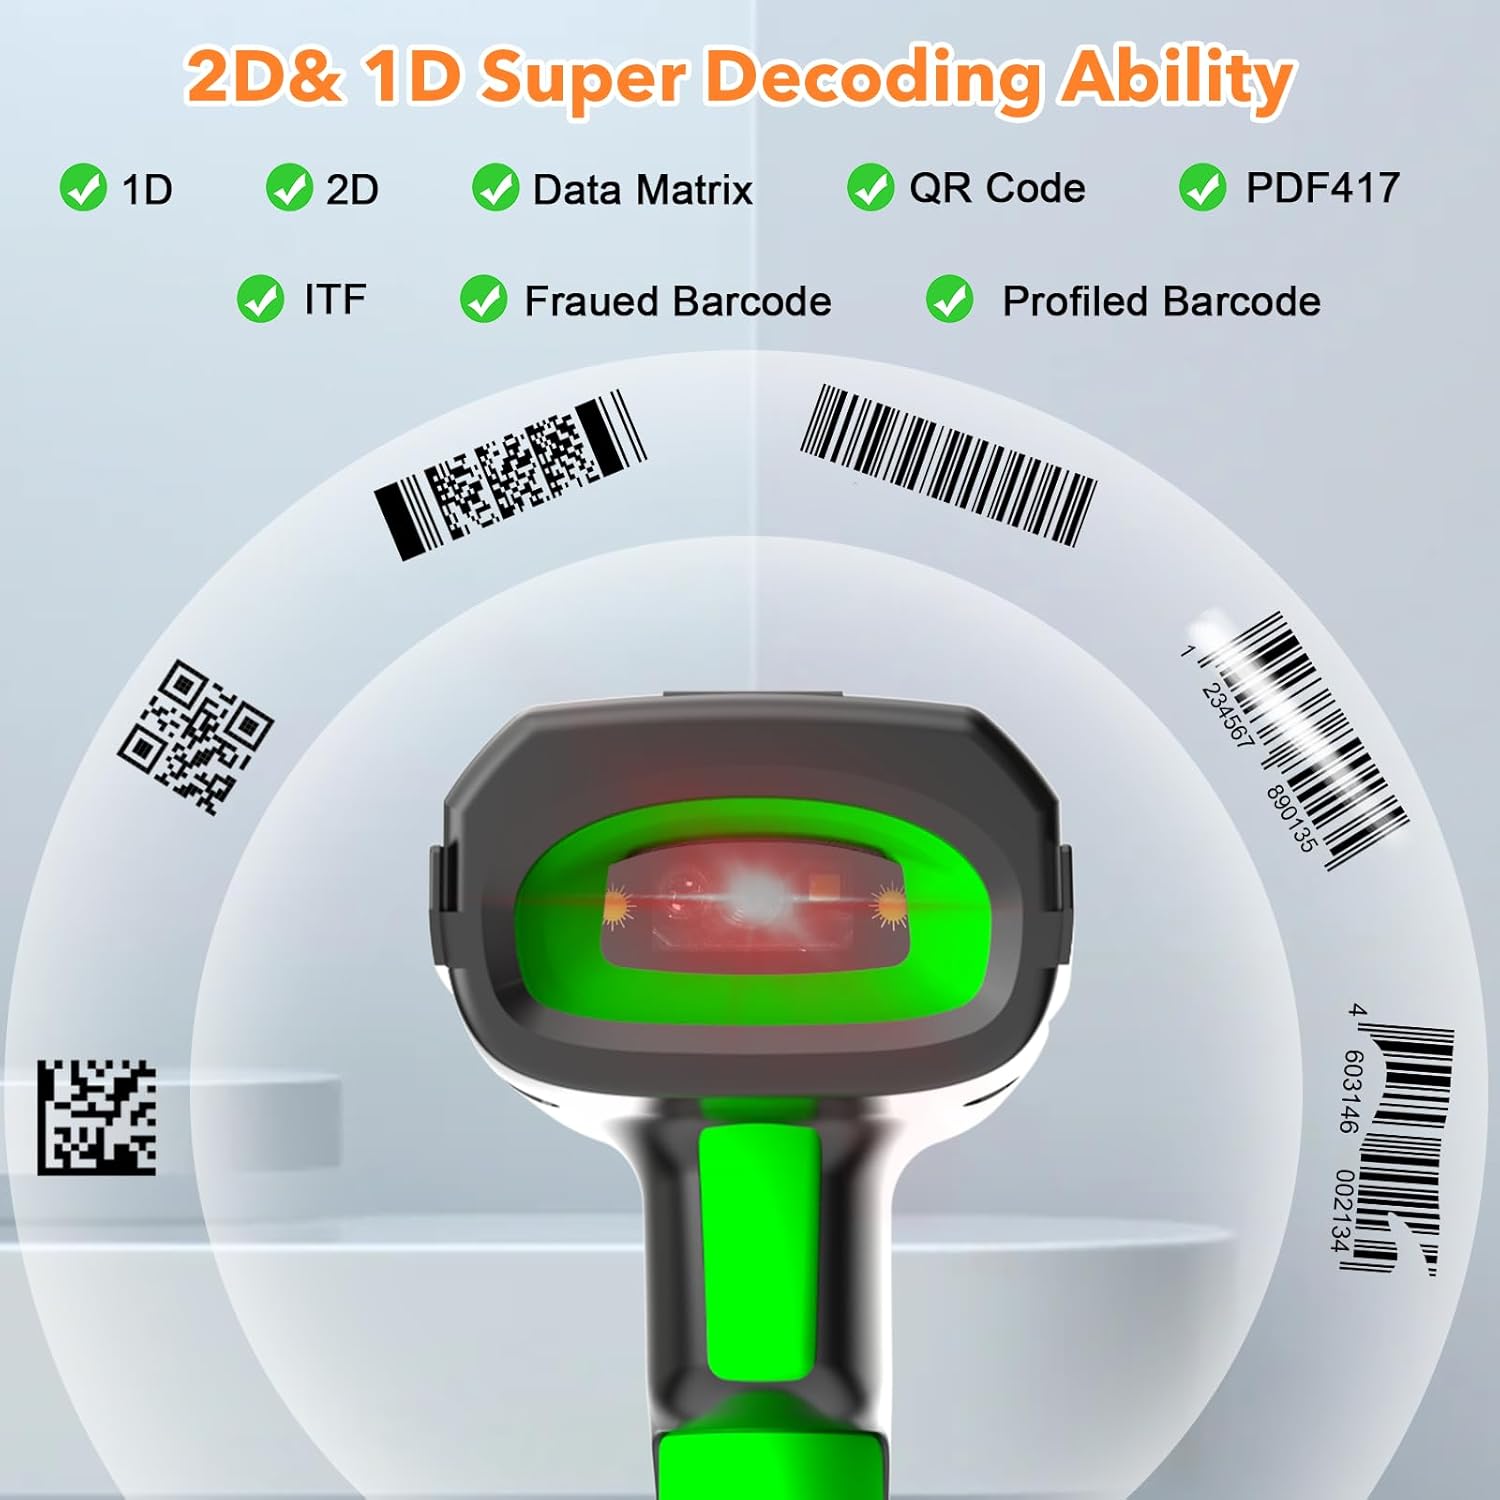
Image: Illustration demonstrating the scanner's ability to decode various 1D and 2D barcode types, including QR Code, Data Matrix, and PDF417.

Image: The scanner shown with a cracked concrete background, illustrating its anti-shock design and ability to withstand drops from 2.5 meters.
3. Package Contents
Verify that all items are present in the package:
- Symcode 2D Screen Barcode Scanner
- Charging Stand (with built-in 433Mhz wireless receiver)
- USB Cable (for charging stand)
- User Manual (this document)
4. Setup and Connection
4.1 Charging the Scanner
Before first use, fully charge the scanner. Place the scanner into the charging stand. Connect the charging stand to a power source (e.g., computer USB port or USB wall adapter) using the provided USB cable. The scanner's screen will indicate charging status.

Image: The barcode scanner being charged in its stand, highlighting the 2600mAh battery and indicating a 4-hour charging time for 30 hours of scanning.
4.2 Connection Modes
The Symcode G2023 scanner supports two primary connection methods:
- 433Mhz Wireless Connection:
The charging stand has a built-in 433Mhz wireless dongle. Connect the charging stand to your computer via USB. The scanner will automatically pair with the stand, providing a plug-and-play experience. This mode offers a long transmission range, up to 1000m (3280ft) in open areas.
- Bluetooth Connection:
The scanner can connect directly to Bluetooth-enabled devices such as laptops, smartphones, and tablets. It supports HID, SPP, and BLE modes. The Bluetooth range is approximately 15m (49ft) indoors.
To connect via Bluetooth:
- Ensure the scanner is powered on.
- Activate Bluetooth on your host device (computer, phone, tablet).
- Scan the Bluetooth pairing barcode (refer to the quick start guide or scanner settings for this barcode).
- On your host device, search for "Symcode Scanner" or similar in the Bluetooth device list and select it to pair.

Image: Comparison of wireless ranges: Bluetooth (15m/49ft) for indoor use and 433Mhz (1000m/3280ft) for outdoor or longer-range applications.

Image: Depiction of the two connection modes: 433Mhz wireless via the charging base connected to a laptop, and direct Bluetooth connection to a tablet.
5. Operating Instructions
5.1 Scanning Barcodes
Point the scanner's window at the barcode you wish to scan. Press the trigger button to activate the scanning beam. Ensure the beam covers the entire barcode for accurate reading. A successful scan is typically indicated by a beep and/or vibration (configurable).
5.2 Scanning Modes
The scanner supports the following operational modes:
- Manual Trigger Mode: Press the trigger button for each scan.
- Continuous Scanning Mode: The scanner continuously emits a scanning beam, reading barcodes as they are presented.
- Auto-sensing Scanning Mode: The scanner activates the beam automatically when a barcode is detected in its field of view.
- Storage Mode: When out of wireless or Bluetooth range, scanned barcodes are stored in the scanner's internal memory. Data can be uploaded later when connection is re-established.
Refer to the included quick start guide or the scanner's configuration barcodes for instructions on switching between these modes.
5.3 Screen Display Information
The 1.77-inch TFT colorful screen provides real-time information:

Image: Close-up of the scanner's screen, detailing the information displayed: 1. Time, 2. Connection status, 3. Connection mode, 4. Electricity level, 5. Stored scan count, 6. Total scan count.
- Time: Current time.
- Connection Status: Indicates if the scanner is connected (e.g., Bluetooth icon, 433Mhz icon).
- Connection Mode: Displays the active connection type (e.g., Bluetooth, 433Mhz).
- Electricity Level: Battery charge indicator.
- Store: Number of barcodes currently stored in memory (in storage mode).
- Total: Total number of barcodes scanned.
- Scanned Barcode Data: The actual data of the last scanned barcode.
- Code Type: The symbology of the last scanned barcode (e.g., QR Code, Code 128).
6. Maintenance
6.1 Cleaning
To clean the scanner, use a soft, damp cloth. Do not use abrasive cleaners or solvents, as these can damage the device. Ensure the scanning window is clean for optimal performance.
6.2 Battery Care
The scanner is equipped with a 2600mAh Lithium Polymer battery. For optimal battery life:
- Avoid fully discharging the battery frequently.
- Charge the scanner regularly, especially when not in use for extended periods.
- Store the scanner in a cool, dry place when not in use.
7. Troubleshooting
| Problem | Possible Cause | Solution |
|---|---|---|
| Scanner not connecting via 433Mhz. | Charging stand not powered or connected to host device. Scanner not paired with stand. | Ensure the charging stand is properly connected via USB. Re-scan the pairing barcode for 433Mhz if available in your quick start guide. |
| Scanner not connecting via Bluetooth. | Bluetooth not enabled on host device. Scanner not in pairing mode. Out of range. | Enable Bluetooth on your device. Scan the Bluetooth pairing barcode on the scanner. Move scanner closer to the host device. |
| Scanner not reading barcodes. | Barcode damaged or poor quality. Scanning window dirty. Incorrect scanning mode. | Try scanning a different, known-good barcode. Clean the scanning window. Verify the scanner is in the correct scanning mode. |
| Battery drains quickly. | Frequent use. Battery nearing end of life. | Ensure the scanner is fully charged before use. Reduce continuous scanning time if possible. |
8. Product Specifications
| Feature | Specification |
|---|---|
| Type | 1D 2D QR CMOS Display Screen Wireless Barcode Scanner |
| Connection Method | Bluetooth 433Mhz Wireless |
| Interface | USB (for charging stand) |
| Scan Speed | 200 times/s |
| Power | DC 5V |
| Current | 400mAh±5% |
| Battery Capacity | 2600mAh Lithium Polymer |
| Continuous Use Time | More than 40,000 hours (product lifespan) / 24 hours (battery life) |
| Drop Resistance | Can withstand drops under 2.2 meters (7.2 ft) / 2.5 meters (8 ft) |
| Display Screen | 1.77 Inch TFT Colorful Screen |
| Compatible Devices | Desktop, Laptop, POS, Smartphone, Tablet |
| Supported Symbologies | 2D: Codeblock A, Codeblock F, PDF417, Micro PDF417, GS1 Composite Codes, QR Code, Data Matrix, MaxiCode, Aztec, HANXIN 1D: Codabar, Code 39, Code 32 Pharmaceutical (PARAF), Interleaved 2 of 5, NEC 2 of 5, Code 93, Straight 2 of 5 Industrial, Straight 2 of 5 IATA, Matrix 2 of 5, Code 11, Code 128, GS1-128, UPC-A, UPC-E, EAN/JAN-8, EAN/JAN-13, MSI, GS1 DataBar Omnidirectional, GS1 DataBar Limited, GS1 DataBar Expanded, China Post (Hong Kong 2 of 5), Korea Post |
9. Warranty and Support
For warranty information and technical support, please refer to the warranty card included with your product or visit the official Symcode website. Keep your purchase receipt as proof of purchase.
Ask a question about this manual
Ask about setup, troubleshooting, compatibility, parts, safety, or missing instructions. Manuals+ will review the question and use this page’s manual context to help answer it.