1. Safety Information
Please read all safety instructions carefully before using the KoDeer X10 Plus projector. Keep this manual for future reference.
- Do not expose the device to rain or moisture to prevent fire or electric shock.
- Do not open the casing. There are no user-serviceable parts inside. Refer all servicing to qualified personnel.
- Ensure proper ventilation. Do not block ventilation openings.
- Avoid direct exposure to the projector lens light.
- Use only the power adapter supplied with the device.
- Keep the device away from heat sources and direct sunlight.
- Do not use the device in extremely dusty or humid environments.
2. What's in the Box
Verify that all items are present in the package:
- 1 x KoDeer X10 Plus Projector
- 1 x USB Wireless Receiver
- 1 x Power Cable
- 1 x TF Card (pre-loaded with games)
- 1 x User Manual (this document)
- 1 x Remote Control
- 2 x 2.4G Wireless Controllers (requires 2 AAA batteries each, not included)

Image: Contents of the KoDeer X10 Plus package, including the projector, two wireless controllers, remote control, TF card, power cable, and user manual.
3. Setup Guide
3.1 Initial Placement and Power Connection
- Place the KoDeer X10 Plus projector on a stable, flat surface. The projector features a 180-degree free projection capability, allowing you to adjust the projection angle as needed.
- Connect the power cable to the projector's power input port and then plug it into a suitable power outlet.
- Press the power button on the projector or the remote control to turn on the device.
3.2 Connecting Wireless Controllers
- Insert 2 AAA batteries into each 2.4G wireless controller (batteries not included).
- Locate the USB Wireless Receiver.
- Insert the USB Wireless Receiver into one of the USB ports on the projector. The controllers should automatically pair with the projector.
- Test the controllers by navigating the on-screen menu.
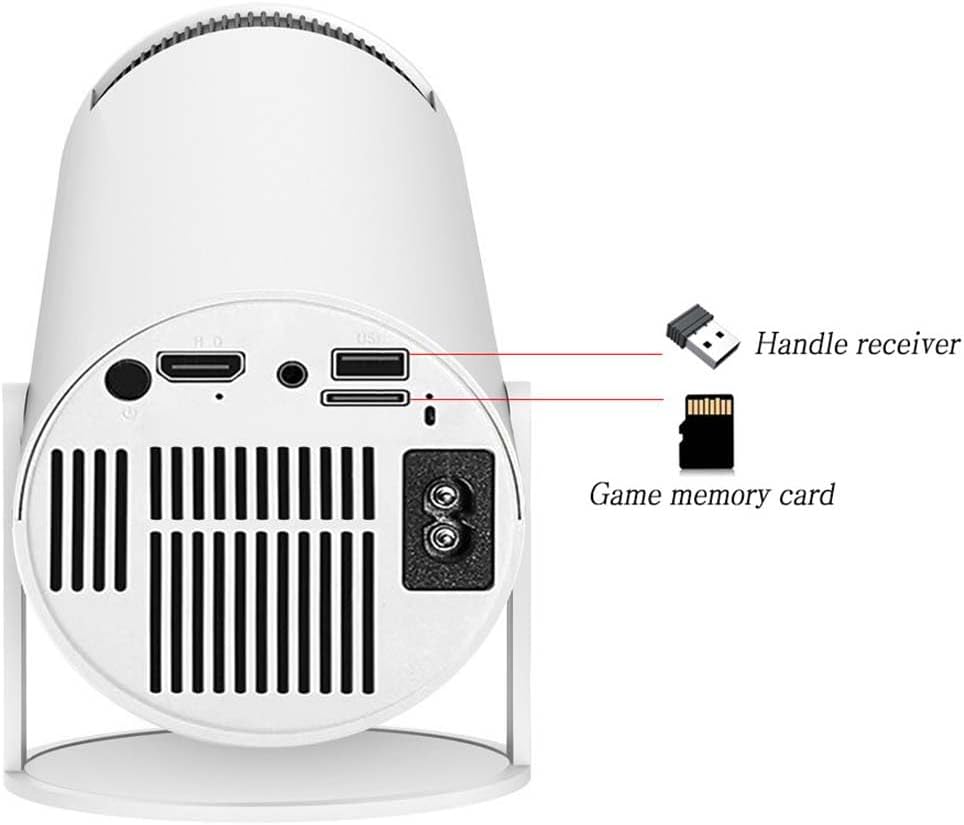
Image: Rear view of the KoDeer X10 Plus projector, highlighting the HDMI output, USB ports for the wireless receiver, and power input. Labels indicate the 'Handle receiver' (USB wireless receiver) and 'Game memory card' (TF card) slots.
3.3 Inserting the TF Card
- Locate the TF card slot on the projector.
- Gently insert the pre-loaded TF card into the slot until it clicks into place. This card contains the retro games and emulators.
4. Operating Instructions
4.1 Navigating the User Interface
Upon startup, the projector will display the Android 11.0 operating system interface. Use the remote control or a connected wireless controller to navigate.
- Remote Control: Use the directional buttons to move, "OK" to select, and "Back" to return.
- Wireless Controllers: The D-pad or analog sticks control movement, "X" or "A" buttons typically select, and "O" or "B" buttons typically go back.
4.2 Accessing Games
The KoDeer X10 Plus comes with a dedicated "Gamer" application or similar icon on the home screen. Select this to access the pre-loaded retro games and emulators.
Video: Demonstration of the KoDeer X10 Plus projector's interface and game selection. This video shows the main menu and how to browse different game emulators and start a game.
- Open the "Gamer" application.
- Browse through the available emulators (e.g., NES, SNES, PS1, Arcade) or game collections. The projector supports 10+ emulators with thousands of retro games.
- Select a game to start playing.
4.3 Adjusting Projection
- Focus: Use the focus ring or button on the projector to sharpen the image.
- Keystone Correction: If the image appears trapezoidal, use the keystone correction settings in the projector's menu to adjust it to a rectangular shape.
- Projection Size: The projection size can be adjusted by moving the projector closer or further from the projection surface. The projector supports various projection ratios.

Image: A diagram illustrating how projection distance affects screen size, showing an 85-inch and 55-inch projection from the KoDeer X10 Plus projector.
4.4 Using HDMI Output
The projector features an HDMI output port, allowing you to connect it to an external display or TV for a larger viewing experience.
- Connect an HDMI cable (not included) from the projector's HDMI output port to an HDMI input port on your TV or monitor.
- Select the corresponding HDMI input on your TV/monitor.
4.5 Wi-Fi Connectivity
The KoDeer X10 Plus supports Wi-Fi, enabling access to online content and updates.
- Go to the projector's settings menu.
- Select "Network & Internet" or "Wi-Fi".
- Turn on Wi-Fi and select your desired network.
- Enter the password if prompted.
5. Maintenance
5.1 Cleaning the Projector
- Lens: Use a soft, lint-free cloth specifically designed for optical lenses to gently wipe the projector lens. Do not use abrasive cleaners or harsh chemicals.
- Casing: Wipe the exterior casing with a soft, dry cloth. For stubborn marks, a slightly damp cloth can be used, followed by a dry cloth.
- Ventilation: Ensure the ventilation openings are free from dust and debris to prevent overheating. Use a soft brush or compressed air to clear them if necessary.
5.2 Storing the Projector
When not in use for extended periods, store the projector in a cool, dry place, away from direct sunlight and extreme temperatures. It is recommended to use the original packaging or a protective case.
6. Troubleshooting
| Problem | Possible Cause | Solution |
|---|---|---|
| No image projected |
|
|
| Image is blurry |
|
|
| Controllers not responding |
|
|
| Cannot access games on TF card |
|
|
| No sound |
|
|
7. Specifications
| Feature | Detail |
|---|---|
| Model Number | RGP-X10Plus |
| CPU | Quad-core ARM Cortex-A53 |
| GPU | Mali-G31 (supports OpenGL ES3.2, Vulkan 1.1, OpenCL2.0) |
| Operating System | Android 11.0 |
| RAM | 1GB |
| Output | HDMI |
| Connectivity | Wi-Fi, 2.4G Wireless (for controllers) |
| Controller Power | 2 x AAA batteries per controller (not included) |
| Dimensions (L x W x H) | 4.1 x 4.1 x 8.0 inches |
| Weight | 2.8 LB |
| Material | Plastic |
| Number of Players | 2 |
| Emulators | 10+ emulators with thousands of retro games |
8. Warranty & Support
8.1 Product Warranty
The KoDeer X10 Plus 4K Retro Game Projector comes with a standard manufacturer's warranty. Please refer to the warranty card included in your package or contact KoDeer customer support for specific warranty terms and conditions.
8.2 Customer Support
For technical assistance, troubleshooting, or any questions regarding your KoDeer X10 Plus projector, please contact our customer support team. Contact information can typically be found on the product packaging or on the official KoDeer website.
- When contacting support, please have your product model number (RGP-X10Plus) and purchase date available.