
1. Introduction
This manual provides instructions for the installation, operation, and maintenance of the Jstpure Carburetor Kit. This kit is designed as a replacement part for specific chainsaw models, including RYOBI PCN4545, RYOBI PCN4040, and Homelite 38cc UT-10927 chainsaws. Please read this manual thoroughly before attempting any installation or maintenance to ensure proper function and safety.
2. Safety Information
Always prioritize safety when working with power tools and fuel systems. Failure to follow safety guidelines can result in serious injury or damage to equipment.
- Disconnect Spark Plug: Before performing any maintenance or installation, always disconnect the spark plug wire to prevent accidental engine startup.
- Fuel Handling: Work in a well-ventilated area. Avoid open flames, sparks, or smoking near fuel. Use an approved fuel container.
- Eye Protection: Wear safety glasses or goggles to protect your eyes from debris and fuel splashes.
- Gloves: Wear appropriate gloves to protect your hands from fuel and sharp edges.
- Consult Chainsaw Manual: Refer to your chainsaw's original owner's manual for specific safety procedures and disassembly/assembly instructions.
- Proper Disposal: Dispose of old fuel, filters, and other components according to local regulations.
3. Package Contents
Verify that all components listed below are present in your Jstpure Carburetor Kit:
- 1x Carburetor
- 2x Gaskets (for carburetor mounting)
- 2x Fuel Lines (yellow)
- 1x Spark Plug
- 2x Fuel Filters (one white, one black)
- 1x Primer Bulb
- 1x Adjustment Tool (splined screwdriver)
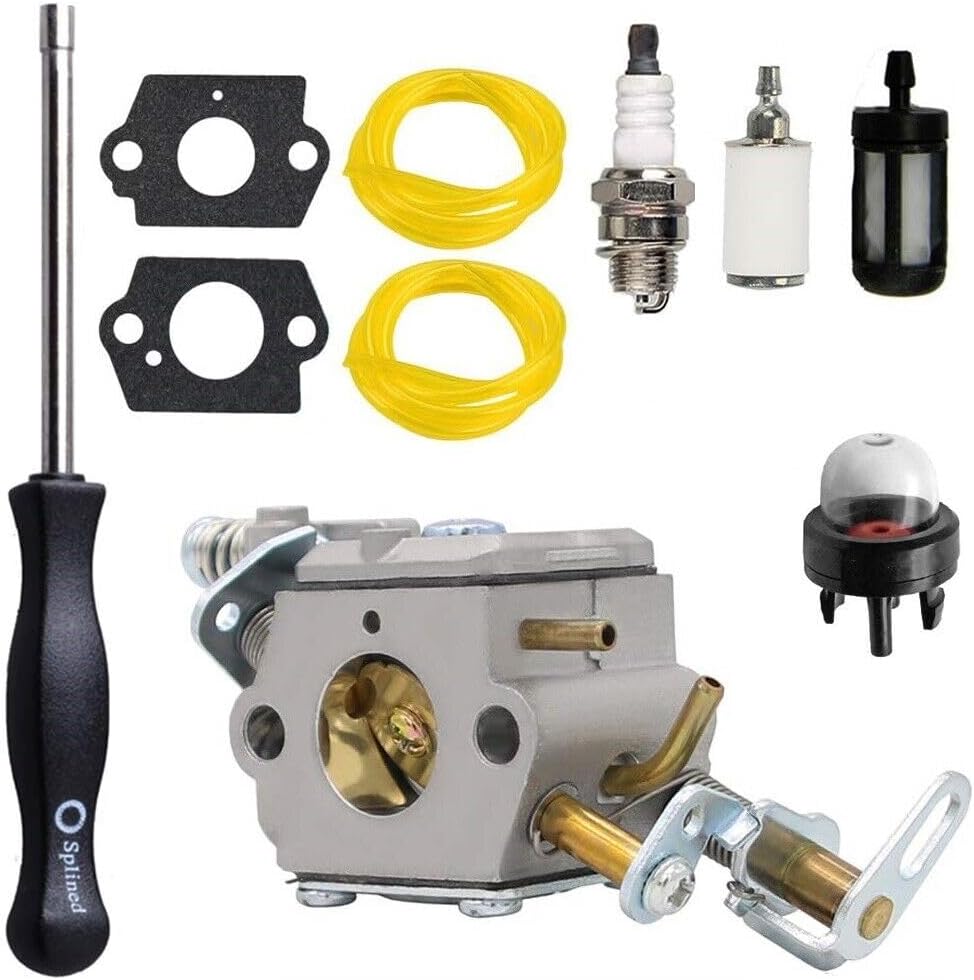
Image 1: Overview of the Jstpure Carburetor Kit components. This image displays the main carburetor unit, two mounting gaskets, two yellow fuel lines, a spark plug, two distinct fuel filters (one white, one black), a primer bulb, and a splined adjustment screwdriver.
4. Setup and Installation
This section outlines the general steps for replacing your chainsaw's carburetor and related components. Specific disassembly and assembly procedures may vary by chainsaw model. Always refer to your chainsaw's service manual for detailed instructions.
4.1. Preparation
- Ensure the chainsaw engine is cool.
- Disconnect the spark plug wire to prevent accidental starting.
- Place the chainsaw on a stable, flat surface.
- Drain any remaining fuel from the fuel tank into an approved container.
4.2. Removing the Old Carburetor
- Remove the air filter cover and air filter.
- Carefully disconnect the throttle linkage and choke rod from the old carburetor.
- Note the routing of the fuel lines. Disconnect the fuel lines from the carburetor and fuel tank.
- Unscrew the mounting bolts or nuts holding the carburetor in place.
- Remove the old carburetor and any old gaskets. Inspect the intake manifold for damage.
4.3. Installing the New Carburetor Kit
- Place new gaskets in their correct positions on the intake manifold and carburetor.
- Mount the new Jstpure carburetor, ensuring the gaskets are properly seated. Secure it with the mounting bolts/nuts, tightening them evenly.
- Reconnect the throttle linkage and choke rod to the new carburetor.
- Fuel Lines and Filters: Replace the old fuel lines with the new yellow fuel lines provided. Install the new fuel filters (one white, one black) into the fuel tank, ensuring they are properly submerged and connected to the fuel lines. Connect the fuel lines to the carburetor, ensuring correct routing for fuel intake and return.
- Spark Plug: Remove the old spark plug. Install the new spark plug from the kit, tightening it to the manufacturer's specifications (typically hand-tight plus a quarter turn with a wrench).
- Primer Bulb: If replacing, carefully remove the old primer bulb and install the new one, ensuring a secure seal.
- Reinstall the air filter and air filter cover.
4.4. Post-Installation
- Refill the fuel tank with the correct fuel/oil mixture for your chainsaw.
- Prime the carburetor by pressing the primer bulb until fuel is visible and flows freely.
- Reconnect the spark plug wire.
5. Operating Instructions (Initial Start-up and Adjustment)
After installation, the carburetor may require minor adjustments for optimal performance.
5.1. Initial Start-up
- Follow your chainsaw's standard starting procedure (e.g., choke on, pull starter rope).
- Once the engine fires, push the choke to the half-choke or run position as per your chainsaw's manual.
- Allow the engine to warm up for a few minutes.
5.2. Carburetor Adjustment
Most carburetors have three adjustment screws: Low Speed (L), High Speed (H), and Idle (T). Use the included splined adjustment tool for these adjustments. Make small adjustments (quarter turns) and test the engine's response.
- Idle (T) Screw: Adjusts the engine's idle speed. Turn clockwise to increase idle, counter-clockwise to decrease. The chain should not move at idle.
- Low Speed (L) Screw: Controls fuel mixture at idle and low RPMs. Adjust for smooth acceleration from idle without bogging down.
- High Speed (H) Screw: Controls fuel mixture at full throttle. Adjust for maximum power without the engine sounding lean (too high pitched) or rich (bogging down, excessive smoke). Avoid running too lean, as this can damage the engine.
Note: If you are unsure about carburetor adjustments, it is recommended to consult a qualified service technician or refer to your chainsaw's specific service manual for factory settings.
6. Maintenance
Regular maintenance ensures the longevity and reliable performance of your chainsaw and its fuel system components.
- Fuel Filters: Inspect fuel filters periodically (e.g., every 25 hours of operation or annually) and replace them if they appear clogged or dirty. The kit includes new filters for replacement.
- Fuel Lines: Check fuel lines for cracks, hardening, or leaks. Replace them if any damage is observed. New fuel lines are provided in the kit.
- Spark Plug: Inspect the spark plug every 25-50 hours of operation. Clean carbon deposits or replace if electrodes are worn or fouled. A new spark plug is included in this kit.
- Air Filter: Regularly clean or replace your chainsaw's air filter (not included in this kit) to ensure proper air flow to the carburetor. A dirty air filter can affect engine performance.
7. Troubleshooting
If your chainsaw experiences issues after carburetor replacement, consider the following common problems and solutions:
- Engine Won't Start:
- No Fuel: Check fuel level, ensure fuel lines are correctly connected, and fuel filters are not clogged.
- No Spark: Check spark plug wire connection. Inspect spark plug for fouling or damage.
- Improper Priming: Ensure the primer bulb is fully primed.
- Engine Runs Poorly / Stalls:
- Carburetor Adjustment: Adjust the L and H screws as described in Section 5.2.
- Air Filter: Check if the air filter is clean and properly installed.
- Fuel Delivery: Inspect fuel lines for kinks or leaks, and fuel filters for clogs.
- Fuel Leaks:
- Gaskets: Ensure carburetor gaskets are properly seated and not damaged.
- Fuel Lines: Check all fuel line connections for tightness and ensure lines are not cracked.
- Primer Bulb: Verify the primer bulb is securely installed and not cracked.
If issues persist after troubleshooting, it is recommended to seek assistance from a qualified service technician.
8. Specifications
| Product Type | Carburetor Kit |
| Brand | Jstpure |
| Model Number (Kit) | JSTPURE |
| Compatibility | RYOBI PCN4545 Chainsaw, RYOBI PCN4040 Chainsaw, Homelite 38cc UT-10927 Chainsaw |
| Kit Contents | Carburetor, 2 Gaskets, 2 Fuel Lines, Spark Plug, 2 Fuel Filters, Primer Bulb, Adjustment Tool |
9. Warranty and Support
For warranty information or technical support regarding your Jstpure Carburetor Kit, please refer to the seller or retailer from whom the product was purchased. Keep your proof of purchase for any warranty claims.