AEXCVG BT-298A+
AEXCVG BT-298A+ Stereo Home Audio Amplifier User Manual
Model: BT-298A+ | Brand: AEXCVG
1. Introduction
This manual provides detailed instructions for the setup, operation, and maintenance of your AEXCVG BT-298A+ Stereo Home Audio Amplifier. Please read this manual thoroughly before using the product to ensure proper function and to prevent damage.
Package Contents
Verify that all items are present in the package:
- AEXCVG BT-298A+ Stereo Home Audio Amplifier
- Remote Controller
- Power Cable
- User Manual (this document)

Image: Package contents including the amplifier, remote control, power cable, and user manual.
2. Safety Instructions
To ensure safe operation and prolong the life of your amplifier, please observe the following safety precautions:
- Do not expose the unit to rain, moisture, or extreme temperatures.
- Do not open the amplifier casing. Refer all servicing to qualified personnel.
- Ensure proper ventilation around the unit to prevent overheating.
- Use only the provided power cable or a suitable replacement.
- Keep the unit away from direct sunlight, heat sources, and strong magnetic fields.
- Disconnect the power plug from the wall outlet if the unit will not be used for an extended period.
3. Product Overview
Front Panel

Image: Detailed view of the amplifier's front panel, highlighting controls and inputs.
- Power Switch: Turns the amplifier on or off.
- SD Card/USB Input: For playing audio files from SD cards or USB drives.
- Treble Control: Adjusts the high-frequency audio output.
- Bass Control: Adjusts the low-frequency audio output.
- Microphone Volume Control: Adjusts the volume of connected microphones.
- Microphone Jacks (MIC 1, MIC 2): Connect microphones for karaoke or voice input.
- Main Volume Control: Adjusts the overall output volume.
- Function Display Window: Shows current mode, track information, and settings.
- MP3 Function Buttons: Control playback (Play/Pause, Next/Previous Track, Mode selection).
Rear Panel

Image: Detailed view of the amplifier's rear panel, highlighting connection ports.
- Audio Input (AUX IN L/R): Connect external audio sources like CD players, TVs, or computers.
- Speaker Outputs (L/R): Connect passive speakers (4-16Ω impedance).
- FM ANT: Connect the FM radio antenna for improved reception.
- DC 12V Input: Alternative power input (e.g., for car use, 12V/5A).
- AC Power Input: Connect the provided AC power cable (AC 90-240V 50-60Hz).
Remote Control
The included remote control allows for convenient operation of the amplifier from a distance. Functions include power, mode selection, volume adjustment, EQ settings, and track control for USB/SD playback.

Image: Remote control in use, demonstrating its function for adjusting settings from a distance.
4. Setup
Follow these steps to set up your AEXCVG BT-298A+ amplifier:
4.1 Connecting Speakers
Connect your passive speakers to the "SPEAKERS OUTPUT" terminals on the rear panel. Ensure correct polarity (positive to positive, negative to negative) for each speaker. The amplifier supports speakers with an impedance of 4-16Ω.
4.2 Connecting Audio Sources
- AUX Input: Use an RCA cable to connect external audio devices (e.g., TV, DVD player, PC) to the "AUDIO INPUT (AUX IN L/R)" jacks on the rear panel.
- USB/SD Card: Insert a USB flash drive or SD card into the respective slots on the front panel. The amplifier will automatically switch to USB/SD mode and begin playback.
4.3 Connecting Microphones
For karaoke or public address, connect up to two microphones to the "MIC 1" and "MIC 2" input jacks on the front panel.

Image: Example of microphones connected to the amplifier for karaoke use.
4.4 Connecting FM Antenna
Connect the included FM antenna to the "FM ANT" terminal on the rear panel for optimal FM radio reception.
4.5 Power Connection
Connect the provided AC power cable to the "AC POWER INPUT" on the rear panel and then to a standard wall outlet. Alternatively, for 12V DC operation, connect a compatible 12V/5A power supply to the "DC 12V INPUT".
5. Operating Instructions
5.1 Power On/Off
Press the "POWER" switch on the front panel to turn the amplifier on or off. The display will illuminate when the unit is powered on.
5.2 Mode Selection
Press the "MODE" button on the front panel or remote control to cycle through available input modes: Bluetooth (BT), AUX, USB, SD, and FM radio. The selected mode will be displayed on the function display window.
5.3 Volume, Treble, and Bass Adjustment
- Main Volume: Rotate the large "VOLUME" knob on the front panel or use the "VOL+/-" buttons on the remote control to adjust the overall sound level.
- Treble/Bass: Use the "TREBLE" and "BASS" knobs on the front panel to fine-tune the high and low frequencies of the audio output.

Image: Close-up of a hand adjusting the main volume knob.
5.4 Microphone Controls
Adjust the "MIC.VOL" knob on the front panel to control the volume of the connected microphones. This volume is independent of the main volume.
5.5 Bluetooth Connection
To connect a Bluetooth device:
- Switch the amplifier to "BT" mode using the "MODE" button. The display will show "BT" and flash, indicating it's in pairing mode.
- On your mobile device (phone, tablet, etc.), enable Bluetooth and search for available devices.
- Select "BT" from the list of devices. Once paired, the display will stop flashing, and you will hear a confirmation tone.
- You can now play audio from your device through the amplifier.
Note: The effective Bluetooth range is approximately 30 feet (10 meters). The amplifier cannot connect to Bluetooth earphones.

Image: Bluetooth connection in action, showing a smartphone paired with the amplifier.
5.6 USB/SD Card Playback
Insert a USB flash drive or SD card containing MP3 audio files into the corresponding slot on the front panel. The amplifier will automatically detect the media and begin playback. Use the MP3 function buttons (Play/Pause, Next/Previous) on the front panel or remote control to manage playback.

Image: Close-up of an SD card being inserted into the amplifier.
5.7 FM Radio Operation
In FM mode, the amplifier can scan and store radio stations. Use the remote control or front panel buttons to scan for stations and navigate between them.
6. Troubleshooting
| Problem | Possible Cause | Solution |
|---|---|---|
| No power | Power cable not connected; Power switch off; No power from outlet. | Ensure power cable is securely connected. Turn on the power switch. Check the wall outlet with another device. |
| No sound output | Volume too low; Incorrect input mode selected; Speakers not connected or faulty; Audio source issue. | Increase main volume. Select the correct input mode. Check speaker connections and ensure speakers are functional. Verify audio source is playing. |
| Bluetooth not connecting | Amplifier not in BT mode; Device too far; Device already connected to another amplifier; Amplifier not visible. | Switch amplifier to BT mode. Ensure device is within 30ft/10m. Disconnect from other devices. Restart amplifier and device. |
| USB/SD card not playing | Incorrect file format; Card/drive not inserted correctly; Corrupted media. | Ensure files are in MP3 format. Reinsert the USB drive/SD card. Try a different USB drive/SD card. |
| Poor FM reception | Antenna not connected or positioned poorly; Weak signal. | Connect the FM antenna. Adjust antenna position for better reception. |
| Microphone not working | Microphone volume too low; Microphone not connected properly; Faulty microphone. | Increase "MIC.VOL" knob. Ensure microphone is fully inserted into the jack. Test with another microphone. |
7. Specifications
| Feature | Detail |
|---|---|
| Model Number | BT-298A+ |
| Rated Power Output | 40W + 40W (2.0 Channel Stereo) |
| Speaker Impedance | 4-16 Ω |
| Distortion Rate | ≤0.4% |
| Signal-to-Noise Ratio | ≥80dB |
| Connectivity | Bluetooth, USB, SD Card, AUX (RCA), FM Radio, Microphone Input (x2) |
| Bluetooth Range | Up to 30 ft (10 m) |
| Power Input | AC 90-240V 50-60Hz / DC 12V/5A |
| Dimensions (L x W x H) | Approx. 7.09 x 5.35 x 2.17 inches (18 x 13.6 x 5.5 cm) |
| Item Weight | 1.76 pounds |
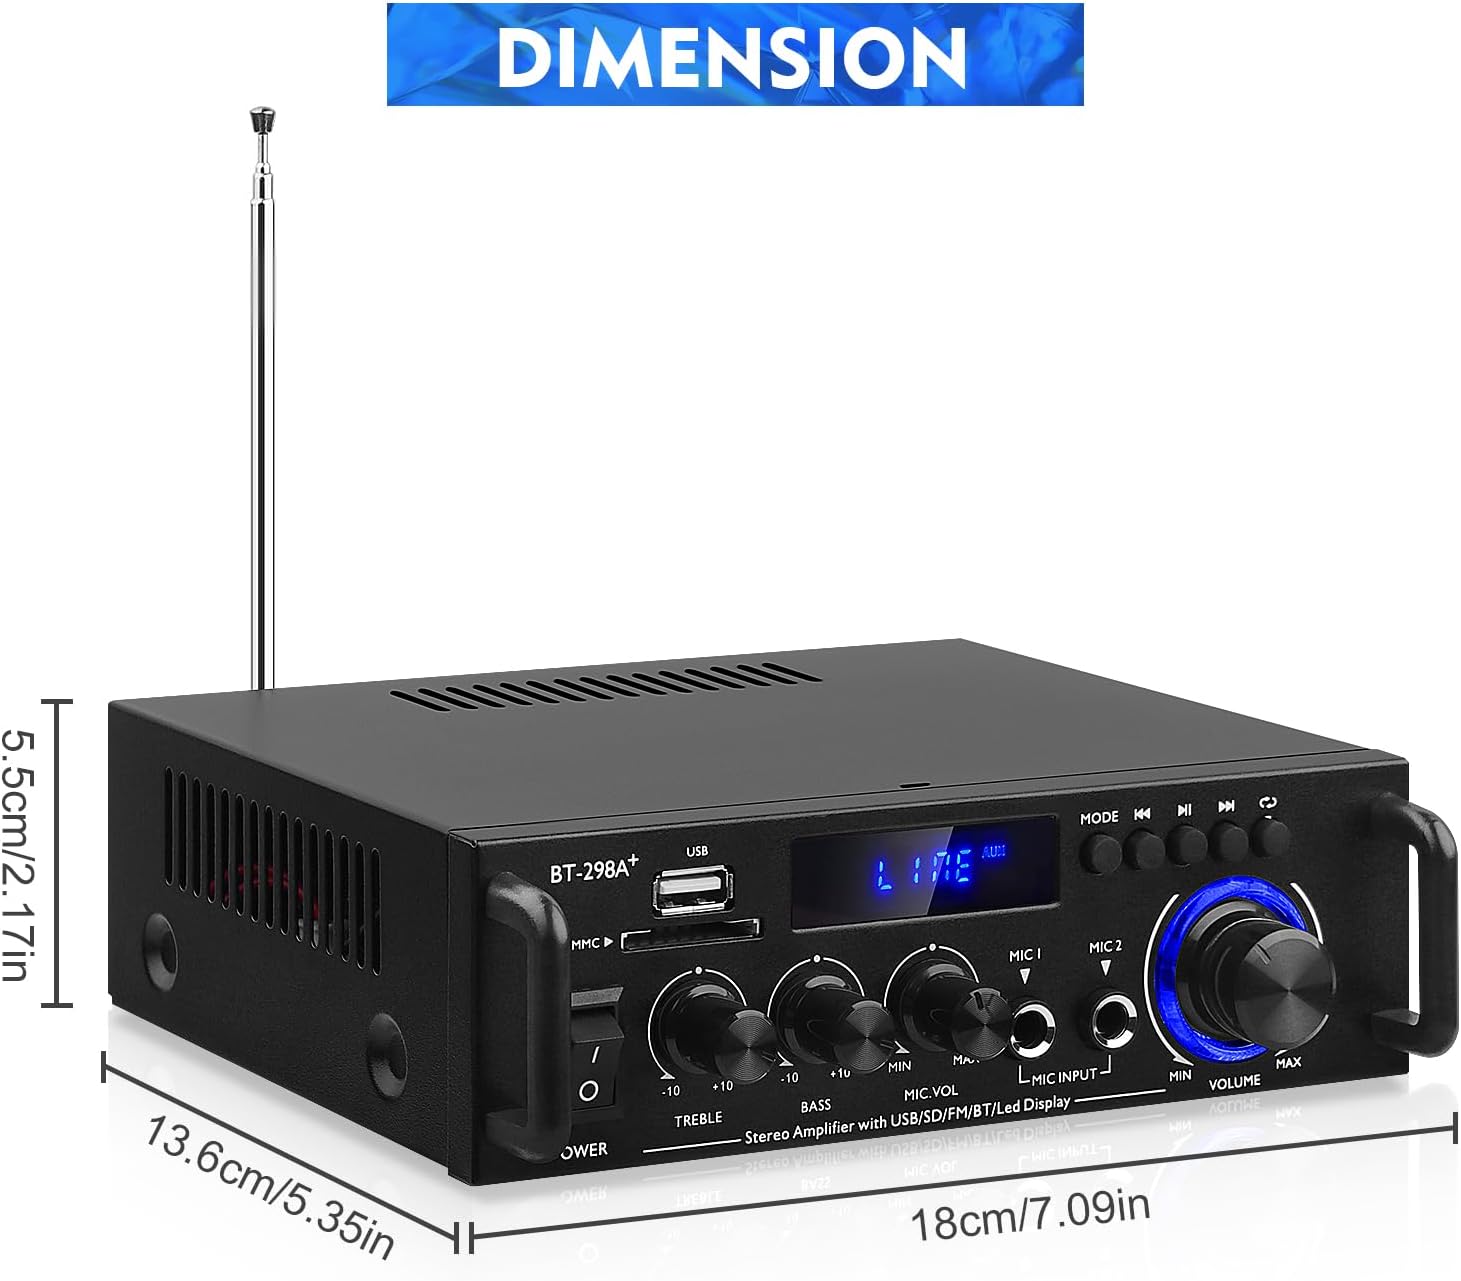
Image: Product dimensions for the amplifier.
8. Maintenance
- Cleaning: Use a soft, dry cloth to clean the exterior of the amplifier. Do not use liquid cleaners or abrasive materials.
- Storage: When not in use for extended periods, store the amplifier in a cool, dry place, away from direct sunlight and extreme temperatures.
- Ventilation: Ensure that the ventilation openings are not blocked to prevent overheating.
9. Warranty and Support
This product comes with a standard manufacturer's warranty. For specific warranty terms and conditions, please refer to the documentation provided at the time of purchase or contact your retailer. For technical support or service inquiries, please contact the manufacturer or your point of purchase.
Ask a question about this manual
Ask about setup, troubleshooting, compatibility, parts, safety, or missing instructions. Manuals+ will review the question and use this page’s manual context to help answer it.