IMMERSTABLE Modern
IMMERSTABLE Queen Floating Bed Frame User Manual
Model: Modern
Introduction
Thank you for choosing the IMMERSTABLE Queen Floating Bed Frame. This bed frame features a unique floating design with integrated RGB LED lights, an upholstered headboard, and solid wood slats for robust support. This manual provides detailed instructions for assembly, operation, maintenance, and troubleshooting to ensure a safe and enjoyable experience with your new bed frame.

Image: The IMMERSTABLE Queen Floating Bed Frame showcasing its unique design and vibrant LED lighting.
Product Features
- Unique Floating Design: Hidden bed feet create an illusion of floating, enhanced by under-bed LED lighting.
- Built-in RGB LED Headboard: Integrated LED lights offer over 60,000 colors, controllable via app, with timing, brightness adjustment, mic mode, and music sync functions.
- Faux Leather Upholstery: Headboard and frame are upholstered in breathable faux leather and filled with high-density cotton for comfort and support.
- Sturdy & Noise-Free Construction: Supported by metal and solid wood slats, featuring a foam strip on the center pole to prevent noise.
- Easy Assembly: Designed for straightforward assembly with numbered components and clear instructions.

Image: Overview of the RGB LED lighting features, including app control and various modes.
Safety Information
Please read and understand all safety warnings before assembly and use. Failure to follow these instructions may result in serious injury.
- Avoid placing the bed near windows or other hazards to prevent entrapment.
- Do not use this bed with infants due to suffocation risks associated with the upholstery.
- Always follow the assembly instructions carefully to ensure the bed's stability and safety.
- Keep all small parts and packaging materials away from children.
- Ensure all connections are securely tightened before use. Periodically check and re-tighten as needed.
- Do not exceed the recommended weight capacity for the bed frame.
Package Contents
Before beginning assembly, ensure all parts are present and undamaged. If any parts are missing or damaged, please contact customer support.
- Headboard (with integrated LED strips)
- Side Rails (Left and Right)
- Footboard
- Center Support Beam
- Solid Wood Slats
- Support Legs (for center beam)
- Hardware Pack (screws, bolts, washers, Allen wrench)
- LED Remote Control (if applicable)
- Power Adapter for LED Lights
- Instruction Manual
Assembly Instructions (Setup)
Assembly typically requires two adults. Please follow the numbered steps carefully. All components are numbered for easy identification.
- Unpack and Identify Parts: Lay out all components on a clean, soft surface (like a carpet) to prevent scratching. Verify all parts against the package contents list.
- Attach Side Rails to Headboard: Connect the left and right side rails to the headboard using the provided bolts and Allen wrench. Do not fully tighten yet.
- Attach Side Rails to Footboard: Connect the other ends of the side rails to the footboard. Ensure proper alignment.
- Install Center Support Beam: Attach the center support beam to the designated points on the headboard and footboard. Secure any support legs to the center beam.
- Tighten All Connections: Once the main frame is assembled, go back and securely tighten all bolts and screws.
- Place Wood Slats: Lay the solid wood slats across the bed frame, ensuring they are evenly spaced and secured if attachment points are present. The foam strip on the center pole should face upwards to prevent noise.
- Connect LED Lights: Locate the LED light strip and its power adapter. Connect the LED strip to the power adapter and plug it into a wall outlet. Ensure the wiring is neatly tucked away and not pinched.
- Final Check: Gently shake the bed frame to ensure it is stable and all connections are secure.
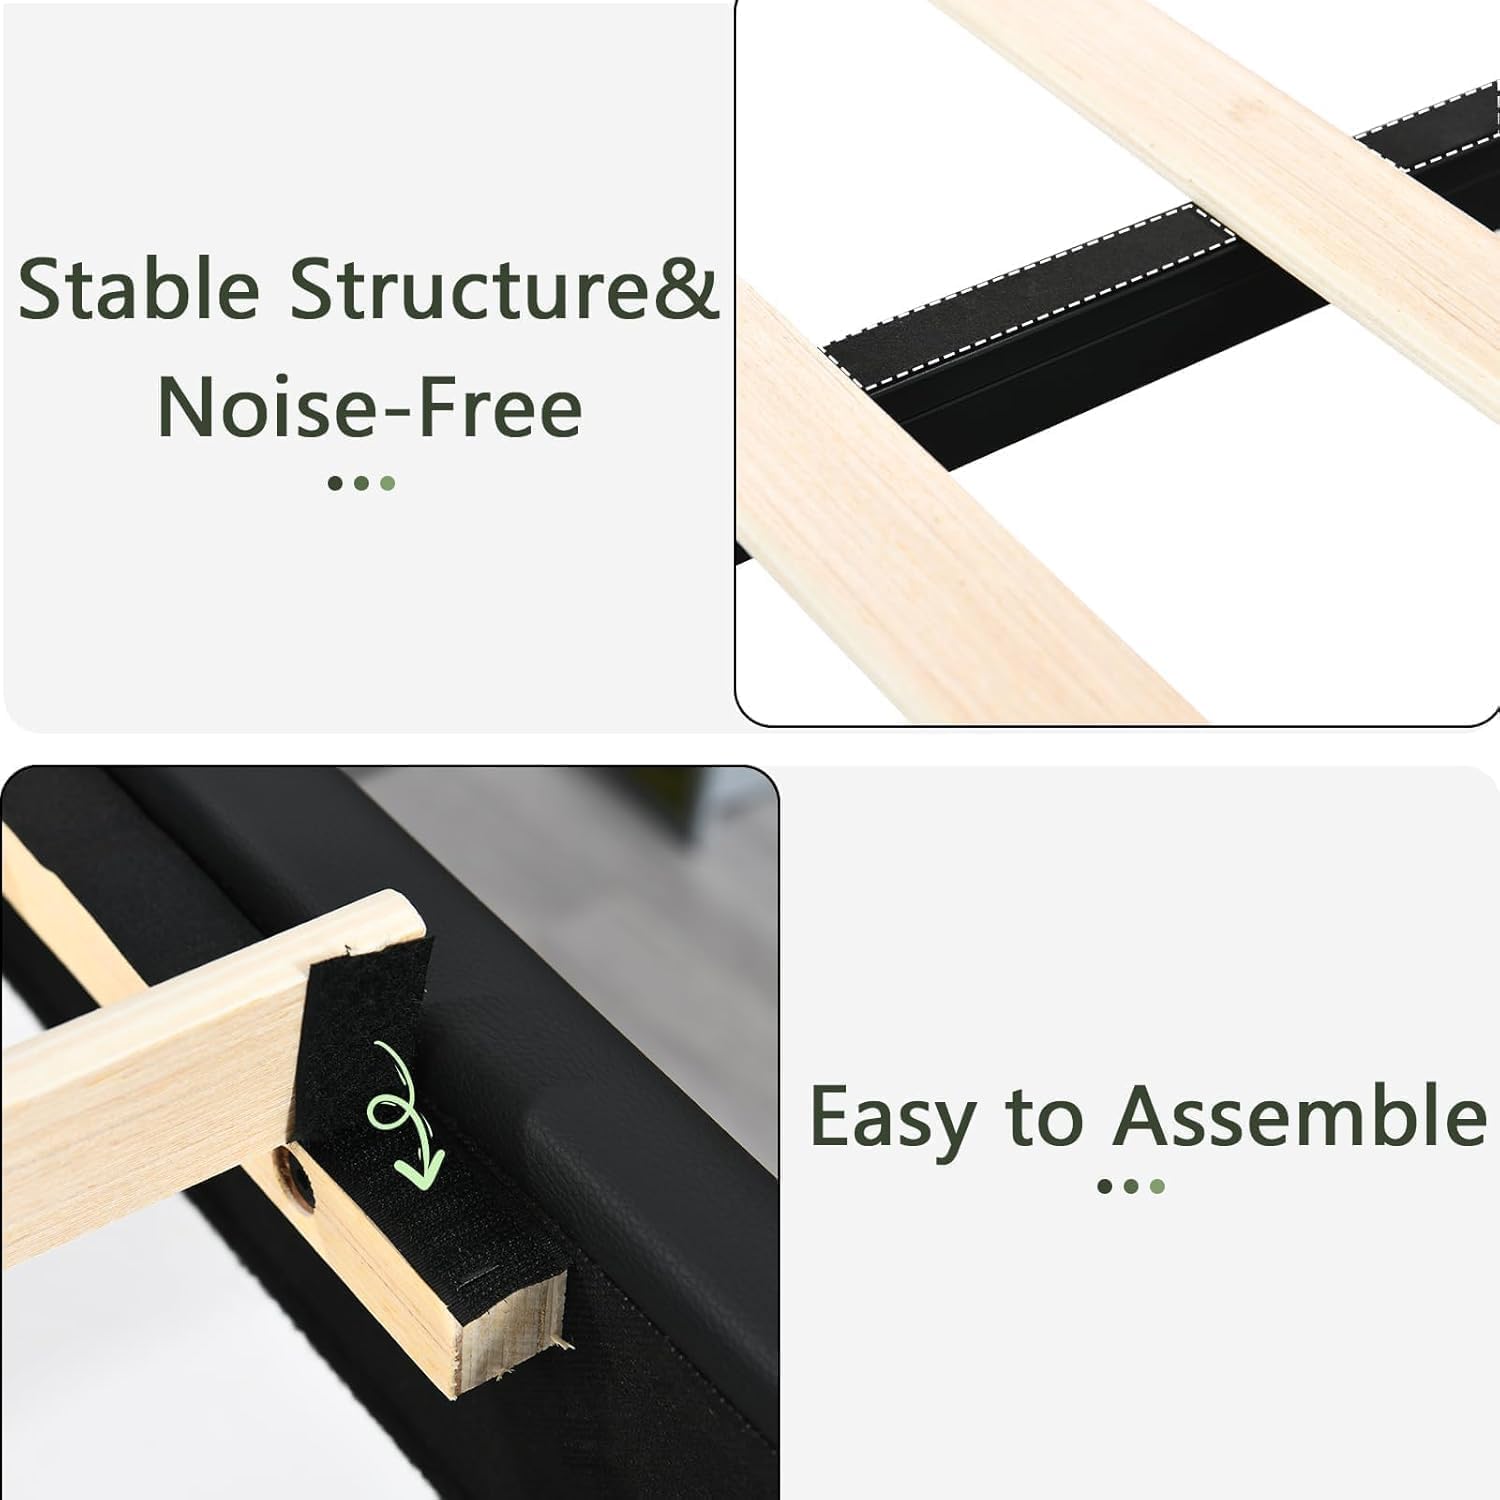
Image: Visual representation of the bed frame's stable structure, noise-free design, and simple assembly points.
Operating Instructions (LED Lights)
The integrated RGB LED lights can be controlled via a remote control or a dedicated mobile application.
Using the Remote Control:
- Power On/Off: Press the power button to turn the lights on or off.
- Color Selection: Use the color buttons to select a static color.
- Brightness Adjustment: Use the brightness up/down buttons to adjust the intensity of the lights.
- Mode Selection: Cycle through various dynamic modes (e.g., flash, fade, strobe) using the mode buttons.
- Music Sync/Mic Mode: If your remote has these features, activate them to synchronize lights with music or ambient sound.
Using the Mobile Application:
- Download App: Scan the QR code provided in the LED light packaging or search for the recommended app in your device's app store.
- Pairing: Follow the in-app instructions to pair your device with the bed frame's LED controller via Bluetooth.
- Advanced Control: The app typically offers more precise color selection (color wheel), custom scene creation, timing functions (schedule on/off), and advanced music synchronization.
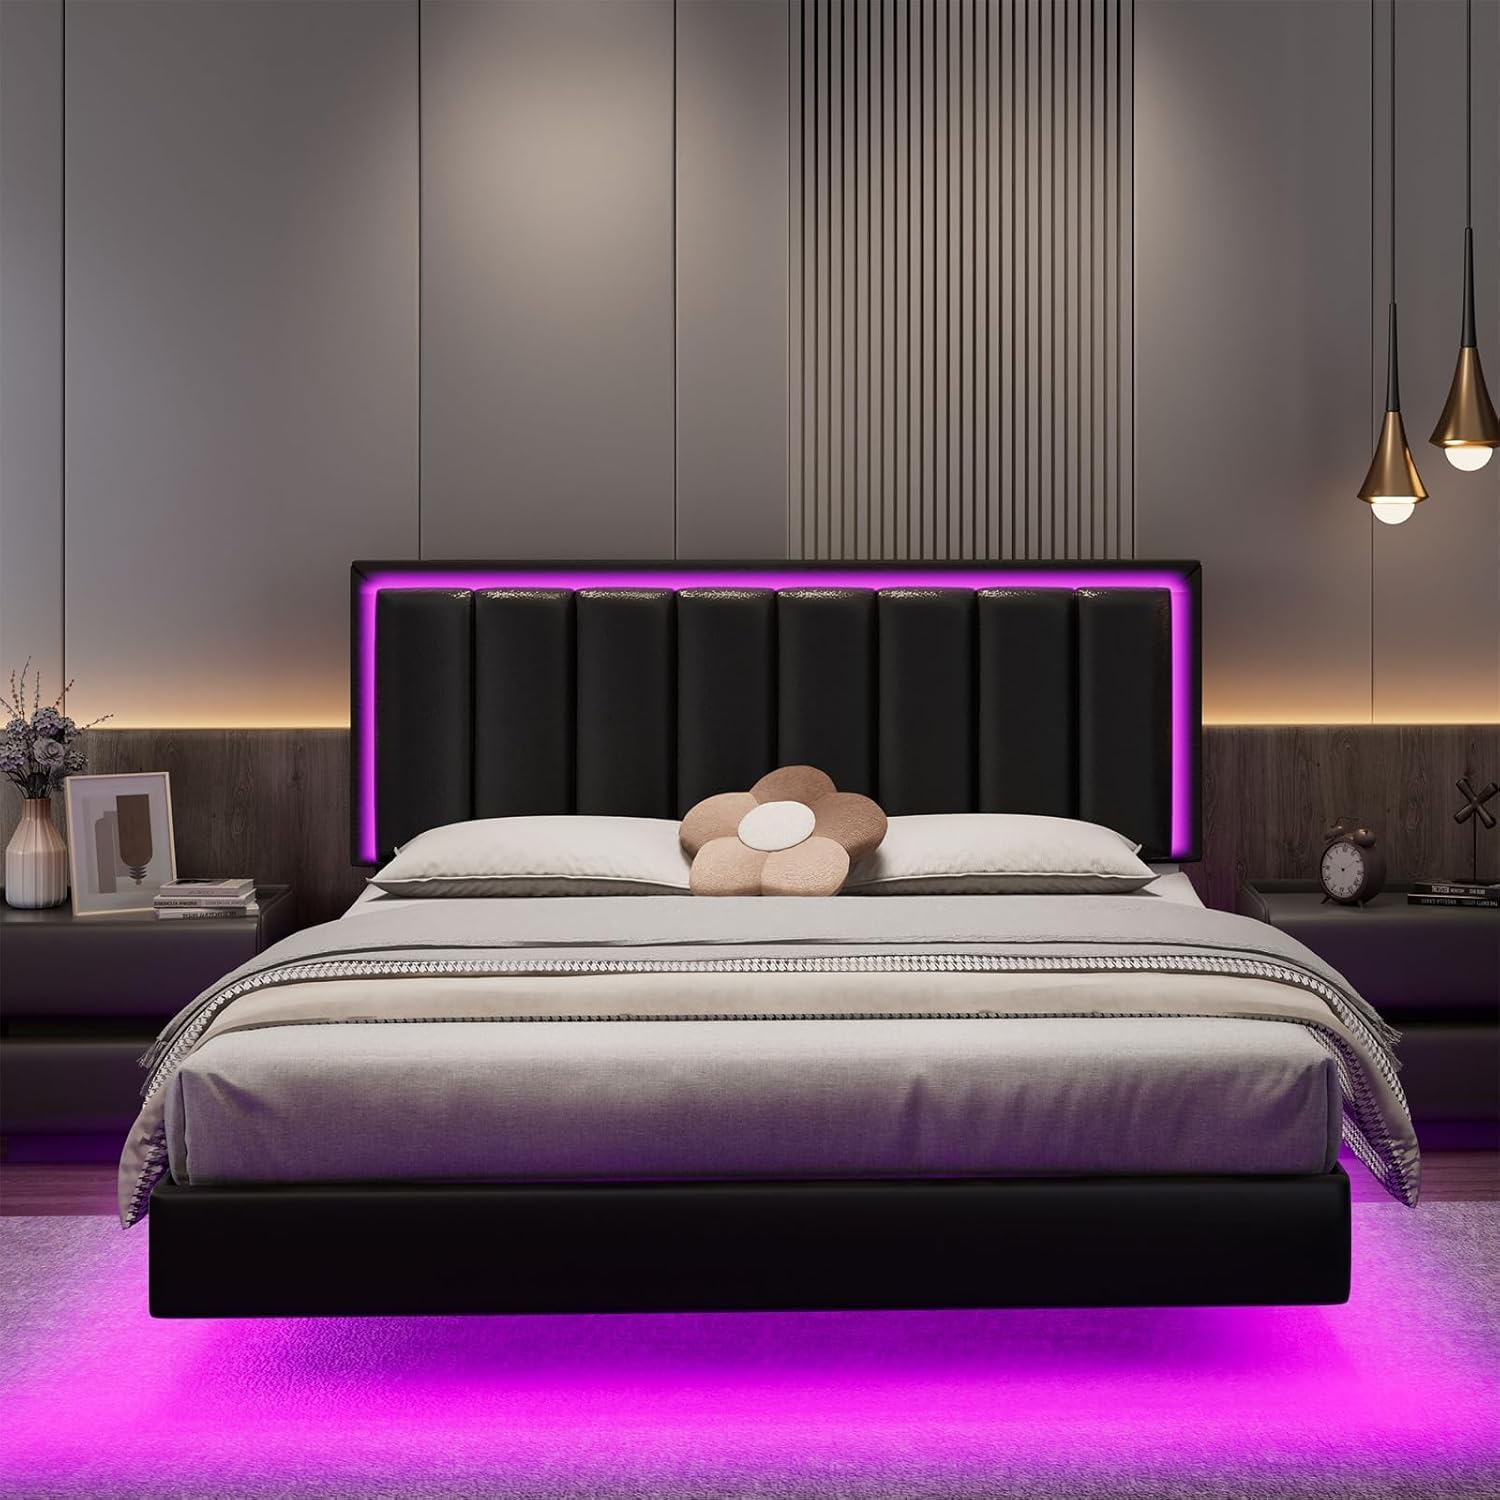
Image: The bed frame with LED lights, illustrating control options via remote and mobile application.
Maintenance
Regular maintenance will prolong the life and appearance of your bed frame.
- Cleaning: For the faux leather upholstery, wipe with a soft, damp cloth. Avoid harsh chemicals or abrasive cleaners. For the metal frame and wood slats, a dry cloth is sufficient.
- Tightening: Periodically (every 3-6 months) check all bolts and screws and re-tighten them to ensure the frame remains stable and noise-free.
- LED Lights: The LED lights are designed for long-term use. If issues arise, check the power connection and consult the troubleshooting section. Do not attempt to replace individual LEDs.
- Ventilation: Ensure adequate air circulation around the bed to prevent moisture buildup, especially if placed against a wall.

Image: Detail of the faux leather upholstery, emphasizing its durability and ease of cleaning.
Troubleshooting
| Problem | Possible Cause | Solution |
|---|---|---|
| Bed frame is wobbly/noisy. | Loose bolts or screws; slats not properly seated; missing foam strip. | Re-tighten all bolts and screws. Ensure slats are correctly placed and the foam strip is on the center pole. |
| LED lights not working. | Power adapter unplugged; loose connection; remote battery dead; app not paired. | Check power connection. Ensure all LED strip connections are secure. Replace remote battery. Re-pair with the mobile app. |
| LED colors are incorrect or unresponsive. | Remote/app issue; interference. | Try resetting the LED controller (unplug and replug). Ensure no obstructions between remote and receiver. Re-pair the app. |
| Mattress slides on the frame. | Mattress not compatible with floating design; no anti-slip measures. | Ensure mattress height is within recommended range (8"-12"). Consider using an anti-slip mat between the mattress and slats. |
Specifications
| Feature | Detail |
|---|---|
| Size | Queen |
| Product Dimensions | 81.9"L x 60.2"W x 42.5"H |
| Special Feature | LED Strips, No Box Spring Needed |
| Color | Black |
| Finish Type | Unfinished |
| Included Components | Headboard, LED Strips |
| Compatible With Mattress Size | Queen |
| Brand | IMMERSTABLE |
| Assembly Required | Yes |
| Manufacturer | IMMERSTABLE |
| Form Factor | Adjustable Bed |
| Item Weight | 66 pounds |
| Item Model Number | Modern |
| Date First Available | October 31, 2024 |

Image: Detailed dimensions of the Queen size bed frame.
Warranty and Support
For warranty information, please refer to the documentation included with your purchase or contact IMMERSTABLE customer support directly. If you encounter any issues or have questions not covered in this manual, please reach out to our support team for assistance.
IMMERSTABLE Customer Support:
- Website: Visit the IMMERSTABLE Store on Amazon
- Email: Refer to product packaging for contact email.
- Phone: Refer to product packaging for contact number.
Ask a question about this manual
Ask about setup, troubleshooting, compatibility, parts, safety, or missing instructions. Manuals+ will review the question and use this page’s manual context to help answer it.