E2 LIGHTING E2-LHB06-L3-220W-H-50K-E-M-2p
E2 LIGHTING Linear High Bay LED Light User Manual
Model: E2-LHB06-L3-220W-H-50K-E-M-2p
2FT Linear High Bay with Emergency Battery Backup, LED Shop Lights with Motion Sensor
1. Product Overview
Thank you for choosing the E2 LIGHTING Linear High Bay LED Light. This industrial-grade fixture is designed to provide powerful, energy-efficient illumination for large spaces such as warehouses, workshops, and commercial facilities. Featuring an integrated motion sensor and an emergency battery backup, this light ensures optimal performance, safety, and energy savings.
Key Features:
- High Brightness: Delivers 33,500 lumens at 5000K daylight color temperature for clear, crisp illumination.
- Emergency Battery Backup: Provides 25W of power for up to 90 minutes during power outages, ensuring continuous lighting.
- Integrated Motion Sensor: Automatically adjusts brightness based on activity, enhancing energy efficiency.
- Dimmable: Allows for adjustable brightness levels to suit various needs and further optimize energy consumption.
- Durable Construction: Made from aluminum and plastic, designed for robust performance in demanding environments.

Figure 1.1: Key Features and Benefits of the E2 Lighting High Bay LED Light.
2. Important Safety Instructions
Please read all instructions carefully before installation and operation. Failure to follow these instructions may result in electric shock, fire, or other hazards.
- WARNING: Risk of electric shock. Disconnect power at the fuse or circuit breaker before installation or servicing.
- Installation should be performed by a qualified electrician in accordance with all national and local electrical codes.
- Ensure the fixture is properly grounded to avoid potential electrical hazards.
- Do not modify or alter the fixture in any way. Any modifications will void the warranty.
- Operate the fixture only within the specified voltage range (120-277 Volts).
- Do not look directly into the LED light source when the fixture is powered on.
- Keep flammable materials away from the fixture during operation.
- Ensure the mounting structure can safely support the weight of the fixture (17 pounds per unit).
3. Package Contents
Verify that all components are present and undamaged before beginning installation.
- E2 LIGHTING Linear High Bay LED Light Fixture (2 units)
- Mounting Hardware (chains and hooks)
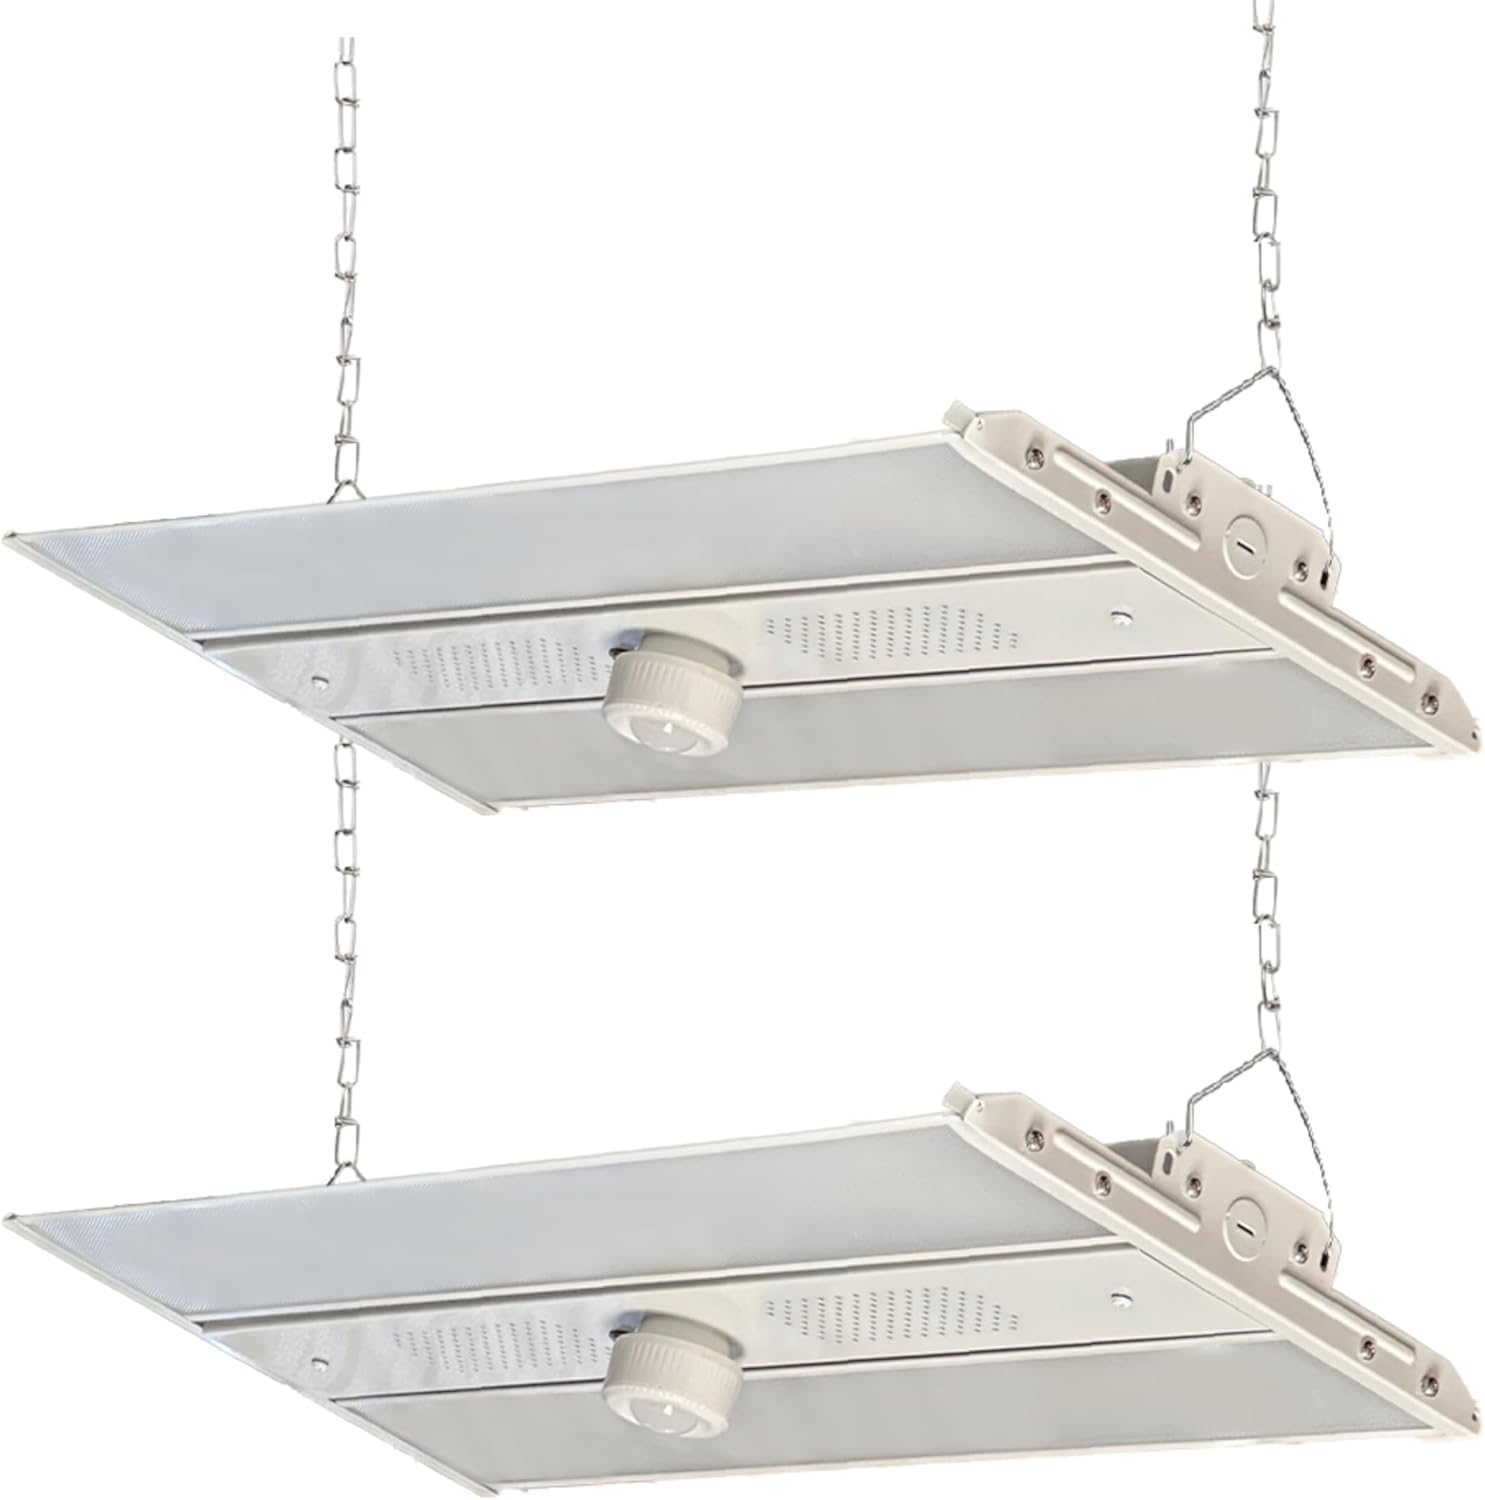
Figure 3.1: E2 Lighting Linear High Bay LED Light Fixtures.

Figure 3.2: Dimensions and Included Mounting Accessories.
4. Installation Guide
This section provides general guidelines for installing your E2 LIGHTING Linear High Bay LED Light. Always consult a qualified electrician for professional installation.
4.1 Mounting
- Ensure power is disconnected at the circuit breaker before starting.
- Determine the desired mounting location. The fixture is designed for suspension mounting using the provided chains.
- Securely attach appropriate ceiling hooks or mounting points to the structural ceiling. Ensure these points can support the fixture's weight.
- Attach the provided chains to the fixture's mounting brackets and then to the ceiling hooks. Adjust chain length to achieve the desired hanging height.
- Verify the fixture is level and securely suspended.

Figure 4.1: Close-up of Chain Mounting Point.
4.2 Wiring
- Connect the fixture's wiring to the main power supply. Typically, this involves connecting the Live (black), Neutral (white), and Ground (green) wires.
- If using a dimming function, connect the dimming wires (usually purple and gray) to a compatible 0-10V dimmer switch.
- Ensure all connections are secure and insulated with appropriate wire connectors.
4.3 Initial Power-Up
- Once mounting and wiring are complete, restore power at the circuit breaker.
- The light should illuminate. If not, refer to the Troubleshooting section.
- Allow the emergency battery backup to charge for at least 24 hours after initial installation to ensure full functionality.
5. Operation
5.1 Motion Sensor Functionality
The integrated motion sensor detects movement within its range and automatically activates or adjusts the light output. This feature helps conserve energy by ensuring the light is only at full brightness when needed.
- The sensor is typically located on the underside of the fixture.
- Avoid placing obstructions directly in front of the sensor that could block its detection range.
- Refer to the sensor's specific instructions (if provided separately or on the fixture) for adjusting sensitivity or time delay settings.
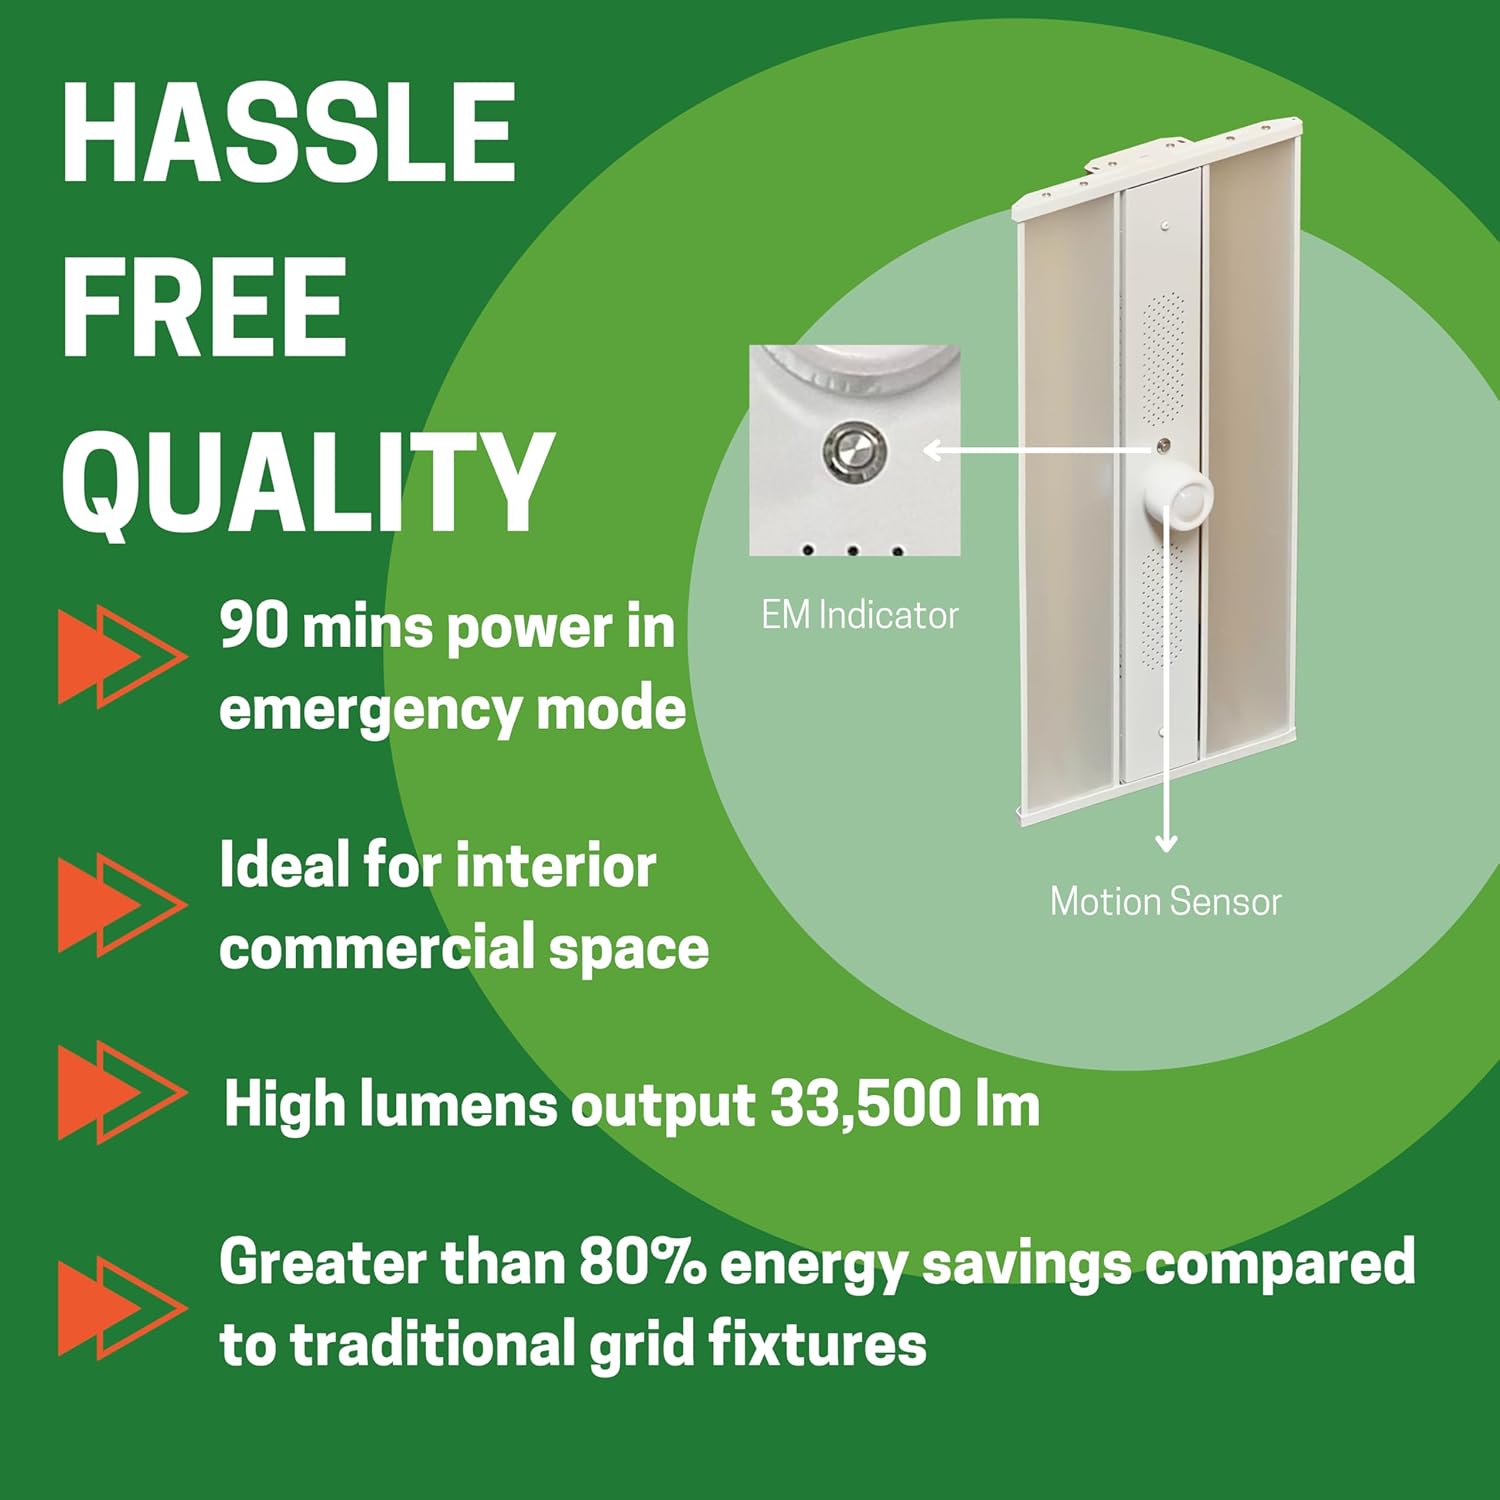
Figure 5.1: Motion Sensor and EM Indicator Location.
5.2 Dimming Control
This fixture supports 0-10V dimming. When connected to a compatible 0-10V dimmer switch (sold separately), you can adjust the light output from 100% down to 10% or lower, depending on the dimmer's capabilities.
- Ensure the dimmer switch is compatible with 0-10V LED drivers.
- Follow the dimmer manufacturer's instructions for installation and operation.
5.3 Emergency Battery Backup
The built-in emergency battery backup provides illumination during power outages. It automatically switches on when the main power supply is interrupted.
- The emergency mode provides 25W of light output for approximately 90 minutes.
- The battery charges automatically when main power is present.
- Regularly test the emergency function by temporarily cutting power to the fixture's circuit to ensure it activates correctly.
6. Care and Maintenance
To ensure the longevity and optimal performance of your E2 LIGHTING High Bay LED Light, follow these simple maintenance guidelines:
- Cleaning: Disconnect power before cleaning. Use a soft, dry, or slightly damp cloth to wipe the exterior of the fixture. Do not use abrasive cleaners, solvents, or cleaners containing alcohol, as they may damage the finish or electrical components.
- Inspection: Periodically inspect the fixture for any signs of damage, loose wiring, or wear. Ensure all mounting hardware remains secure.
- No User-Serviceable Parts: The LED light source and emergency battery are not user-serviceable. Do not attempt to open or repair the fixture. Contact qualified personnel for any repairs.
7. Troubleshooting
If you encounter issues with your E2 LIGHTING High Bay LED Light, refer to the table below for common problems and solutions.
| Problem | Possible Cause | Solution |
|---|---|---|
| Light does not turn on. | No power supply; Loose wiring; Faulty switch/breaker. | Check power supply at the source; Verify all wire connections are secure; Reset circuit breaker or check switch. |
| Motion sensor not detecting movement or light stays on. | Sensor obstructed; Incorrect sensitivity/time delay settings; Constant motion in detection zone. | Clear obstructions from sensor; Adjust sensor settings (if applicable); Ensure no continuous motion. |
| Emergency mode does not activate during power outage. | Battery not charged; Battery fault. | Allow 24 hours for initial battery charge; If issue persists, contact customer support. |
| Light flickers or dims unexpectedly. | Unstable power supply; Loose wiring; Incompatible dimmer. | Check power source stability; Secure all wire connections; Ensure dimmer is 0-10V compatible. |
If the problem persists after attempting these solutions, please contact E2 LIGHTING customer support.
8. Technical Specifications
Detailed specifications for the E2 LIGHTING Linear High Bay LED Light (220W model):
| Specification | Value |
|---|---|
| Brand | E2 LIGHTING |
| Model Name | Linear High Bay 220W with Battery and Motion Sensor |
| Part Number | E2-LHB06-L3-220W-H-50K-E-M |
| Item Model Number | E2-LHB06-L3-220W-H-50K-E-M-2p |
| Wattage | 220 watts |
| Brightness | 33,500 Lumen |
| Color Temperature | 5000 Kelvin (Daylight White) |
| Voltage | 120-277 Volts |
| Emergency Mode Output | 25W |
| Emergency Run Time | Approx. 90 minutes |
| Material | Aluminum, Plastic |
| Product Dimensions | 48"L x 1.87"W x 24"H |
| Item Weight | 17 Pounds |
| Indoor/Outdoor Usage | Indoor |
| Special Features | Dimmable, Energy Efficient, Motion Sensor |
| Included Components | Mounting Hardware |

Figure 8.1: Other Available Wattage Options.
9. Warranty Information
E2 LIGHTING products are manufactured to the highest quality standards. This product comes with a manufacturer's warranty covering defects in materials and workmanship under normal use. Please refer to the product packaging or contact E2 LIGHTING customer support for specific warranty terms and duration.
Keep your purchase receipt as proof of purchase for any warranty claims.

Figure 9.1: E2 Lighting Quality Assurance.
10. Customer Support
For technical assistance, warranty inquiries, or any questions regarding your E2 LIGHTING Linear High Bay LED Light, please contact our customer support team.
E2 LIGHTING International Inc.
Please visit our official website or refer to your product packaging for the most current contact information (phone, email, or support portal).