1. Introduction
This manual provides essential information for the safe and efficient operation of your Acer VERO HL6810ATV projector. Please read this manual thoroughly before using the projector and retain it for future reference.
The Acer VERO HL6810ATV is an UltraHD 4K projector featuring an advanced hybrid laser/LED light source. This design contributes to energy efficiency and enhanced brightness. It supports a 240Hz refresh rate and integrates Android TV for smart functionality.
2. Safety Information
- Do not block ventilation openings. Ensure adequate airflow around the projector.
- Do not expose the projector to rain or moisture to prevent fire or electric shock.
- Avoid looking directly into the projector lens when the lamp is on. The intense light can damage your eyes.
- Place the projector on a stable, level surface to prevent it from falling.
- Use only the power adapter supplied with the projector.
- Disconnect the power cord from the outlet if the projector will not be used for an extended period.
3. Package Contents
Verify that all items listed below are included in your package:
- Acer VERO HL6810ATV Projector
- Power Cord
- Remote Control with Batteries
- Quick Start Guide
- User Manual (this document, typically digital)
4. Product Overview
4.1 Front and Side View

Figure 4.1: Front-side view of the Acer VERO HL6810ATV projector, showing the main lens, ventilation grilles, and focus/zoom controls. The lens is emitting light, indicating operation.

Figure 4.2: Side view of the Acer VERO HL6810ATV projector, highlighting the extensive ventilation grilles on the left side and the large projection lens on the front. This view also shows the adjustable feet.
4.2 Top View and Control Panel
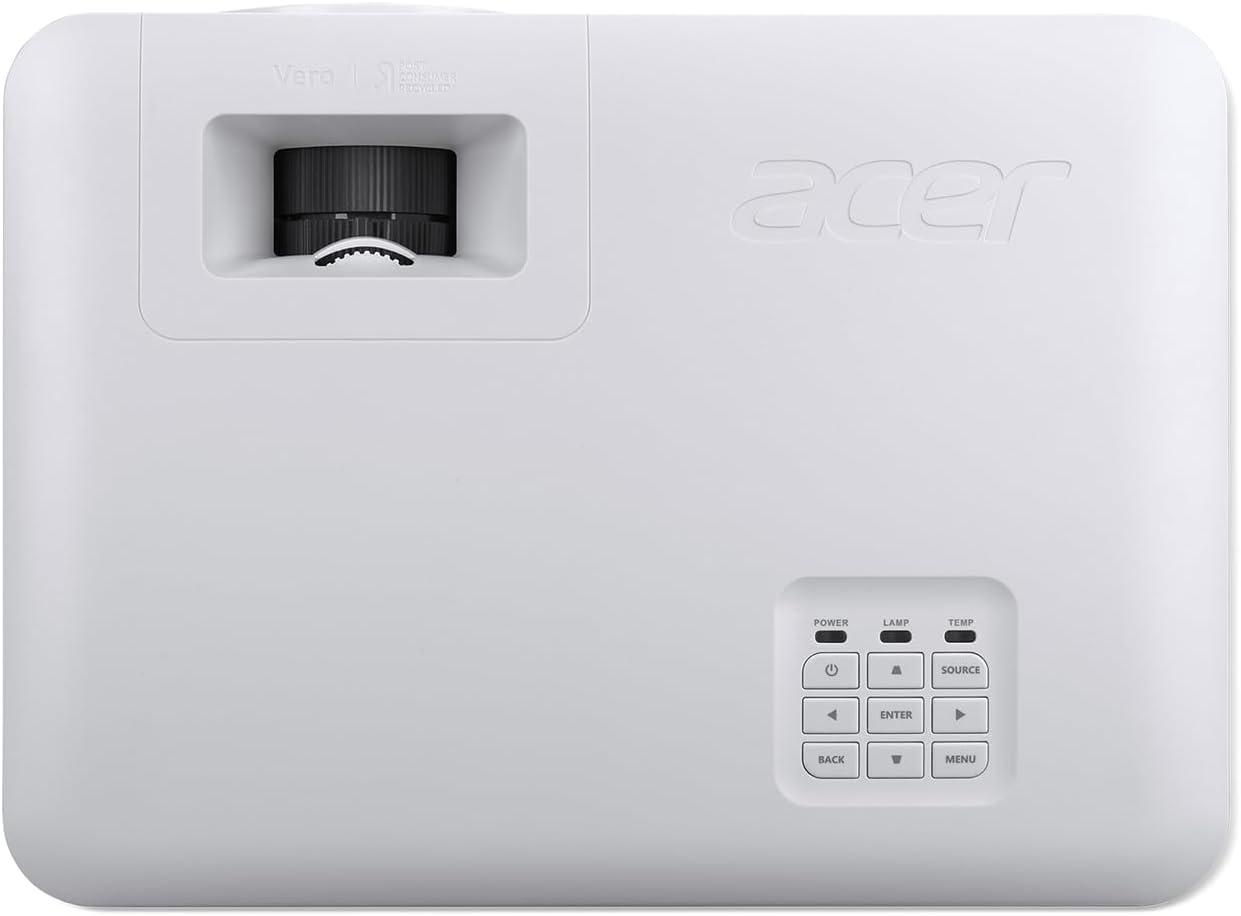
Figure 4.3: Top view of the Acer VERO HL6810ATV projector, displaying the integrated control panel on the right side. The control panel includes buttons for power, lamp, temperature, source selection, navigation, enter, back, and menu.
The control panel on the top of the projector allows for basic operation without the remote control. It includes:
- POWER: Turns the projector on or off.
- LAMP/TEMP: Indicators for lamp status and temperature warnings.
- SOURCE: Selects the input source (HDMI, etc.).
- Navigation Arrows (Up, Down, Left, Right): Navigate menus and adjust settings.
- ENTER: Confirms selections.
- BACK: Returns to the previous menu.
- MENU: Accesses the main menu.
5. Setup
5.1 Projector Placement
Consider the following when placing your projector:
- Projection Distance: The distance from the projector to the screen will determine the image size. Refer to the specifications for recommended throw distances.
- Screen Alignment: Position the projector perpendicular to the screen for a rectangular image.
- Ventilation: Ensure there is at least 30 cm (12 inches) of clear space around the projector's ventilation openings.
- Surface: Place the projector on a flat, stable surface. The adjustable feet can be used to fine-tune the angle.
5.2 Power Connection
- Connect the power cord to the projector's power input port.
- Plug the other end of the power cord into a grounded electrical outlet.
5.3 Connecting Input Sources
The Acer VERO HL6810ATV supports HDMI connectivity.
- Connect an HDMI cable from your source device (e.g., Blu-ray player, laptop, gaming console) to the HDMI input port on the projector.
- Ensure the source device is powered on.
5.4 Initial Power-On and Adjustment
- Press the Power button on the projector or the remote control to turn on the unit.
- Once the image appears, use the focus ring around the lens to sharpen the image.
- If the image is trapezoidal, use the keystone correction function (accessible via the menu or dedicated button on the remote) to adjust it to a rectangular shape.
6. Operating the Projector
6.1 Using the Remote Control
The remote control provides full functionality for operating the projector, including power, input selection, menu navigation, volume control, and smart TV features.
6.2 Navigating Android TV
Your projector comes with integrated Android TV. Use the remote control's navigation buttons to browse apps, stream content, and access settings. Ensure the projector is connected to a Wi-Fi network for full smart TV functionality.
- Home Screen: Access installed apps, recommended content, and input sources.
- Settings: Configure network, display, sound, and system preferences.
- Google Assistant: Use voice commands via the remote control for search and control.
6.3 Input Source Selection
Press the SOURCE button on the remote control or the projector's control panel to cycle through available input sources (e.g., HDMI 1, HDMI 2, Android TV).
6.4 Picture and Audio Settings
Access the main menu to adjust picture and audio settings:
- Picture Mode: Select from predefined modes (e.g., Standard, Bright, Movie, Game) or customize settings like brightness, contrast, color, and sharpness.
- Aspect Ratio: Adjust the image aspect ratio (e.g., 16:9, 4:3, Auto).
- Sound Mode: Choose audio presets or adjust bass and treble.
- Volume: Control the audio output level.
7. Maintenance
7.1 Cleaning the Projector Lens
Use a soft, lint-free cloth specifically designed for optical lenses. Do not use abrasive cleaners or excessive pressure, as this can scratch the lens surface.
7.2 Cleaning the Projector Casing and Vents
Wipe the projector casing with a soft, damp cloth. For the ventilation grilles, use a soft brush or a vacuum cleaner with a brush attachment to remove dust buildup. Ensure the projector is powered off and unplugged before cleaning.
7.3 Storage
If storing the projector for an extended period, power it off correctly, unplug it, and store it in a cool, dry place away from direct sunlight and extreme temperatures. It is recommended to use the original packaging for storage.
8. Troubleshooting
| Problem | Possible Cause | Solution |
|---|---|---|
| No power | Power cord not connected; Power outlet faulty; Projector in standby mode. | Check power cord connection; Try a different outlet; Press power button. |
| No image | Incorrect input source selected; Source device not powered on or connected; Lens cap on. | Select correct input source; Check source device and cable connections; Remove lens cap. |
| Image is blurry | Focus not adjusted; Projector too close/far from screen. | Adjust the focus ring; Reposition the projector. |
| Image is trapezoidal | Projector not perpendicular to screen. | Adjust keystone correction in the menu or reposition the projector. |
| No sound | Volume too low; Muted; Audio cable not connected (if applicable); Source device audio settings. | Increase volume; Unmute; Check audio connections; Adjust audio settings on source device. |
9. Specifications
| Feature | Detail |
|---|---|
| Brand | Acer |
| Model Number | HL6810ATV |
| Display Technology | DLP |
| Light Source | Hybrid Laser/LED |
| Brightness | 4000 ANSI Lumens |
| Native Resolution | 1920 x 1080 (Full HD) |
| Maximum Display Resolution | 3840 x 2160 (4K UHD) |
| Refresh Rate | 240Hz |
| Connectivity Technology | HDMI |
| Hardware Interface | HDMI |
| Control Method | Remote Control, Voice |
| Mounting Type | Table Mount |
| Operating System | Android TV |
| Item Weight | 4 Kilograms |
10. Warranty and Support
For detailed warranty information, please refer to the warranty card included with your product or visit the official Acer support website. Keep your proof of purchase for warranty claims.
If you encounter issues not covered in the troubleshooting section or require further assistance, please contact Acer Customer Support. Contact details can typically be found on the Acer website or in your product's quick start guide.
Note: Software updates are not guaranteed beyond the initial purchase date. Spare parts availability information is not provided.


