1. Introduction
This manual provides detailed instructions for the installation, operation, and maintenance of your Generic Black Box Traffic Recorder 3-Way Dash Camera. Please read this manual thoroughly before using the device to ensure proper functionality and safety.
The Generic Black Box Traffic Recorder is a versatile dash camera system designed to provide comprehensive video surveillance for your vehicle. It features three camera lenses to record the front, interior cabin, and rear views simultaneously, offering a complete record of your journeys.
2. Package Contents
Verify that all items listed below are present in your package:
- Generic Black Box Traffic Recorder Dash Camera
- Car Mount (Suction Cup)
- Car Charger
- Charging Cable (USB)
- Cable Clips
- User Manual (This document)

Figure 2.1: Contents of the package including the dash camera, mount, and cables. This image illustrates the main unit with its suction cup mount, a car charger, and connecting cables.
3. Product Overview
The dash camera features a compact design with multiple lenses and an integrated display. Familiarize yourself with the device's components.

Figure 3.1: Front view of the dash camera, showing the main lens, display screen, and suction cup mount. The screen displays a car image, indicating its recording function.

Figure 3.2: Rear view of the dash camera, highlighting the cabin-facing lens and product details like F/2.0 1080P FOV 130. This lens records the interior of the vehicle.
Key Features:
- Three-Way Camera System: Records front, interior, and rear simultaneously.
- 1296p HD Resolution: High-definition video capture for clear details.
- G-Sensor Technology: Automatically detects impacts and locks footage.
- Integrated Microphone: Records audio with video footage.
- Parking Monitor: Motion detection and impact-triggered recording while parked.
- Loop Recording: Overwrites older footage for continuous recording.
- Wi-Fi Connectivity: Connects to mobile app for live view and downloads.
- Night Vision: Enhanced recording in low-light conditions.
- 170-Degree Wide Angle: Broad field of view for comprehensive coverage.
4. Setup and Installation
4.1 Inserting a MicroSD Card
A MicroSD card (not included, up to 32GB supported) is required for recording. Insert the card into the designated slot with the contacts facing the front of the camera until it clicks into place.
Note: Format the MicroSD card within the camera settings before first use to ensure optimal performance.
4.2 Mounting the Dash Camera
- Clean the windshield area where you intend to mount the camera.
- Attach the suction cup mount to the camera.
- Press the suction cup firmly against the windshield and flip the lever to secure it. Position the camera to ensure a clear view of the road without obstructing your driving vision.
- Adjust the camera angle to capture the desired field of view for the front lens.
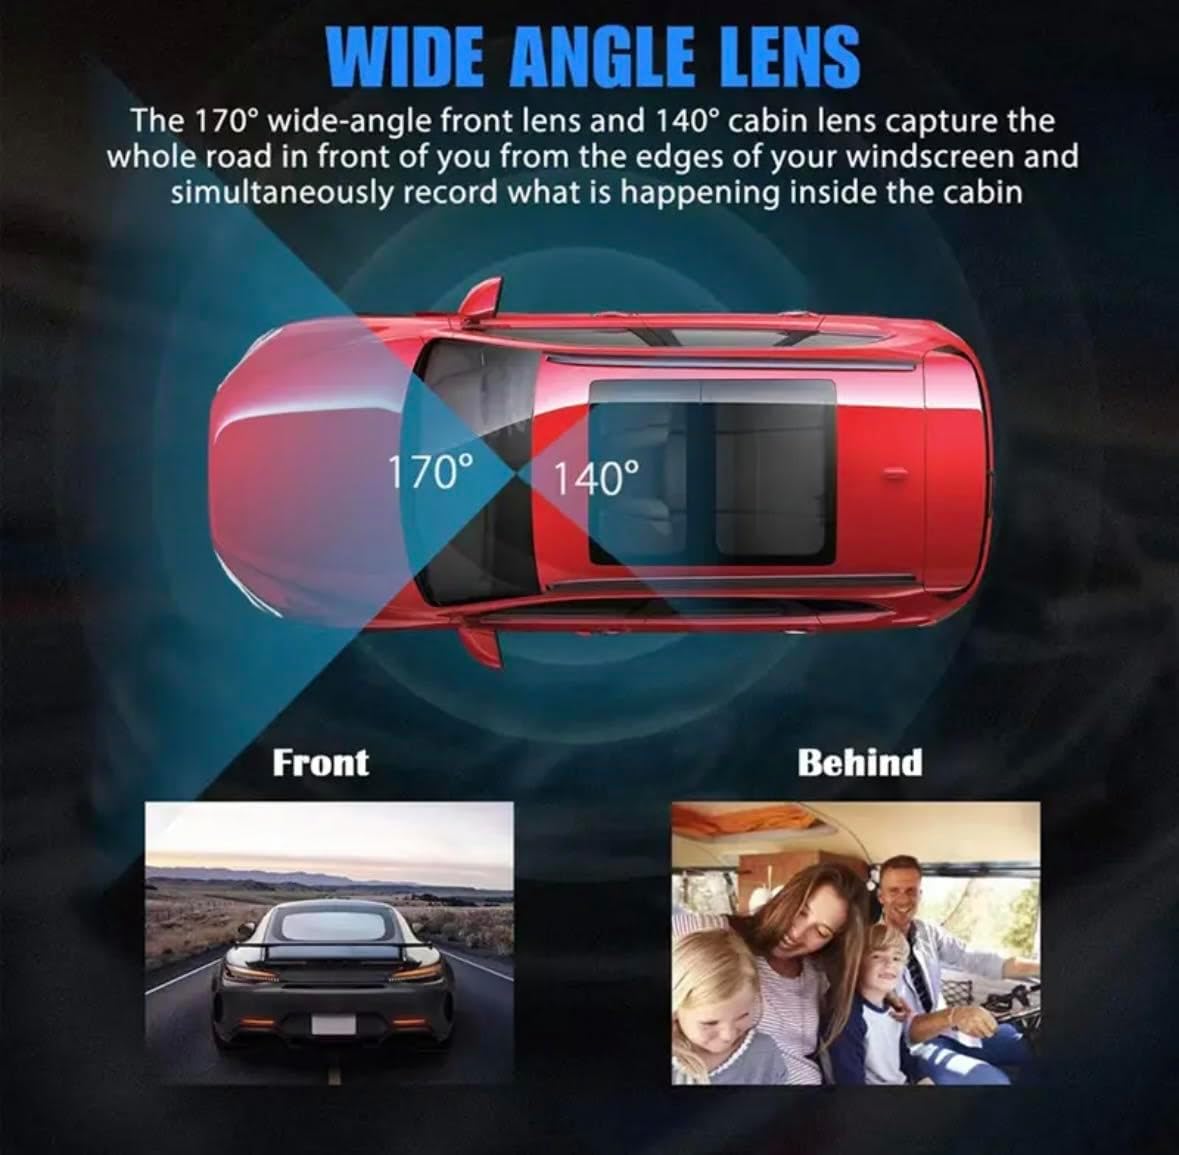
Figure 4.1: Illustration of the wide-angle coverage (170° front, 140° cabin) provided by the dash camera. This diagram helps in positioning the camera for optimal recording.
4.3 Powering the Dash Camera
- Connect the provided car charger to the camera's power input port.
- Plug the other end of the car charger into your vehicle's 12V power outlet (cigarette lighter socket).
- Route the charging cable neatly along the windshield and dashboard using the provided cable clips to avoid obstructing your view or interfering with vehicle controls.
The camera will typically power on automatically when the vehicle's ignition is turned on and begin recording.
5. Operating Instructions
5.1 Basic Operation
- Power On/Off: The camera powers on automatically with vehicle ignition. To manually power on/off, press and hold the power button.
- Recording: Recording starts automatically when the camera powers on. A flashing indicator light usually signifies active recording.
- Menu Navigation: Use the menu buttons (refer to your camera's specific button layout) to navigate through settings.
5.2 Mobile App Connectivity (Wi-Fi)
The dash camera supports Wi-Fi connectivity for viewing live footage, downloading recordings, and adjusting settings via a mobile application (available for iOS and Android).
- Download the official mobile application from your smartphone's app store.
- Enable Wi-Fi on your dash camera (usually via the menu settings).
- On your smartphone, connect to the dash camera's Wi-Fi network. The network name (SSID) and password will be displayed on the camera screen or in its settings.
- Open the mobile app. You should now be able to view live footage, access recorded files, and modify camera settings.
Troubleshooting Tip: If Wi-Fi connection issues occur, ensure the app is updated and try restarting both the camera and your smartphone's Wi-Fi.
5.3 G-Sensor and Emergency Recording
The built-in G-Sensor detects sudden impacts or rapid acceleration/deceleration. When triggered, it automatically locks the current video segment to prevent it from being overwritten by loop recording. These files are typically stored in a separate "Event" folder on the MicroSD card.
5.4 Parking Monitor
When enabled, the parking monitor feature allows the camera to record events while your vehicle is parked. It can be triggered by motion detection or impact detection, providing surveillance even when the vehicle is off.
Note: Continuous use of the parking monitor may drain your vehicle's battery. Consider using a hardwire kit with low-voltage protection if extended parking surveillance is required.
6. Maintenance
6.1 Cleaning the Camera
- Use a soft, dry cloth to clean the camera body.
- For lenses, use a specialized lens cleaning cloth and solution to avoid scratches.
- Do not use abrasive cleaners or solvents.
6.2 MicroSD Card Management
- Formatting: Regularly format the MicroSD card (e.g., once a month) within the camera's settings to maintain optimal performance and prevent data corruption.
- Replacement: MicroSD cards have a limited lifespan due to continuous overwriting. Replace the card if you notice recording errors or degraded performance.
7. Troubleshooting
| Problem | Possible Cause | Solution |
|---|---|---|
| Camera does not power on. | No power supply; faulty car charger; loose connection. | Check car charger connection; ensure vehicle's 12V outlet is functional; try a different charger. |
| Recording stops or fails. | MicroSD card full or corrupted; incompatible MicroSD card; faulty card. | Format the MicroSD card; replace with a high-quality Class 10 or U1/U3 card; check card capacity. |
| Video footage is blurry. | Protective film on lens; dirty lens; camera not focused. | Remove any protective film; clean lenses with a soft cloth; ensure camera is securely mounted. |
| Wi-Fi connection issues. | Incorrect Wi-Fi password; app not updated; camera Wi-Fi not enabled. | Verify Wi-Fi password; update mobile app; enable Wi-Fi in camera settings; restart camera and phone. |
| Camera gets hot during operation. | Normal operation; prolonged exposure to direct sunlight. | Slight warming is normal. Ensure adequate ventilation; avoid direct sunlight when parked for extended periods. |
8. Specifications
| Model Name | Black Box Traffic Recorder |
| Video Capture Resolution | 1296p (Front), 1080p (Front), 480p (Inner/Rear) |
| Field of View | 170 Degrees (Front) |
| Connectivity Technology | Wi-Fi |
| Special Features | Compact Design, Motion Sensing, Parking Monitor, Three-Way Camera System, Mobile App Connectivity, SuperHD 1296p, Night Vision, G-Sensor Technology, Loop Recording |
| Supported Memory Card | MicroSD, up to 32GB (Class 10 or higher recommended) |
| Power Input | 12-24V DC (Car Charger) |
| Product Dimensions | 1 x 4 x 1.75 inches |
| Manufacturer | Alibaba |
9. Warranty and Support
For warranty information and technical support, please refer to the contact details provided by your retailer or the manufacturer's official website. Keep your purchase receipt as proof of purchase for warranty claims.
For common issues, please consult the Troubleshooting section of this manual or the FAQ section on the product support page.


