1. Introduction
This manual provides detailed instructions for the safe and effective use of the LUCKDANO AVD06 Non-Contact AC Voltage Detector. Please read this manual thoroughly before operation and retain it for future reference.
2. Safety Information
WARNING: Electrical shock hazard. Always exercise extreme caution when working with electricity.
- Do not use the device if it appears damaged or is not functioning correctly.
- Verify the device's operation on a known live circuit before use.
- This device is designed for AC voltage detection only.
- Adhere to all local and national electrical safety codes.
- The device complies with international safety standard CE CAT.II 1000V.
- Keep out of reach of children.
3. Product Features
- Non-contact AC voltage detection.
- Automatic or manual testing modes.
- Adjustable sensitivity for precise detection.
- Color-coded LED indicators (Green, Yellow, Red) for voltage strength.
- Audible beeper and visual light flash alerts.
- Ability to distinguish between zero and live wires.
- Integrated LED flashlight for dark environments.
- Automatic power-off function after 5 minutes of inactivity.
- Low battery indication.
- Designed to international safety standard CE CAT.II 1000V.
4. Package Contents
- 1 x LUCKDANO AVD06 Non-Contact AC Voltage Detector
- 1 x User Manual (this document)
Note: 1 x 9V 6F22 Battery is not included and must be purchased separately.
5. Setup
5.1 Battery Installation
- Locate the battery compartment cover on the back of the device.
- Slide or unclip the cover to open.
- Insert one 9V 6F22 battery, observing the correct polarity (+/-).
- Close the battery compartment cover securely.

Figure 1: Front view of the LUCKDANO AVD06 Non-Contact AC Voltage Detector, showing the tip, LED indicators, sensitivity dial, and mode button.

Figure 2: Comparison illustrating potential minor cosmetic differences between new and old production models. Functionality remains consistent.
6. Operating Instructions
6.1 Power On/Off
Press the power button (often integrated with the mode button or a separate button) to turn the device on. The device will typically start in Automatic Mode. To turn off, press and hold the power button, or it will auto-power off after 5 minutes of inactivity.
6.2 Automatic Mode (48V~1000V AC)
When powered on, the detector defaults to Automatic Mode. In this mode, the device automatically adjusts its sensitivity to detect AC voltage within the range of 48V to 1000V. Simply bring the tip of the detector near the wire or outlet you wish to test.
6.3 Manual Mode (12V~1000V AC) and Sensitivity Adjustment
- Press the "MODE" button to switch from Automatic Mode to Manual Mode.
- In Manual Mode, the sensitivity can be adjusted using the sensitivity knob (dial).
- Rotate the knob to increase (+) or decrease (-) the detection sensitivity.
- High Sensitivity: Useful for detecting hidden wires (e.g., behind walls) or low voltage signals (12V AC).
- Low Sensitivity: Recommended for detecting uncovered live wires to avoid false positives from adjacent circuits.

Figure 3: Angled view of the detector highlighting the sensitivity adjustment dial and the mode selection button.
6.4 Voltage Indication (LEDs and Beeper)
When AC voltage is detected, the device will provide both visual and audible alerts:
- LED Lights:
- Green LED: Indicates low voltage presence.
- Yellow LED: Indicates moderate voltage presence.
- Red LED: Indicates high voltage presence.
- Beeper: An audible beep will sound, increasing in frequency as the voltage strength increases or as the detector gets closer to the voltage source.
- Light Flash: The tip of the detector will flash.
6.5 Zero/Live Wire Distinction
In Manual Mode, by adjusting the sensitivity, you can often distinguish between live and neutral (zero) wires. A live wire will typically trigger a stronger indication (e.g., red LED, rapid beeping) at a lower sensitivity setting compared to a neutral wire, which may only trigger a weaker or no indication, or require higher sensitivity.
6.6 LED Flashlight Function
Press the flashlight button (usually located on the side or front) to activate the integrated LED flashlight. This is useful for illuminating dark work areas. Press the button again to turn off the flashlight.
7. Maintenance
- Cleaning: Wipe the device with a dry, soft cloth. Do not use abrasive cleaners or solvents.
- Battery Replacement: Replace the 9V battery when the low battery indicator appears or if the device fails to power on.
- Storage: Store the detector in a cool, dry place, away from direct sunlight and extreme temperatures. If storing for extended periods, remove the battery to prevent leakage.
8. Troubleshooting
| Problem | Possible Cause | Solution |
|---|---|---|
| Device does not power on. | Dead or incorrectly installed battery. | Replace the 9V battery, ensuring correct polarity. |
| No detection or weak signal. | Low sensitivity setting (in Manual Mode); battery low; voltage too low. | Increase sensitivity in Manual Mode; replace battery; ensure voltage is within detection range (12V-1000V AC). |
| False positives or erratic readings. | High sensitivity setting (in Manual Mode); interference from adjacent circuits. | Decrease sensitivity in Manual Mode; ensure proper isolation from other electrical sources. |
| Flashlight not working. | Battery low or dead; flashlight button not pressed correctly. | Replace battery; press flashlight button firmly. |
9. Specifications
| Parameter | Value |
|---|---|
| Brand | LUCKDANO |
| Model | AVD06 |
| AC Voltage Range (Manual Mode) | 12V ~ 1000V |
| AC Voltage Range (Auto Mode) | 48V ~ 1000V |
| Frequency | 50Hz / 60Hz |
| Safety Standard | CE CAT.II 1000V |
| Power Supply | 1 x 9V 6F22 Battery (Not Included) |
| Dimensions | Approx. 173 x 48 x 34 mm (6.8 x 1.9 x 1.3 inches) |
| Weight | Approx. 101g (3.6oz) |
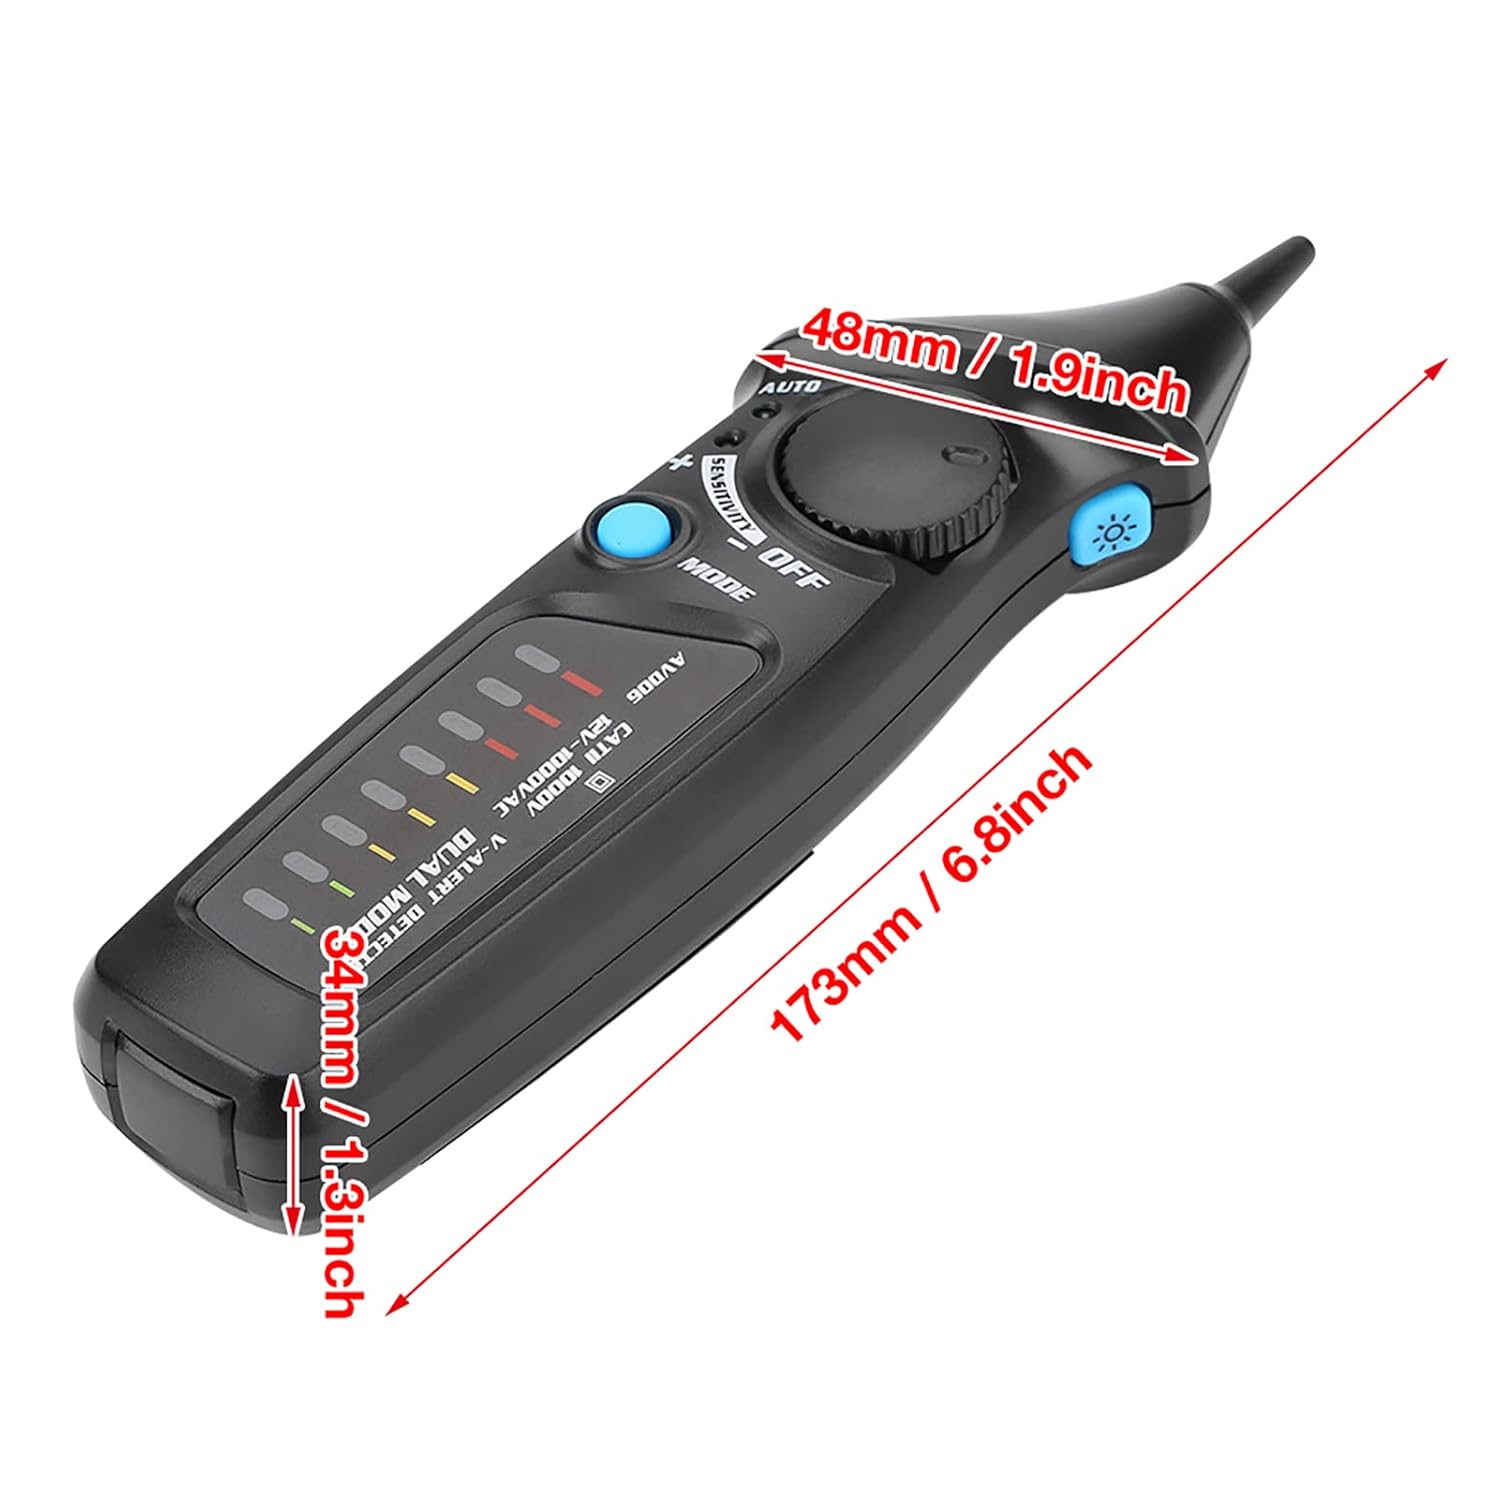
Figure 4: Diagram showing the approximate dimensions of the LUCKDANO AVD06 detector.
10. Warranty and Support
LUCKDANO products are designed for reliability and performance. For warranty information or technical support, please refer to the product packaging or contact your retailer. Keep your purchase receipt as proof of purchase.