1. Introduction
This manual provides detailed instructions for the safe and effective use of your Healthible 100a Permanent Jewelry Welder. This pulse arc welding machine is designed for precision welding of small metal workpieces, primarily for permanent jewelry applications, but also suitable for other delicate metal repairs such as denture repair, wire welding, and glasses repair.
Please read this manual thoroughly before operating the device to ensure proper setup, operation, and maintenance, and to prevent injury or damage to the unit.
2. Safety Instructions
WARNING: Always prioritize safety when operating welding equipment. Failure to follow these instructions may result in serious injury or damage to the equipment.
- Eye Protection: Always wear the provided safety goggles or appropriate welding eye protection to shield your eyes from intense light and sparks during operation.
- Ventilation: Ensure adequate ventilation in your workspace to disperse any fumes produced during welding.
- Workpiece Compatibility: This welder is designed for workpieces with a caliber range of 0.8-3mm. Do not attempt to weld items outside this range.
- Material Limitations: This machine is not suitable for welding iron bars, drilling holes, or welding complex workpieces that do not allow for precise contact.
- Workpiece Stability: The workpiece must be held infinitely close to the welding needle and remain fixed during welding to ensure proper welding effect.
- Power Supply: Connect the welder to a stable 110V power supply.
- Argon Gas: For optimal welding results, an argon bottle and regulator are recommended. Ensure proper connection and gas flow if using argon.
- Electrical Safety: Do not operate the welder with wet hands or in damp conditions. Ensure all connections are secure before powering on.
3. Package Contents
Carefully unpack your Healthible Permanent Jewelry Welder and verify that all components listed below are present. If any items are missing or damaged, please contact customer support.
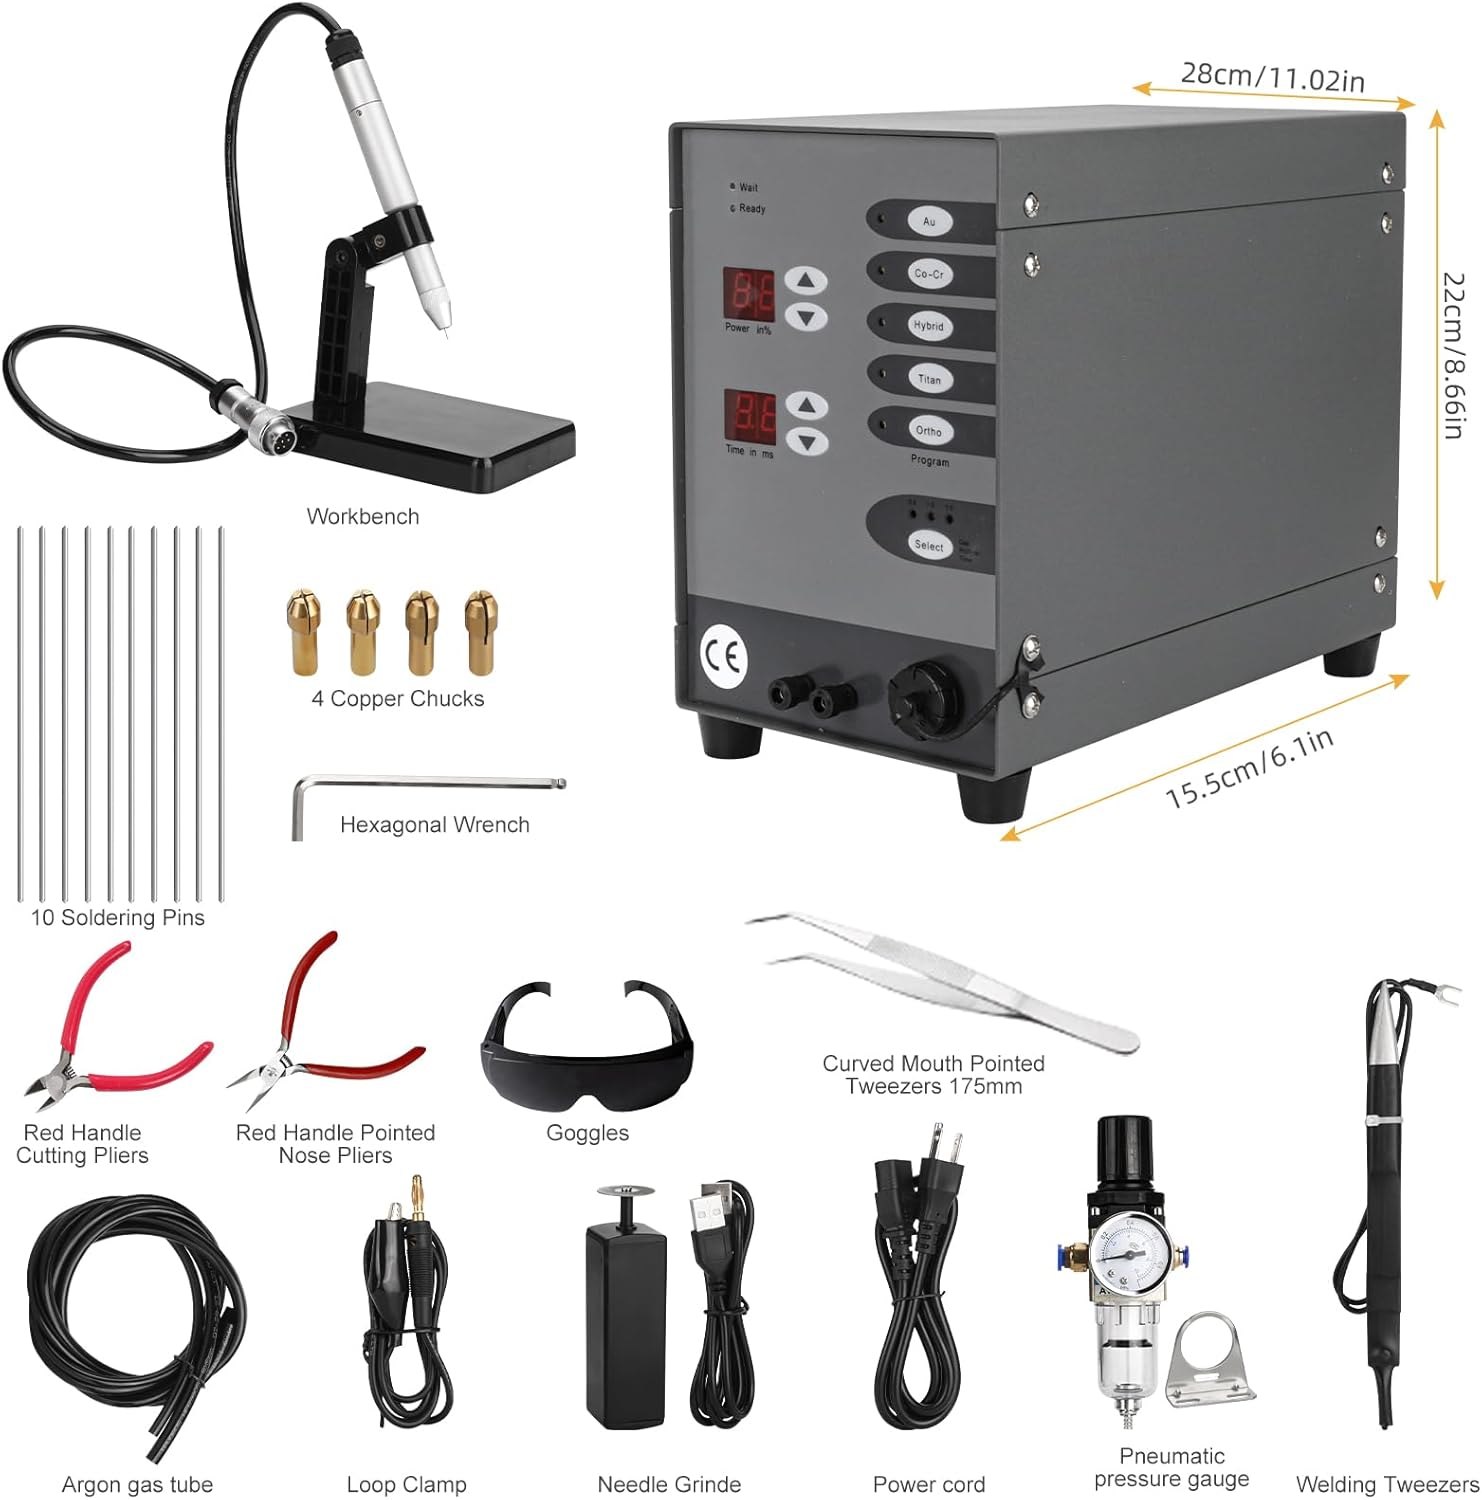
Figure 3.1: Overview of all included accessories and the main unit.
- Main Welder Unit
- Welding Handle with Stand (Workbench)
- 10 Tungsten Welding Needles (Soldering Pins)
- 4 Brass Collets (Copper Chucks)
- Hexagonal Wrench
- Curved Mouth Pointed Tweezers (175mm)
- Red Handle Cutting Pliers
- Red Handle Pointed Nose Pliers
- Safety Goggles
- Argon Gas Tube
- Loop Clamp
- Needle Grinder
- Power Cord
- Pneumatic Pressure Gauge (Argon Regulator)
- English Instruction Manual
4. Setup
Follow these steps to set up your welding machine for first use:
- Placement: Place the main welder unit on a stable, flat, and dry surface with adequate ventilation.
- Connect Welding Handle: Insert the connector of the welding handle into the "Welding handle interface" port on the front of the main unit.
- Connect Negative Circuit: Connect the negative circuit cable (usually a black cable with a clamp) to the "Negative circuit interface" port.
- Install Argon Regulator (Optional but Recommended):

Figure 4.1: Air Pressure Gauge (Argon Regulator) Installation.
- If using an argon bottle for improved welding results, connect the pneumatic pressure gauge (argon regulator) to your argon bottle.
- Connect the argon gas tube from the regulator to the 6mm argon gas interface on the back of the welder unit.
- Ensure all connections are tight to prevent gas leaks.
- Prepare Welding Needles: Before first use, or when a needle becomes dull, use the provided needle grinder to sharpen one end of a tungsten welding needle into a pointed tip.
- Insert Welding Needle: Select an appropriate brass collet for your chosen welding needle. Insert the sharpened welding needle into the collet, then secure the collet into the welding handle.
- Power Connection: Plug the power cord into the power connector on the back of the welder unit, then plug the other end into a standard 110V AC outlet.
5. Operating Instructions
The Healthible Permanent Jewelry Welder operates on the principle of spot welding. Precision and proper settings are key to successful welds.

Figure 5.1: Welder Control Panel Overview.
- Power On: Flip the power switch on the back of the unit to the "ON" position. The display will illuminate. The "Wait" indicator will be lit initially, then switch to "Ready" when the machine is prepared for welding.
- Select Material Program: Use the buttons (Au, Co-Cr, Hybrid, Titan, Ortho) to select the appropriate preset program for the material you are welding. This welder can be used for platinum, gold, K gold, silver copper, stainless steel plate, cobalt-chromium alloy, and pure titanium.
- Adjust Power and Time:
- Use the up/down arrows next to "Power in %" to adjust the welding power.
- Use the up/down arrows next to "Time in ms" to adjust the welding duration.
- Experiment with settings on scrap material first to find the optimal parameters for your specific workpiece.
- Position Workpiece: Place the workpiece on the workbench or hold it securely with the provided tweezers. Ensure the area to be welded is clean and free of debris.
- Perform Weld: Bring the workpiece infinitely close to the tip of the welding needle. Ensure the workpiece is fixed and does not move during the welding process. Press the foot pedal (if applicable, or trigger on handle) to initiate the weld. A brief flash and a small spark will occur.
- Inspect Weld: After welding, inspect the joint. If the weld is not satisfactory, adjust the power and time settings and re-attempt on a new spot or scrap.

Figure 5.2: Applications and Exclusions of the Welder.
6. Maintenance
Regular maintenance ensures the longevity and optimal performance of your welder.
- Welding Needle Care: The tungsten welding needles will wear down or become stained with debris over time. Use the provided needle grinder to re-sharpen the tip. Replace needles when they become too short or damaged.
- Collet Replacement: The brass collets may also wear. Replace them as needed to ensure a secure grip on the welding needles. Different sizes of soldering pins require different sizes of copper collets.
- Cleaning: Keep the main unit and accessories clean and free of dust and metal particles. Use a soft, dry cloth for cleaning. Do not use abrasive cleaners or solvents.
- Storage: When not in use, store the welder and its accessories in a clean, dry environment, away from direct sunlight and extreme temperatures.

Figure 6.1: Tungsten Needles and Brass Collets.
7. Troubleshooting
If you encounter issues with your welder, refer to the following common problems and solutions:
| Problem | Possible Cause | Solution |
|---|---|---|
| Poor welding effect / Weak weld |
|
|
| Machine does not power on |
|
|
| Welding needle sparks excessively or melts quickly |
|
|
8. Specifications
Refer to the table below for the technical specifications of your Healthible Permanent Jewelry Welder.

Figure 8.1: Main Performance Parameters.
| Parameter | Value |
|---|---|
| Manufacturer | Healthible |
| Model Number | cxt-dhj-fba-zx1 |
| Input Voltage/Frequency | 110V/60Hz |
| Input Power | 100W |
| Fuse | 250V/2.0A |
| Protection Grade | IP21 |
| Gas Supply Pressure | ≥0.1Mpa |
| Welding Voltage | 40V |
| Welding Current | 50A-600A |
| Welding Time | 3ms-30ms |
| Maximum Welding Frequency | 1Hz |
| Maximum Argon Consumption | 5L/min |
| Item Weight | 16.72 pounds |
| Package Dimensions | 14 x 12 x 10 inches |
| Color | Blackish |
9. Warranty and Support
For information regarding the product warranty, please refer to the warranty card included in your package or contact the seller directly. Healthible is committed to providing quality products and customer satisfaction.
If you require technical assistance, have questions about operation, or need to report a missing/damaged part, please contact the seller or manufacturer through the platform where you purchased the product. Please have your model number (cxt-dhj-fba-zx1) and purchase date ready when contacting support.