Heelay KW-CS02
Heelay 3200ml Dehumidifier User Manual
Model: KW-CS02
1. Important Safety Instructions
Please read all instructions carefully before using the dehumidifier and retain this manual for future reference. Failure to follow these instructions may result in electric shock, fire, or serious injury.
- Always place the dehumidifier on a stable, level surface.
- Ensure the power cord is not damaged and is properly plugged into a grounded outlet.
- Do not operate the unit with a damaged cord or plug.
- Keep the unit away from water and other liquids. Do not immerse the unit in water.
- Do not block the air intake or outlet vents. Maintain at least 20 cm (8 inches) clearance around the unit.
- Unplug the dehumidifier before cleaning, maintenance, or when not in use.
- This appliance is not intended for use by persons (including children) with reduced physical, sensory, or mental capabilities, or lack of experience and knowledge, unless they have been given supervision or instruction concerning use of the appliance by a person responsible for their safety.
- Do not use the dehumidifier in areas where flammable gases or liquids are stored.
- Empty the water tank regularly to prevent overflow.
2. Product Overview
The Heelay 3200ml Dehumidifier Model KW-CS02 is designed to efficiently remove excess moisture from your indoor environment, helping to prevent mold, mildew, and musty odors. It features an enhanced dual-semiconductor dehumidification system and includes two replaceable HEPA filters for air purification.
Key Features:
- Dual-Semiconductor Technology: For efficient moisture removal.
- Integrated HEPA Filtration: Captures 99.97% of fine particles (down to 0.1 microns).
- 3200ml Water Tank: Large capacity with automatic shut-off when full.
- 1-7 Hour Timer: For scheduled operation.
- Automatic Defrost: Ensures efficient operation in cooler conditions (below 15°C).
- Quiet Operation: Operates at approximately 39 dB.
- Multi-color Night Light: Provides ambient lighting.
- Energy Efficient: Consumes approximately 1.2 kWh per 24 hours.
Package Contents:
- Heelay Dehumidifier Unit
- 3200ml Water Tank
- 2 x HEPA Filters (one pre-installed, one spare)
- Power Adapter (integrated cord)
- User Manual

Figure 2.1: Heelay 3200ml Dehumidifier Model KW-CS02. This image shows the main product unit, a black dehumidifier with a transparent water tank at the bottom, displaying collected water. A blue light is visible on the front panel.
3. Setup
3.1 Unpacking
- Carefully remove the dehumidifier and all accessories from the packaging.
- Inspect the unit for any signs of damage. If damaged, do not operate and contact customer support.
- Remove any protective films or packaging materials from the unit.
3.2 Placement
Proper placement is crucial for optimal performance.
- Place the dehumidifier on a firm, level surface to prevent vibration and water leakage.
- Ensure there is at least 20 cm (8 inches) of space around the air intake (rear) and air outlet (top) to allow for proper airflow.
- Do not place the unit near heat sources, such as radiators or ovens, or in direct sunlight.
- Avoid placing the unit in extremely dusty or dirty environments, as this can affect filter performance.
- The dehumidifier is suitable for rooms up to 30 m² (322 sq.ft), including living rooms, bedrooms, bathrooms, basements, wardrobes, and RVs.

Figure 3.1: Recommended placement and coverage area. This diagram illustrates a floor plan with the dehumidifier positioned to cover various indoor spaces like living rooms, bedrooms, and bathrooms, indicating a maximum coverage of 30m².
3.3 Power Connection
- Ensure the power switch is in the 'OFF' position.
- Plug the power cord into a standard electrical outlet (refer to specifications for voltage requirements).
4. Operation
4.1 Control Panel

Figure 4.1: Multi-function Control Panel. This image displays the top control panel of the dehumidifier with clearly labeled buttons for various functions including night light, power, timer, and defrost.
- Power Button: Press to turn the unit ON or OFF.
- Timer Button: Press to set the auto-off timer from 1 to 7 hours.
- Night Light Button: Press to turn the multi-color night light ON or OFF, or to cycle through colors.
- Defrost Indicator: A light will flash when the unit is in automatic defrost mode.
- Full Water Tank Indicator: A red light will illuminate when the water tank is full.
4.2 Powering On/Off
Press the Power Button once to turn the dehumidifier ON. Press it again to turn the unit OFF.
4.3 Setting the Timer
To set the auto-off timer:
- With the unit ON, press the Timer Button.
- Each press will cycle through 1, 2, 4, 7 hours, then off. Select your desired operating duration.
- The unit will automatically turn off after the set time has elapsed.

Figure 4.2: Timer and Night Light Function. This image highlights the 1-7 hour timer and the colorful LED night light features of the dehumidifier.
4.4 Night Light Function
Press the Night Light Button to activate the multi-color LED light. Press again to cycle through different colors or turn it off.
4.5 Water Tank Management
The dehumidifier is equipped with a removable 3200ml (3.2L) water tank. When the tank is full, the unit will automatically shut off, and a red indicator light will illuminate to prevent overflow.
- When the red indicator light is on, carefully pull out the water tank from the front of the unit.
- Empty the collected water into a sink or drain.
- Slide the empty water tank back into the unit until it clicks into place. The unit will resume operation automatically.

Figure 4.3: Automatic Shut-off and Full Water Tank Indicator. This image shows the dehumidifier with a red light indicating the water tank is full, and the tank capacity of 3.2L is prominently displayed.
4.6 Automatic Defrost
The dehumidifier features an automatic defrost function. If the ambient temperature drops below 15°C (59°F), the unit will automatically enter defrost mode to prevent ice buildup on the cooling elements. During this process, the defrost indicator light may flash. The unit will resume normal dehumidification once defrosting is complete.

Figure 4.4: Low Temperature Defrosting. This image illustrates the dehumidifier's automatic defrost feature, which activates when the temperature drops below 15°C, with a note explaining the flashing defrost indicator light.
5. Maintenance
Regular maintenance ensures optimal performance and extends the lifespan of your dehumidifier.
5.1 Cleaning the Exterior
- Ensure the unit is unplugged before cleaning.
- Wipe the exterior with a soft, damp cloth. Do not use abrasive cleaners or solvents.
- Dry thoroughly with a soft cloth.
5.2 Cleaning the Water Tank
- Remove the water tank from the unit.
- Clean the tank with mild soap and warm water.
- Rinse thoroughly and ensure it is completely dry before reinserting it into the dehumidifier.
5.3 HEPA Filter Replacement
The dehumidifier includes two replaceable HEPA filters. It is recommended to check and replace the filter every 3-6 months, depending on usage and air quality.
- Ensure the unit is unplugged.
- Locate the filter compartment (usually at the back or side of the unit).
- Open the compartment cover and carefully remove the old HEPA filter.
- Insert a new HEPA filter, ensuring it is correctly oriented.
- Close the filter compartment cover securely.
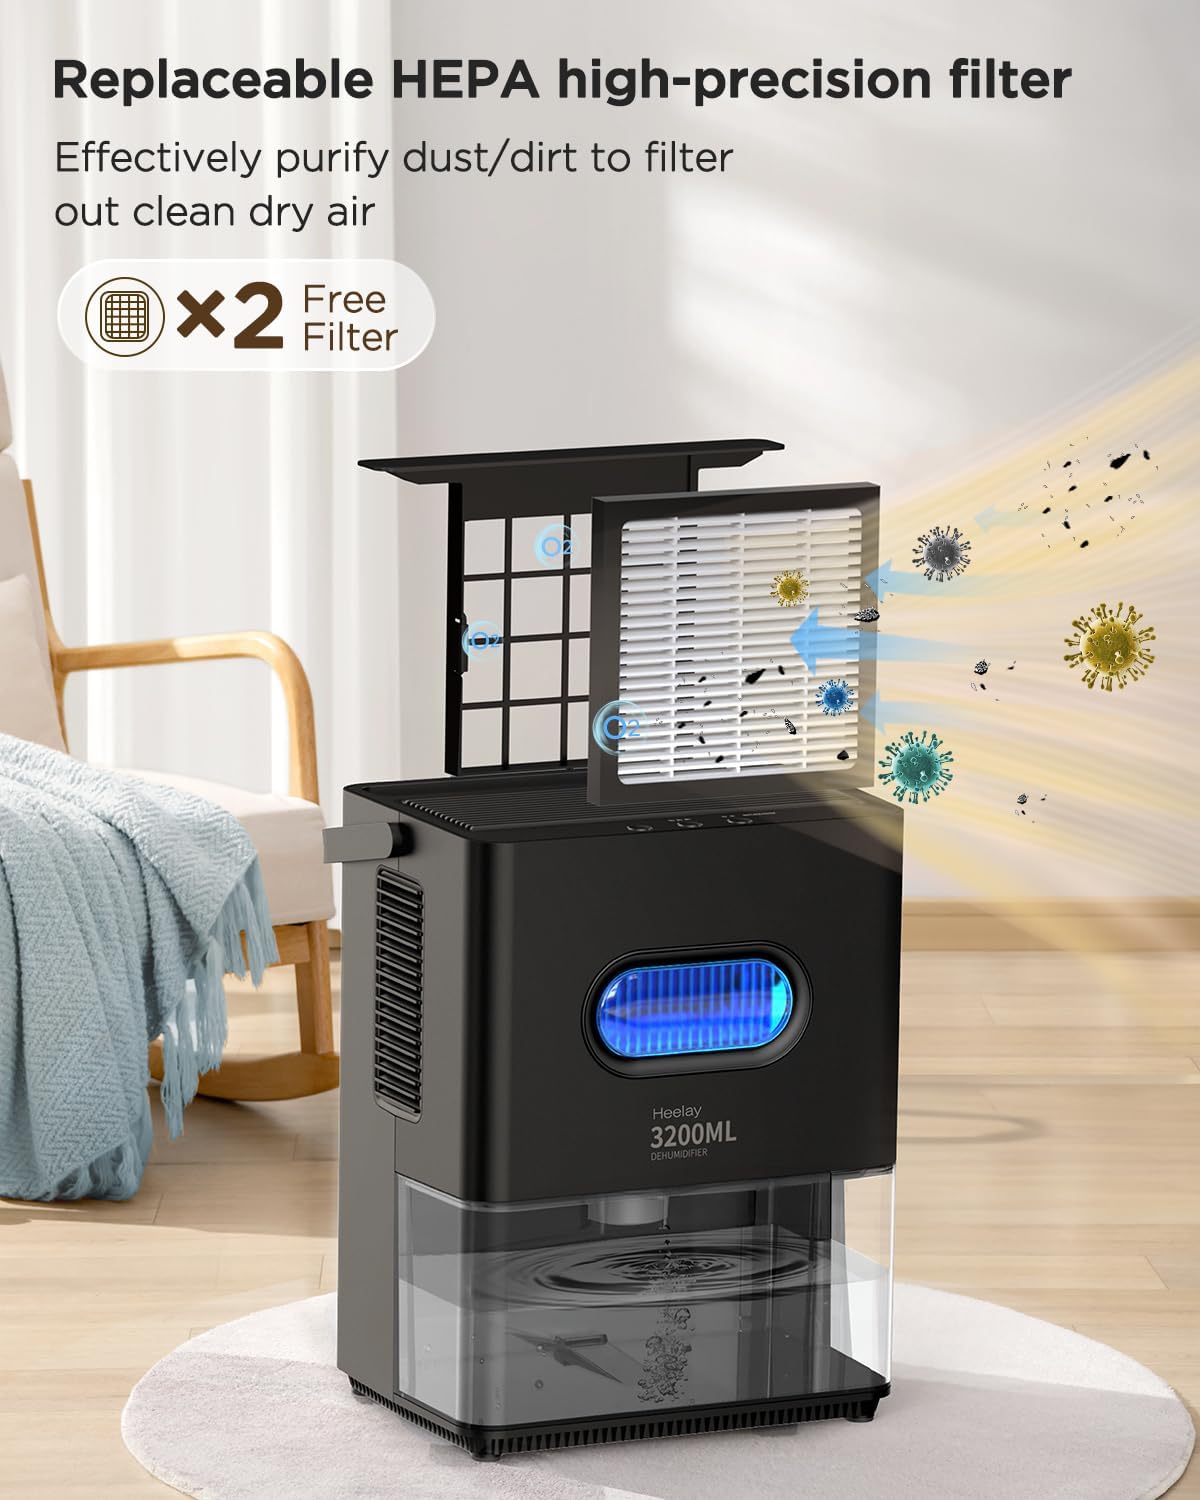
Figure 5.1: Replaceable HEPA Filter. This image shows the process of replacing the HEPA filter, highlighting its role in purifying the air by capturing dust and other particles.
5.4 Storage
If the dehumidifier will not be used for an extended period:
- Unplug the unit and empty the water tank completely.
- Clean the unit and replace the HEPA filter if necessary.
- Store the unit in a cool, dry place, away from direct sunlight and extreme temperatures.
- The integrated power cord can be neatly stored using the winding column on the unit.

Figure 5.2: Ergonomic Handle, Removable Filter, and Cord Storage. This image details the physical features of the dehumidifier, including its dimensions, the convenient handle for portability, the removable filter for easy maintenance, and the integrated cord storage solution.
6. Troubleshooting
If you encounter any issues with your dehumidifier, please refer to the following troubleshooting guide before contacting customer support.
| Problem | Possible Cause | Solution |
|---|---|---|
| Dehumidifier does not turn on. | No power supply. Water tank is full or not properly installed. | Check if the power cord is securely plugged in. Empty the water tank and ensure it is correctly reinserted. |
| No water collected. | Room humidity is too low. Temperature is too low (below 15°C). Air vents are blocked. | The unit will not collect water if humidity is already low. The unit may be in defrost mode; allow it to complete. Ensure air intake and outlet are clear. |
| Unit is noisy. | Unit is not on a level surface. Air filter is dirty. | Place the unit on a flat, stable surface. Clean or replace the HEPA filter. |
| Red light is on. | Water tank is full. | Empty the water tank. |
| Defrost light is flashing. | Unit is in automatic defrost mode. | This is normal operation in low temperatures. The unit will resume dehumidifying automatically. |
7. Specifications
| Brand | Heelay |
| Model Number | KW-CS02 |
| Color | Black |
| Water Tank Capacity | 3200 ml (3.2 Liters) |
| Dimensions (L x W x H) | 30 x 23 x 34.2 cm (11.8 x 9.1 x 13.5 inches) |
| Item Weight | 3.37 kg (7.43 lbs) |
| Power Consumption | Approx. 1.2 kWh / 24 hours |
| Noise Level | 39 dB |
| Coverage Area | Up to 30 m² (322 sq.ft) |
| Special Features | Automatic Shut-off, Automatic Defrost, 1-7 Hour Timer, Multi-color Night Light, Dual Semiconductor Dehumidification, HEPA Filtration |
8. Warranty and Support
Heelay products are manufactured to high-quality standards. For any questions, technical assistance, or warranty claims, please contact our customer support team. Please have your model number (KW-CS02) and purchase information ready when contacting support.
Contact Information: [Insert Manufacturer Contact Information Here, e.g., Website, Email, Phone Number]
Please note that warranty terms and conditions may vary by region and retailer. Keep your proof of purchase for warranty validation.