1. Introduction
Thank you for choosing the FLRONGSUN Solar Shed Pendant Light. This dual-light system is designed to provide efficient and versatile illumination for various indoor and outdoor spaces, utilizing solar power for energy efficiency. It features automatic dusk-to-dawn operation, multiple brightness settings, and timer functions, all controllable via a remote. This manual provides essential information for safe installation, operation, and maintenance of your solar light system.
2. What's in the Box
Please check the package contents to ensure all items are present and undamaged:
- Solar panel
- Solar light (2 units)
- Bracket for solar panel
- Remote control (AAA batteries not included)

3. Safety Information
Please read and understand all safety instructions before installation and use. Failure to follow these instructions may result in electric shock, fire, or serious injury.
- Do not attempt to disassemble, repair, or modify the product. This may cause damage and void the warranty.
- Keep the solar panel and lights away from flammable materials.
- Ensure the solar panel is installed in a location that receives direct sunlight for optimal charging.
- Do not immerse the solar panel or lights in water, despite their IP65 waterproof rating, to prevent damage to internal components.
- Handle the product with care to avoid physical damage.
- Keep out of reach of children.
4. Setup and Installation
The FLRONGSUN Solar Shed Pendant Light is designed for convenient installation. Follow these steps for optimal performance:
4.1 Solar Panel Placement
Choose a location for the solar panel that receives maximum direct sunlight throughout the day, free from obstructions like trees or buildings. The solar panel comes with a 5-meter power cable to connect to the lights, allowing flexibility in placement.


4.2 Light Installation
Each light unit has a hook on its back for easy hanging. Install the lights in your desired location, such as a chicken coop, gazebo, patio, tent, or barn.

4.3 Connecting the System
Connect the power cable from the solar panel to the light units. Ensure a secure connection. The system is designed to automatically detect charging when connected to the solar panel and exposed to light.
5. Operating Instructions
Your solar shed pendant light system comes with a remote control for easy operation and customization.
5.1 Remote Control Functions
Insert AAA batteries (not included) into the remote control. The remote allows you to:
- ON/OFF: Turn the lights on or off manually.
- +/-: Adjust brightness levels (8 stages available).
- AUTO: Activate the dusk-to-dawn mode. The lights will automatically turn on at night and off during the day. This also serves as a factory reset for light control.
- 3H/5H/8H: Set a timer for the lights to turn off after 3, 5, or 8 hours.
- M: Mode switching (e.g., between full brightness and half brightness).

5.2 Charging and Lighting
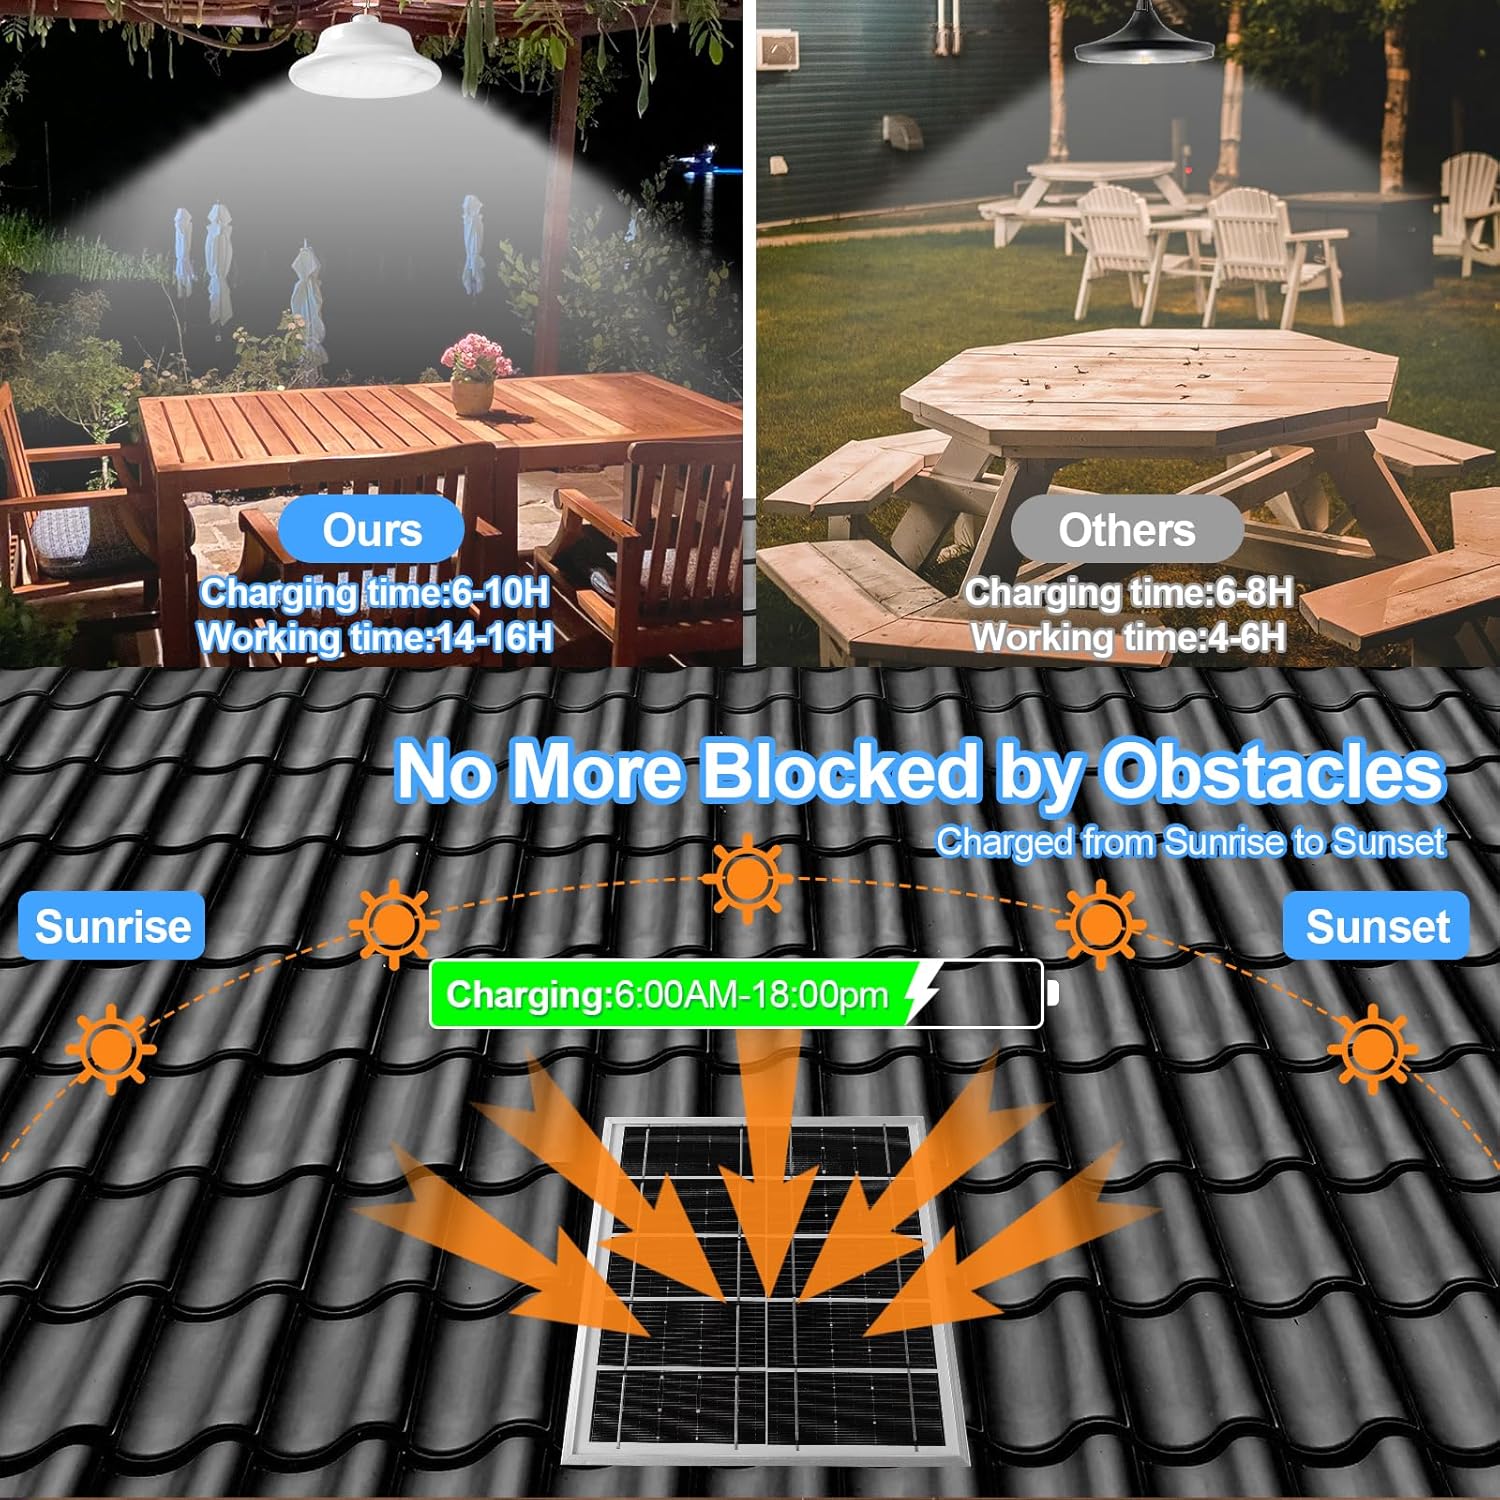
The system is equipped with a large-capacity battery. A full charge takes approximately 6-10 hours of direct sunlight and provides 14-16 hours of lighting. On cloudy or rainy days, the battery may not fully charge, and the brightness may automatically decrease to extend lighting duration.
The light supports both auto dusk-to-dawn operation and manual activation during the daytime if needed, making it suitable for basements or other areas requiring daytime illumination.

6. Maintenance
To ensure the longevity and optimal performance of your solar shed pendant light, follow these maintenance guidelines:
- Clean the Solar Panel: Regularly wipe the solar panel with a soft, damp cloth to remove dust, dirt, and debris. A clean panel ensures efficient sunlight absorption and charging.
- Inspect Connections: Periodically check all cable connections between the solar panel and the lights to ensure they are secure and free from corrosion.
- Clear Obstructions: Ensure no new obstructions (e.g., growing branches, accumulated snow) block direct sunlight from reaching the solar panel.
- Battery Care: The integrated lithium metal batteries are designed for long life. If the light's performance significantly degrades over time, it may indicate battery aging. Contact customer support for assistance.
7. Troubleshooting
If you encounter issues with your FLRONGSUN Solar Shed Pendant Light, refer to the following common problems and solutions:
| Problem | Possible Cause | Solution |
|---|---|---|
| Light does not turn on at night. | Insufficient solar panel charging; AUTO mode not activated; remote control battery low. | Ensure solar panel receives 6-10 hours of direct sunlight daily. Press the AUTO button on the remote. Replace remote control batteries. |
| Light is dim or turns off quickly. | Insufficient charging due to cloudy weather or obstructions; battery degradation. | Clean solar panel. Relocate solar panel to a sunnier spot. Allow several sunny days for full charge. If problem persists, contact support. |
| Remote control is not working. | Remote batteries are dead or incorrectly inserted; remote is too far from the light. | Replace AAA batteries in the remote, ensuring correct polarity. Operate the remote within close range of the light. |
| Lights flicker or behave erratically. | Loose connection; internal fault. | Check all cable connections for tightness. If problem persists, contact customer support. |
8. Specifications
Detailed technical specifications for the FLRONGSUN Solar Shed Pendant Light (Model SPL68):
| Feature | Detail |
|---|---|
| Model Number | SPL68 |
| Color | Dual light |
| Shape | Round |
| Material | Polycarbonate (PC) |
| Finish Type | Polished |
| Light Source Type | Light Emitting Diode (LED) |
| Power Source | Solar Powered |
| Item Weight | 3.5 Pounds |
| Number of Batteries | 2 Lithium Metal batteries (included) |
| Voltage | 3.7 Volts (DC) |
| Brightness | 1200 Lumens (Max) |
| Mounting Type | Ceiling Mount |
| Bulb Features | Multiple brightness modes, timer settings (3, 5, 8 hours), auto dusk to dawn mode, remote control compatibility |
| Number of Light Sources | 2 |
| Product Dimensions | 5.9"L x 5.9"W x 2.56"H |
| Waterproof Rating | IP65 |
9. Warranty and Support
FLRONGSUN is committed to providing high-quality products. For warranty information, technical support, or any questions regarding your solar shed pendant light, please refer to the contact information provided with your purchase or visit the official FLRONGSUN website. Please retain your proof of purchase for warranty claims.