Introduction
Thank you for choosing the UINTAI Queen Bed Frame. This manual provides essential information for the safe and efficient assembly, operation, and maintenance of your new bed frame. Please read all instructions carefully before beginning assembly and retain this manual for future reference.
Setup and Assembly
Before assembly, ensure all parts are present and undamaged. Refer to the included parts list. Assembly typically requires two adults. Do not use power tools unless explicitly instructed, as over-tightening can damage components.
Required Tools (Included)
- Hex Key
- Screwdriver
Assembly Steps
- Unpack Components: Carefully remove all parts from the packaging and lay them out on a clean, soft surface to prevent scratches. Verify all parts against the parts list.
- Assemble Bed Frame Base:
Connect the main frame components (H, J, K, L) using screws (Y1, Y3) as shown in the diagram. Ensure all connections are secure but do not fully tighten until all frame pieces are in place.
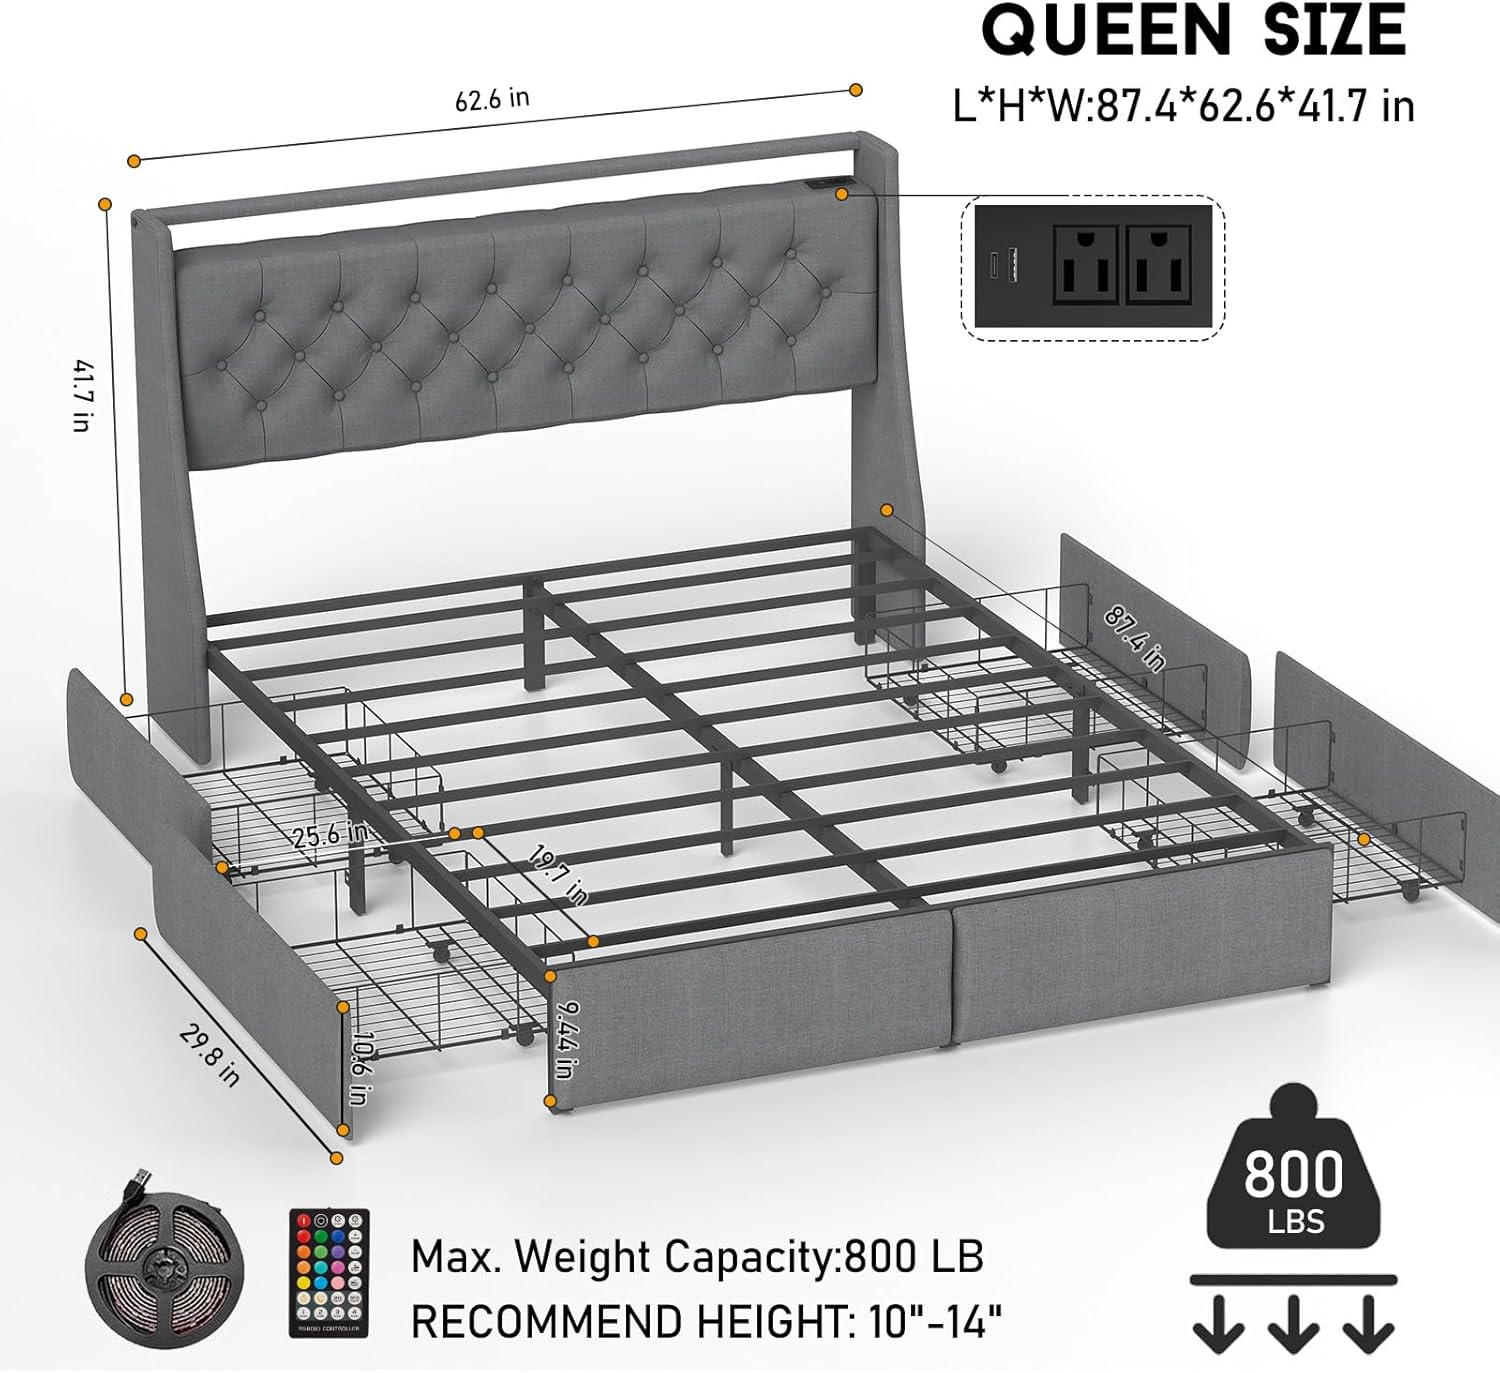
Image Description: An exploded view of all bed frame components laid out on a white surface, showing metal frame pieces, upholstered headboard sections, and hardware.
- Attach Headboard Components:
Secure the headboard (B) to the side wings (A1, A2) using screws (T4). Ensure the headboard is correctly oriented.
Video Description: A detailed tutorial demonstrating the assembly of the bed frame headboard, including attaching the side wings and securing the charging station.
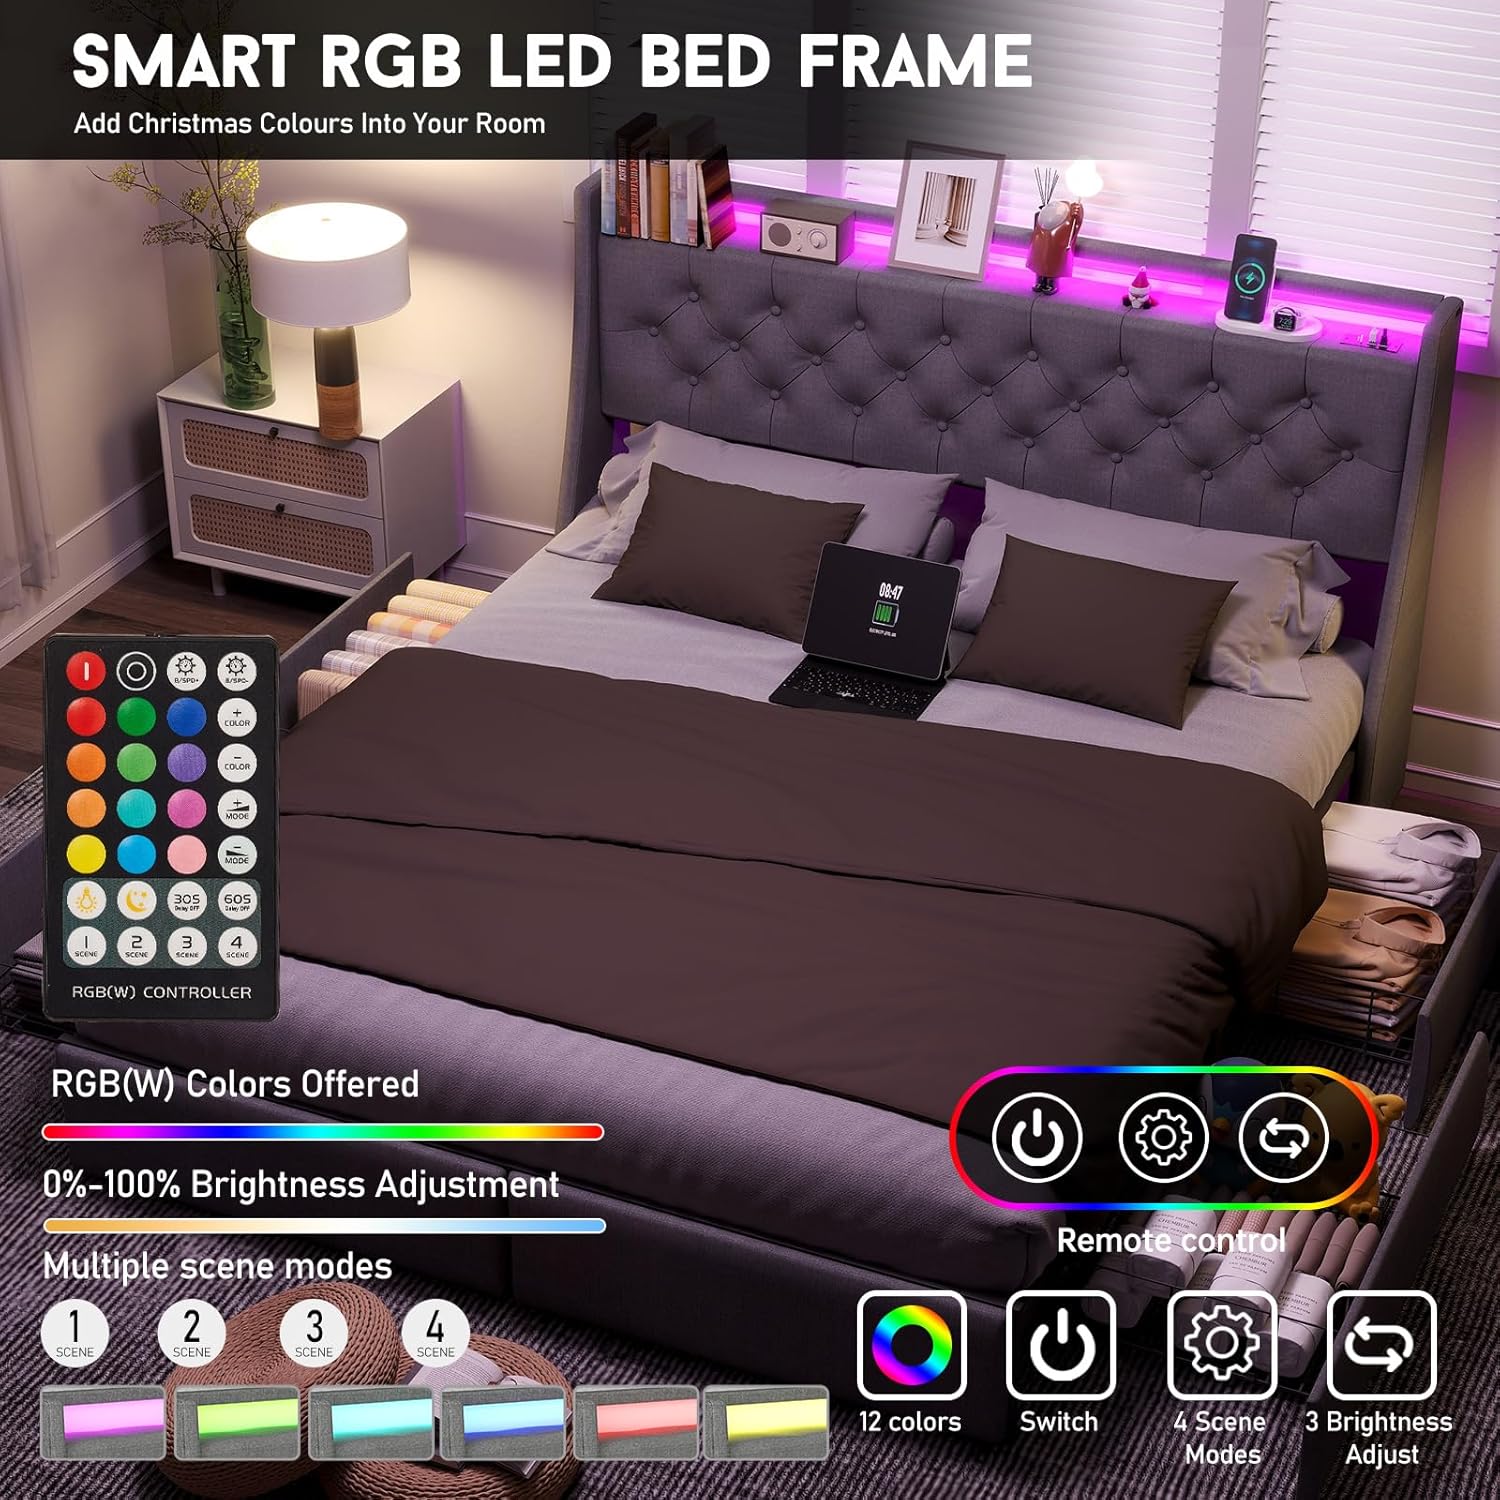
Image Description: A close-up of the upholstered headboard, highlighting the built-in LED lights and charging station with USB and power outlets.
- Install Charging Station and LED Lights:
Mount the charging station (D) into the designated slot on the headboard using screws (V2). Connect the USB interface to the power strip and the other end to the LED light strip (C).
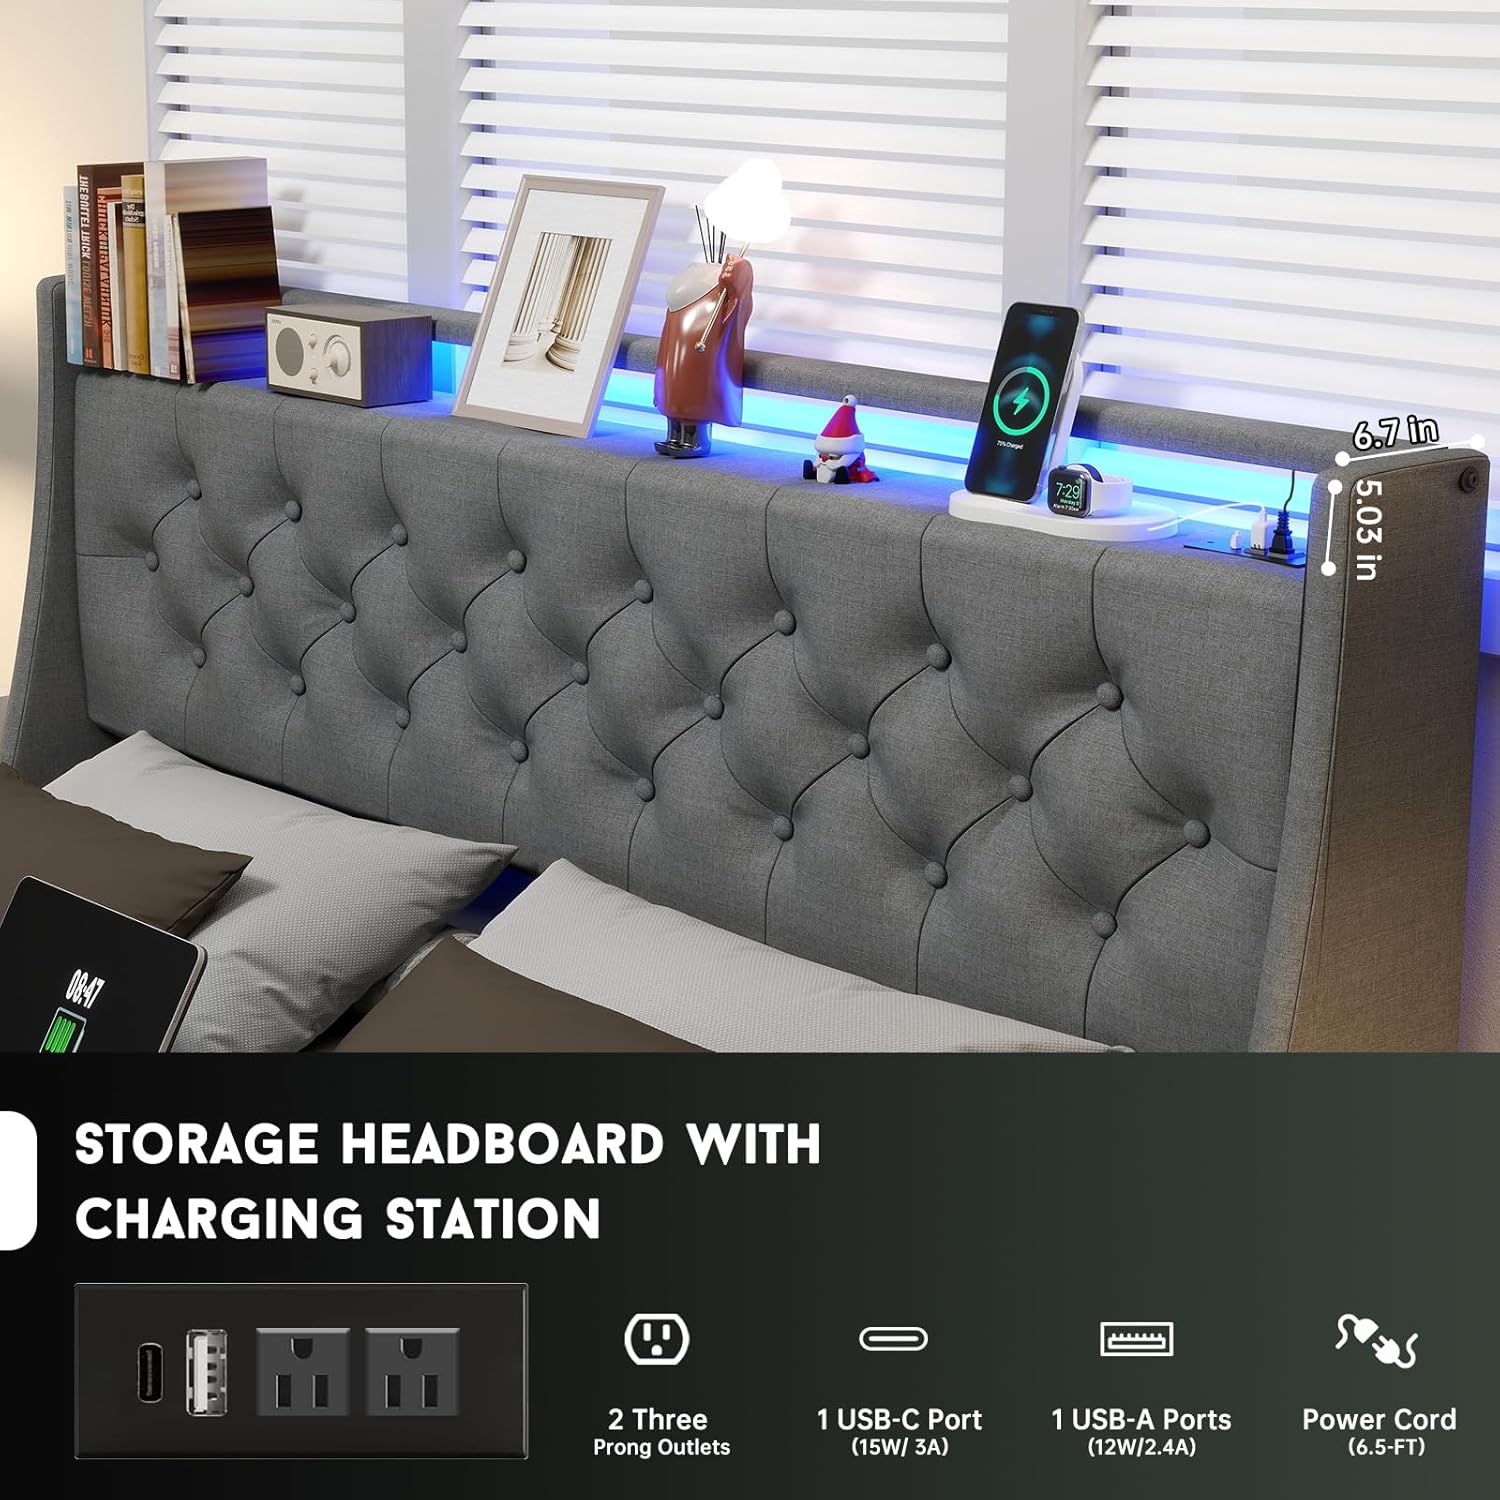
Image Description: A view of the headboard with a tablet, smartphone, and other devices charging on the integrated station, illuminated by the LED lights.
- Attach Side Panels:
Secure the upholstered side panels (G) to the bed frame using screws (T1, T2). These panels provide the housing for the storage drawers.
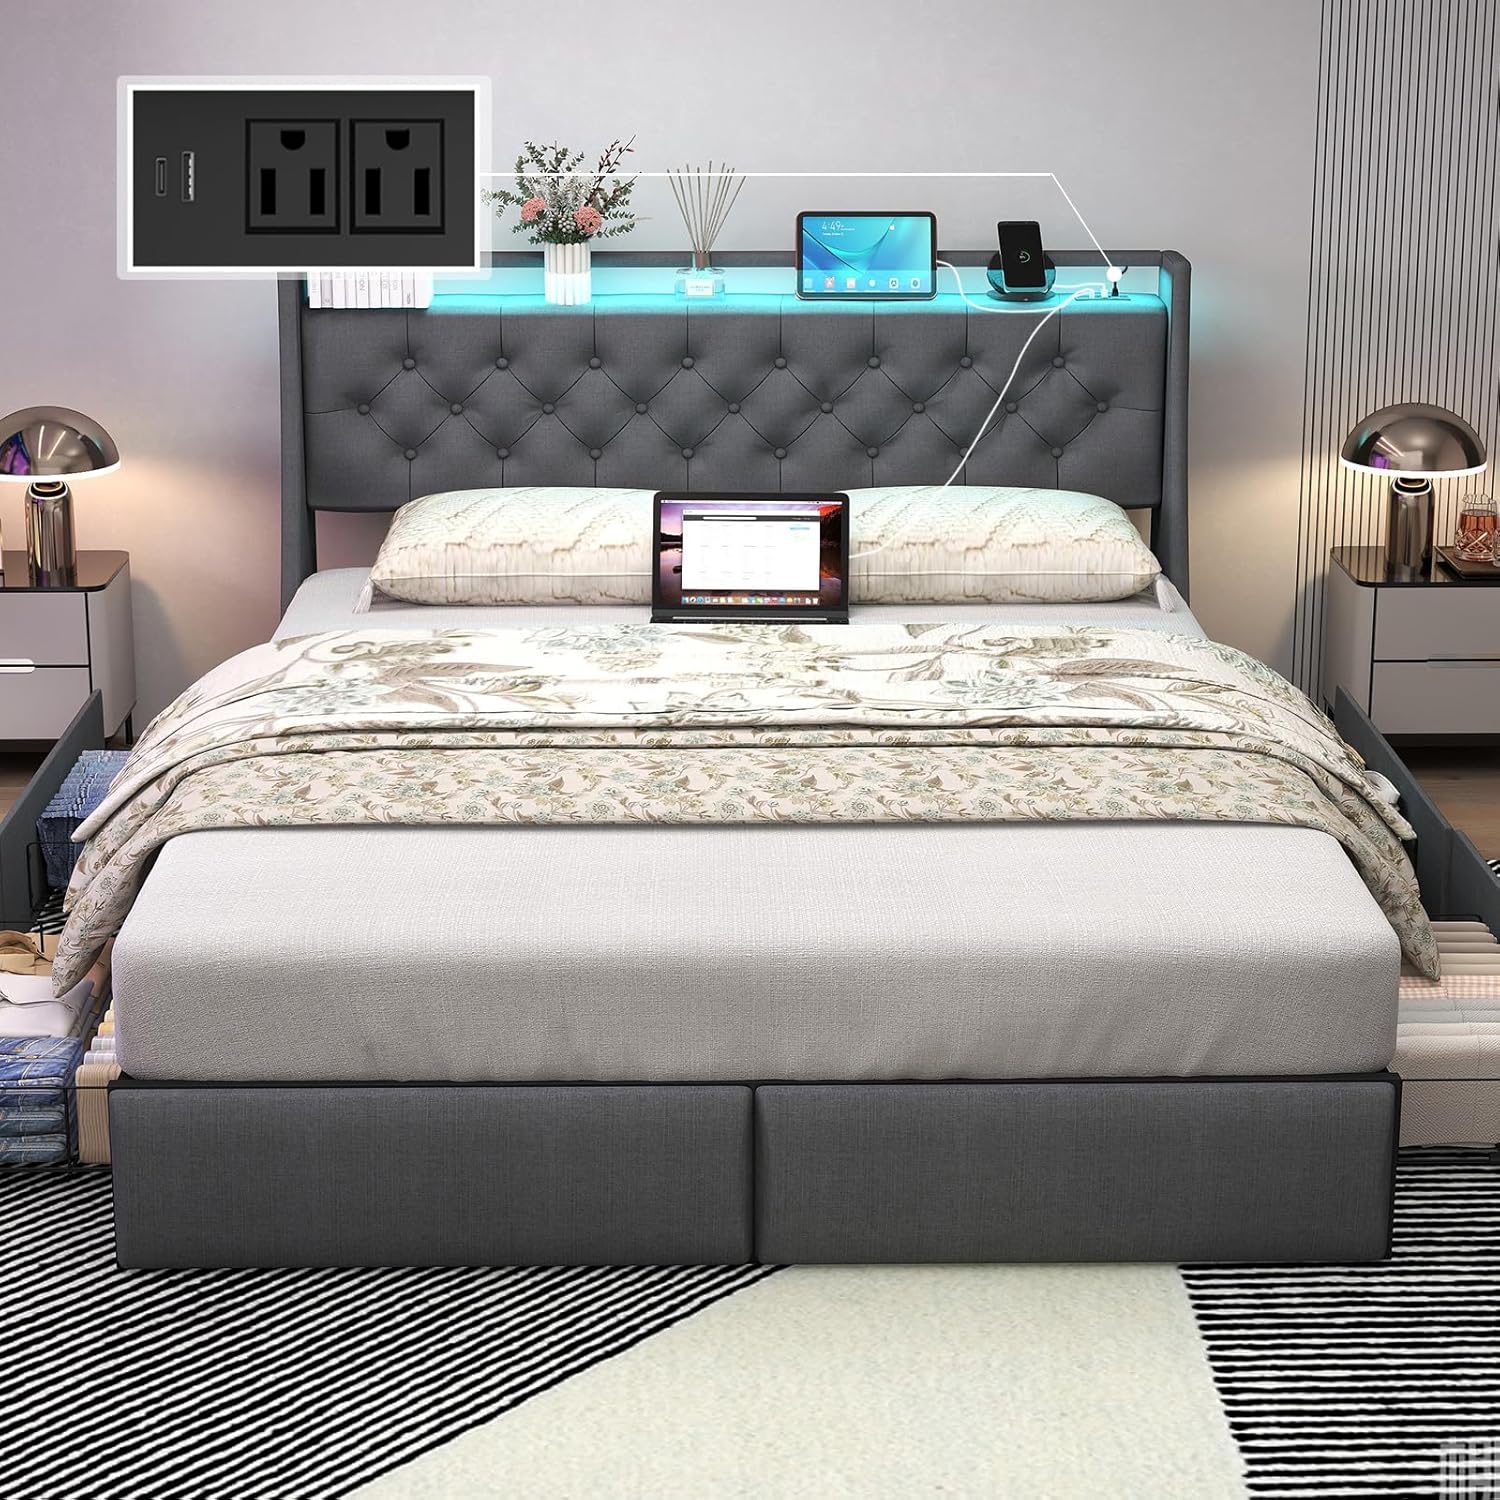
Image Description: A full view of the assembled bed frame, showing the upholstered headboard, side panels, and the metal slat support system.
- Assemble Storage Drawers:
Attach the wheels (Z5) to the drawer frames (Z4) using screws (Z6). Assemble the side and front panels of the drawers using the provided clips (Q1) and secure them to the main drawer frame.
Video Description: A step-by-step guide on assembling the storage drawers, including attaching the wheels and connecting the wire mesh panels.
- Insert Drawers:
Slide the assembled drawers into the designated slots under the bed frame. Ensure they slide smoothly.

Image Description: A view of the bed frame with one of the four storage drawers pulled out, showing ample space for bedding or other items.
- Final Tightening:
Once all components are in place, go back and fully tighten all screws using the hex key. Do not overtighten.
Operating Instructions
LED Lights Operation
- The LED lights are controlled via a remote control.
- Power On/Off: Press the power button on the remote.
- Color Selection: Use the color buttons to choose from 12 available colors.
- Mode Adjustment: Select from 4 different lighting modes (e.g., flash, strobe, fade, smooth).
- Brightness Control: Adjust the brightness using the up/down arrows.
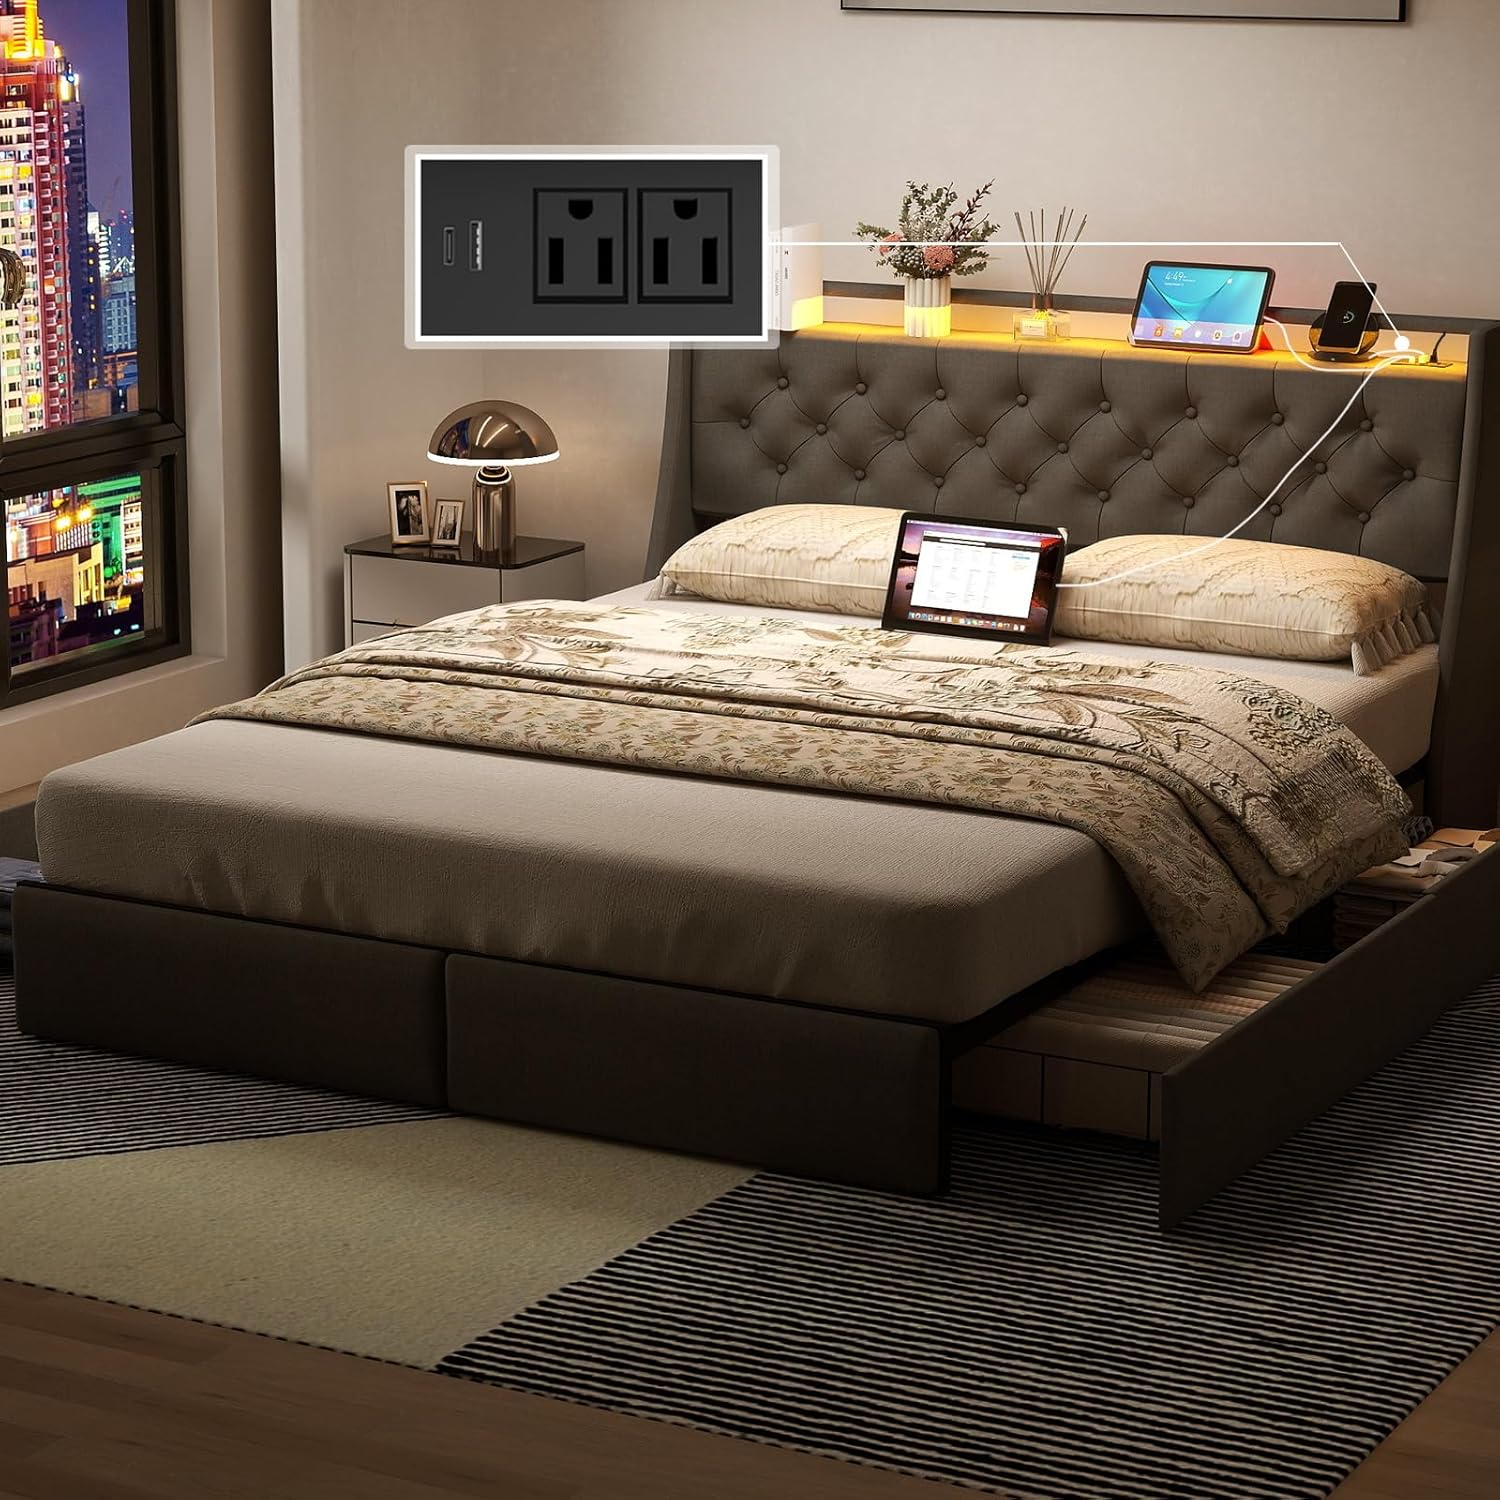
Image Description: A close-up of the LED light remote control, showing various color, mode, and brightness buttons.
Charging Station Usage
- The built-in charging station features 2 standard power outlets, 1 USB port, and 1 Type-C port.
- Plug the bed frame's power cord into a wall outlet.
- Connect your electronic devices (smartphones, tablets, e-readers, etc.) to the appropriate ports for charging.
Storage Drawers
- The four large storage drawers are equipped with rollers for smooth opening and closing.
- Use the drawers to store bedding, clothes, or other personal items.
- Ensure drawers are fully closed when not in use to maintain a tidy appearance and prevent dust accumulation.
Maintenance
- Cleaning: Wipe the upholstered surfaces with a damp cloth. For metal parts, use a dry cloth. Avoid harsh chemicals or abrasive cleaners.
- Tightness Check: Periodically check all screws and connections to ensure they remain tight. Re-tighten if necessary to maintain stability and prevent squeaking.
- Drawer Care: Keep the drawer rollers clean and free of debris to ensure smooth operation.
- LED Lights: If LED lights malfunction, check the connections. If issues persist, contact customer support.
Troubleshooting
| Problem | Possible Cause | Solution |
|---|---|---|
| Bed frame squeaks | Loose connections; uneven floor. | Tighten all screws. Ensure the bed is on a level surface. |
| LED lights not working | Loose connection; remote battery low. | Check all power connections. Replace remote battery. |
| Charging station not working | Bed frame not plugged in; loose connection. | Ensure the bed frame's power cord is securely plugged into a wall outlet. Check internal connections. |
| Drawers not sliding smoothly | Debris in rollers; misaligned drawer. | Clean rollers. Re-align the drawer within its track. |
Specifications
- Model: C226-QB-FH
- Size: Queen
- Material: Metal, Wood, Upholstery
- Product Dimensions: 88"L x 60"W x 42"H
- Item Weight: 100 Pounds
- Maximum Weight Recommendation: 800 Pounds
- Special Features: 4 Storage Drawers, Charging Station (USB, Type-C, 2 AC outlets), LED Lights (12 colors, 4 modes, 3 brightness), No Box Spring Needed, Squeak Resistant.
- Color: Button Tufted & Gray
- Care Instructions: Wipe with Damp Cloth
Safety Information
Please adhere to the following safety guidelines:
- Do not exceed the maximum weight recommendation of 800 pounds.
- Be cautious around sharp metal edges during assembly and use.
- Always follow the assembly instructions carefully to prevent instability or injury.
- Keep small parts away from children during assembly.
- Ensure all electrical connections for the charging station and LED lights are secure and properly installed to avoid electrical hazards.
Warranty and Support
For any missing parts, damaged accessories, or other issues, please contact UINTAI customer service. We are committed to replying and assisting you within 24 hours.
Contact information for support is typically found on the product packaging or the seller's website.