1. Introduction
This manual provides detailed instructions for the installation, operation, and maintenance of your Hiseeu 4MP Wireless Solar Security Camera System. Please read this manual thoroughly before using the product to ensure proper functionality and safety. Keep this manual for future reference.
2. Product Overview
2.1 Package Contents
- Hiseeu 4MP Solar Cameras (2 units)
- 10-inch LCD Monitor NVR
- 1TB HDD (pre-installed in NVR)
- Mounting accessories
- Power adapters for NVR
- User Manual
2.2 Key Features
- 4-Megapixel High-Definition Video: Provides clear and detailed images.
- Completely Wireless & Easy Setup: No complex wiring required for camera installation.
- Solar Powered with Ultra-Low Power Consumption: Equipped with 6W monocrystalline silicon solar panels and large-capacity lithium-ion batteries for extended operation without external power.
- AI Motion Detection: Reduces false alarms by accurately detecting human motion.
- IP65 Waterproof Rating: Ensures reliable operation in various outdoor weather conditions.
- Two-Way Audio: Allows for real-time communication through the camera.
- Sound and Light Alarm: Deters intruders with integrated sound and light alerts.
- Remote Monitoring & Multi-User Sharing: Access live feeds and recordings from anywhere via a free smartphone application, with support for multiple users.
- 10-inch LCD Monitor NVR with 1TB HDD: Integrated monitor for local viewing and 1TB storage for continuous recording.
- 2.4G Router Compatibility: Supports standard 2.4GHz Wi-Fi networks for stable wireless connection.
2.3 Product Diagram

Figure 2.3.1: The Hiseeu 4MP Wireless Solar Security Camera System, including two solar-powered cameras, a 10-inch LCD monitor NVR, and a 1TB hard disk drive.

Figure 2.3.2: An overview image of the Hiseeu 4MP solar camera set, emphasizing its wireless and easy-to-operate nature.
3. Setup
3.1 Camera Installation
- Choose a Location: Select an outdoor location for each camera that receives ample sunlight for the solar panel and has a clear view of the area you wish to monitor. Ensure the location is within range of your NVR's wireless signal.
- Mount the Camera: Use the provided mounting accessories to securely attach the camera to a wall or other stable surface. Adjust the camera angle for optimal coverage.
- Position the Solar Panel: Ensure the solar panel is positioned to receive direct sunlight for most of the day to maximize charging efficiency. Connect the solar panel cable to the camera.

Figure 3.1.1: An illustration showing the solar panel connected to the camera, indicating that the camera is powered by solar energy, eliminating the need for external power sources.
3.2 NVR Setup
- Power On: Connect the NVR to a power outlet using the provided power adapter.
- Initial Boot: The NVR will power on and display the boot screen on its integrated 10-inch LCD monitor.
- Camera Pairing: The cameras are pre-paired with the NVR at the factory. Once the NVR and cameras are powered on, the camera feeds should automatically appear on the NVR monitor. If a camera does not connect, refer to the troubleshooting section.
- Network Connection (Optional): For remote viewing, connect the NVR to your 2.4GHz Wi-Fi router. Follow the on-screen instructions on the NVR to configure the network settings.

Figure 3.2.1: A diagram illustrating the wireless connectivity of multiple Hiseeu cameras to a central NVR system within a home environment.
3.3 Mobile App Setup
- Download App: Download the 'EseeCloud' app from your smartphone's app store (iOS or Android).
- Register Account: Open the app and register a new account.
- Add Device: Follow the in-app instructions to add your NVR system. This typically involves scanning a QR code displayed on the NVR monitor or entering the device ID manually.
- Remote Viewing: Once added, you can view live feeds, access recordings, and configure settings remotely.
4. Operating Instructions
4.1 Live View and Playback
- NVR Monitor: The NVR's integrated screen displays live feeds from all connected cameras. Use the NVR controls to switch views or access playback.
- Mobile App: Open the EseeCloud app to view live streams from your cameras. Navigate to the playback section to review recorded footage stored on the NVR's 1TB HDD.
4.2 Two-Way Audio
The cameras support two-way audio communication. Use the microphone and speaker icons within the mobile app or NVR interface to speak through the camera and hear audio from the camera's location.
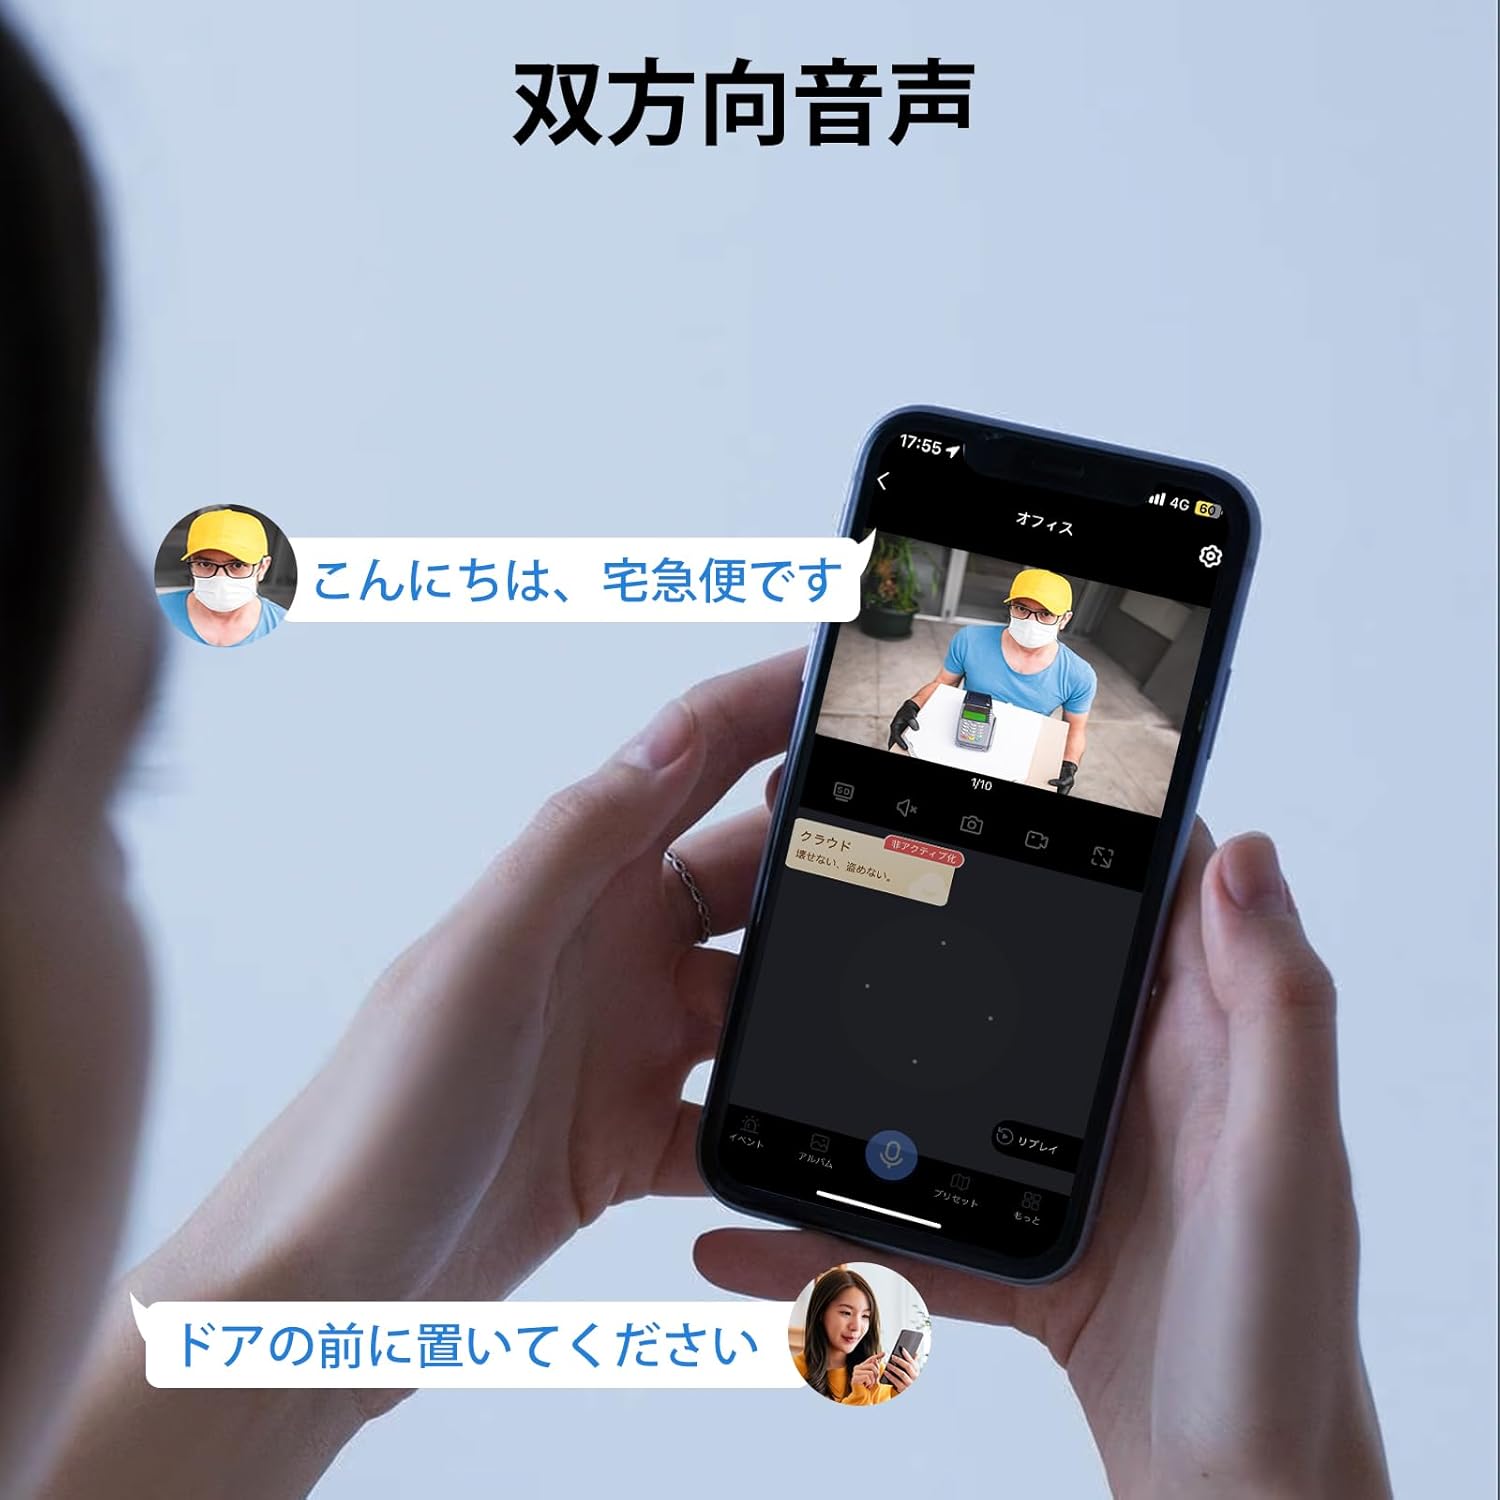
Figure 4.2.1: A smartphone screen displaying a live feed from the camera, with speech bubbles indicating two-way audio communication between a person at the door and a person viewing the feed remotely.
4.3 Motion Detection and Alarms
- AI Motion Detection: The system uses AI to detect human shapes, reducing false alarms from pets or swaying branches.
- Customizable Detection Zones: You can define specific areas within the camera's view for motion detection, ignoring irrelevant zones.
- Sound and Light Alarm: Upon detecting an intruder, the camera can activate a built-in siren and spotlight to deter them.
- Smartphone Notifications: Receive instant alerts on your smartphone when motion is detected.

Figure 4.3.1: An illustration of a house layout with highlighted areas, demonstrating the ability to set specific motion detection zones for targeted monitoring.

Figure 4.3.2: An image depicting a person approaching a garage at night, with the Hiseeu camera emitting light and sound as a deterrent, and a smartphone displaying a notification from the EseeCloud app.

Figure 4.3.3: A visual representation of the camera's sound and light alarm system, showing how it activates upon detecting an intruder to deter them.
4.4 Multi-User Access
The EseeCloud app allows multiple users to access the camera feeds simultaneously. You can share access with family members or trusted individuals through the app's settings.

Figure 4.4.1: A person holding a smartphone showing a live camera feed, surrounded by smaller images of other people also viewing camera feeds on their devices, illustrating the multi-user sharing feature of the free app.
5. Maintenance
- Solar Panel Cleaning: Regularly wipe the solar panels with a soft, damp cloth to remove dust, dirt, or debris that may reduce charging efficiency.
- Lens Cleaning: Gently clean the camera lens with a microfiber cloth to ensure clear image quality. Avoid abrasive materials.
- Battery Health: While the system is designed for continuous solar charging, ensure the cameras receive adequate sunlight. In prolonged periods of low light, the battery may deplete.
- Firmware Updates: Check the EseeCloud app or Hiseeu website periodically for firmware updates to ensure optimal performance and security.
- Waterproof Integrity: The cameras have an IP65 waterproof rating. Ensure all covers and seals are properly closed after any manual adjustments to maintain water resistance.

Figure 5.1.1: The Hiseeu solar camera is shown mounted outdoors during rain, demonstrating its IP65 waterproof capability for reliable operation in various weather conditions.
6. Troubleshooting
- Camera Not Connecting to NVR:
- Ensure both the camera and NVR are powered on.
- Check if the camera is within the NVR's wireless range.
- If issues persist, try re-pairing the camera with the NVR (refer to the NVR's on-screen menu for pairing options). - No Image on NVR Monitor:
- Verify the NVR is powered on.
- Check the video input settings on the NVR. - Camera Battery Draining Quickly:
- Ensure the solar panel is clean and receiving direct sunlight for several hours daily.
- Reduce the frequency of motion detection alerts or live view access if not critical, as these consume battery power. - Poor Image Quality:
- Clean the camera lens.
- Ensure there are no obstructions in the camera's field of view.
- Check the camera's resolution settings in the NVR or app. - No Remote Access via App:
- Confirm the NVR is connected to your 2.4GHz Wi-Fi network.
- Check your smartphone's internet connection.
- Ensure the EseeCloud app is updated to the latest version.
7. Specifications
| Feature | Specification |
|---|---|
| Brand | Hiseeu |
| Model Number | WK-10VP-2TD403-EG |
| Camera Resolution | 4 Megapixels |
| NVR Display | 10-inch LCD Monitor |
| Storage | 1TB HDD (internal) |
| Power Source | Solar Panel (6W monocrystalline silicon), Built-in Lithium-ion Battery (8000mAh) |
| Waterproof Rating | IP65 |
| Connectivity | 2.4GHz Wi-Fi |
| Product Dimensions | 10 x 2 x 2.7 cm (camera unit); 2.67 kg (total package weight) |
| Included Components | Camera body, parts, NVR |
8. Warranty and Support
Hiseeu products are designed for reliability and performance. For any technical assistance, warranty claims, or product inquiries, please contact Hiseeu customer support.
8.1 Customer Support
For prompt assistance, you may contact Hiseeu customer service through the following methods:
- Online Support: Visit the official Hiseeu website for FAQs and support resources.
- LINE Service: Scan the QR code below to connect with Hiseeu's LINE customer service for direct support.

Figure 8.1.1: QR code for accessing Hiseeu's LINE customer support service.
8.2 Warranty Information
Please refer to the warranty card included with your product or visit the Hiseeu official website for detailed warranty terms and conditions. Keep your purchase receipt as proof of purchase for warranty claims.