1. Introduction
This manual provides essential instructions for the safe and effective use of your ATsafepro Torque Wrench Set. This set includes 1/4, 3/8, and 1/2 inch drive torque wrenches, designed for precise torque application in various tasks, from bicycle and motorcycle maintenance to automotive and machine assembly.
Please read this manual thoroughly before operating the tools and retain it for future reference.
2. Package Contents
Your ATsafepro Torque Wrench Set (Model: HDAT230NS3) includes the following components:
- 1x 1/4 inch Drive Torque Wrench (3-25 Nm range)
- 1x 3/8 inch Drive Torque Wrench (5-60 Nm range)
- 1x 1/2 inch Drive Torque Wrench (20-230 Nm range)
- 1x Socket Adapter: 1/4 inch to 3/8 inch
- 1x Socket Adapter: 3/8 inch to 1/2 inch
- 1x Socket Adapter: 1/2 inch to 3/8 inch
- Custom-fit storage case
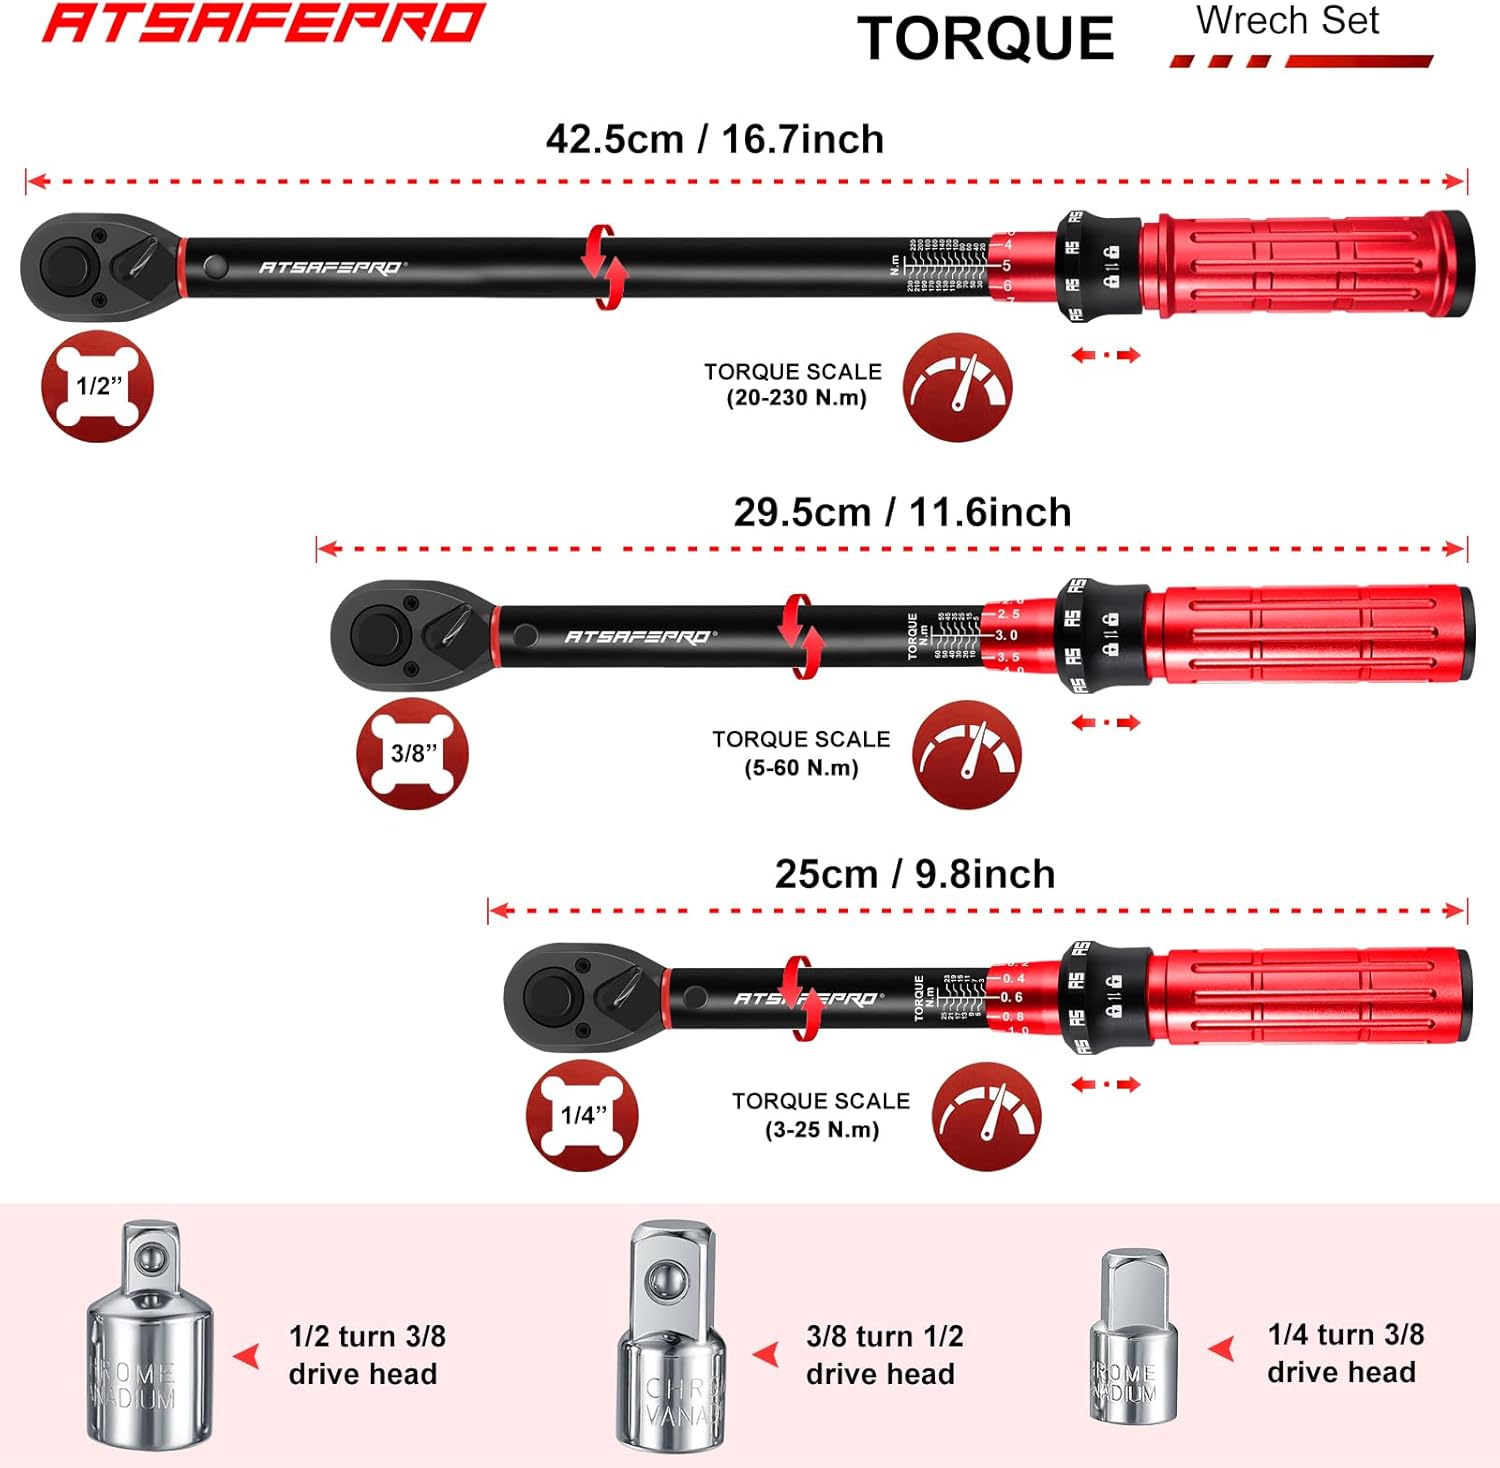
Figure 1: Complete ATsafepro Torque Wrench Set in its storage case.
3. Setup and Preparation
Before using your torque wrench, ensure it is clean and free from debris. Select the appropriate torque wrench and adapter for your task.
3.1 Attaching a Socket or Bit
- Select the correct size socket or bit for your fastener.
- If necessary, attach the appropriate socket adapter to the square drive of the torque wrench.
- Press the quick-release button on the ratchet head and firmly insert the socket or bit onto the square drive. Release the button to secure the attachment.

Figure 2: The quick-release button on the 72-tooth ratchet head for secure socket attachment.
4. Operating Instructions
4.1 Setting the Torque Value
- Locate the locking knob at the base of the handle.
- Pull the locking knob downwards and hold it to unlock the handle.
- Rotate the handle to adjust the torque value. The main scale on the wrench body and the micro-scale on the handle will indicate the set torque. Ensure the desired torque value is precisely aligned.
- Release the locking knob. It will automatically spring back into place, locking the set torque value. The handle cannot be turned after locking.

Figure 3: Steps for unlocking, adjusting, and locking the torque setting.
4.2 Applying Torque
- Place the attached socket or bit onto the fastener.
- Ensure the ratchet direction lever is set correctly for tightening (clockwise) or loosening (counter-clockwise). The 72-tooth ratchet head allows for fine adjustments.
- Apply steady, increasing force to the handle. Do not use sudden jerks.
- Continue applying force until you feel a distinct "click" or a slight vibration in the handle. This indicates that the preset torque value has been reached.
- Immediately stop applying force once the click is felt/heard. Over-tightening beyond the click can damage the fastener or the wrench.
The dual-direction capability provides flexibility for various applications.
5. Maintenance and Storage
- Cleaning: After each use, wipe the torque wrench with a clean, dry cloth. Do not use solvents or harsh chemicals, as these can damage the finish or internal mechanisms.
- Storage: Always return the torque wrench to its lowest scale setting (but not below the minimum) before storing. This relieves tension on the internal spring, preserving the wrench's accuracy over time. Store the wrench in its protective case in a dry, clean environment.
- Calibration: Torque wrenches are precision instruments and should be calibrated periodically (e.g., annually or after significant use) by a qualified service center to maintain accuracy.
6. Troubleshooting
| Problem | Possible Cause | Solution |
|---|---|---|
| Wrench does not "click" at set torque. |
|
|
| Socket/bit falls off. |
|
|
7. Specifications
| Feature | Detail |
|---|---|
| Brand | ATsafepro |
| Model Number | HDAT230NS3 |
| Material | Alloy Steel |
| Drive Sizes Included | 1/4 inch, 3/8 inch, 1/2 inch |
| Torque Range (1/4 inch) | 3-25 Nm |
| Torque Range (3/8 inch) | 5-60 Nm |
| Torque Range (1/2 inch) | 20-230 Nm |
| Ratchet Teeth | 72-tooth |
| Direction | Dual-direction (Clockwise & Counter-clockwise) |
| Adapters Included | 1/4" to 3/8", 3/8" to 1/2", 1/2" to 3/8" |
| Total Weight | 2 Kilograms (approx.) |
| Batteries Required | No |

Figure 4: The ATsafepro torque wrench set is suitable for a wide range of applications.
8. Warranty and Support
ATsafepro products are manufactured to high-quality standards. For any questions, issues, or warranty claims, please refer to the contact information provided with your purchase or scan the QR code on the product packaging for support. We aim to provide email responses within 12 hours.
Please retain your proof of purchase for warranty purposes.
