Introduction
This manual provides detailed instructions for the Camnoon 1080P Tiny Action Camera. This compact device features 1080P video recording, a 120° wide-angle lens, WiFi connectivity, and a magnetic design for versatile mounting. It is designed for capturing various activities with ease.

Image: Camnoon Tiny Action Camera showcasing its key features.
Package Contents
Verify that all items listed below are included in your package:
- 1 x Video Camera
- 1 x 32GB Memory Card
- 1 x Back Clip
- 1 x Magnetic Lanyard
- 1 x Camera Frame
- 1 x Waterproof Case
- 2 x Mounting Bases
- 1 x Buckle Mount
- 1 x Long Screw Mount
- 1 x Handlebar Mount
- 1 x Mount Adapter
- 1 x Strap
- 1 x Type-C Charging Cable

Image: Overview of the Camnoon Tiny Action Camera and its complete set of accessories.
Specifications
| Video Resolution | 3840*2160 (4K) |
| Video Format | MP4 |
| Frames Per Second | 30 |
| Storage Temperature | -10-60℃ |
| Operating Temperature | -10-60℃ |
| Memory Card | TF card, supports up to 256GB |
| Interface Type | Type-C |
| Charging Voltage | 5V/2A |
| Product Size | 64.5*28*20mm |
| Charging Time | 120 minutes |
| Item Weight | 11.8 ounces |
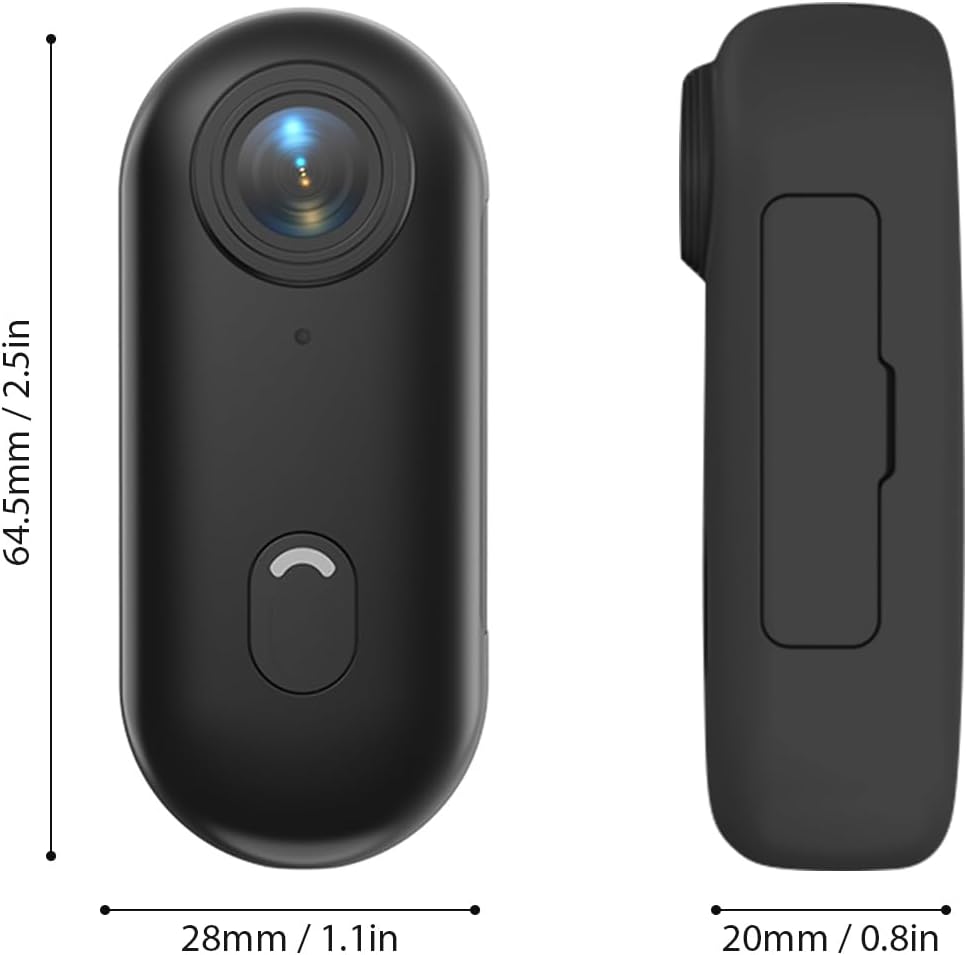
Image: Dimensions of the Camnoon Tiny Action Camera.
Setup
1. Charging the Camera
Before first use, fully charge the camera. Connect the provided Type-C charging cable to the camera's charging port and a 5V/2A power adapter (not included). The charging indicator will show progress and turn off when fully charged. The camera can record while charging.
2. Inserting the TF Card
Locate the TF card slot on the camera. Gently insert the 32GB TF card (included) into the slot until it clicks into place. Ensure the card is inserted correctly to avoid damage. The camera supports TF cards up to 256GB.
3. Mounting the Camera
The camera offers multiple mounting options due to its magnetic design and included accessories:
- Magnetic Lanyard: Place the magnetic lanyard around your neck. The camera can then be magnetically attached to the lanyard, allowing for hands-free recording from your chest area.
- Back Clip: Attach the back clip to the camera. This allows you to secure the camera to clothing, such as a collar or pocket, for a stable recording position.
- Helmet Mount: Use the provided mounting bases and buckle mount to attach the camera securely to a helmet. This is ideal for capturing point-of-view footage during activities like cycling or skiing.
- Handlebar Mount: Utilize the handlebar mount to fix the camera onto bicycle handlebars. This provides a stable front-facing view for cycling adventures.

Image: Magnetic lanyard in use for hands-free recording.

Image: Various mounting options including helmet and handlebar mounts.
4. WiFi Connection and App
The camera supports WiFi connection for remote control and media management via a smartphone application. Download the dedicated app (refer to the product packaging or manufacturer's website for app name and download instructions). Follow the in-app instructions to connect your camera to your smartphone via WiFi. This allows you to view live footage, control recording, and access recorded videos and photos.
Operating the Camera
1. Power On/Off
To power on the camera, press and hold the power button until the indicator light illuminates. To power off, press and hold the power button again until the indicator light turns off.
2. Recording Video
Once powered on, press the record button to start video recording. The indicator light will change to confirm recording is in progress. Press the record button again to stop recording.
3. Taking Photos
While the camera is on, a short press of the mode button (if available, or refer to app for photo mode) will capture a still image. The indicator light may flash to confirm the photo has been taken.
4. Loop Recording
The camera supports loop recording, which automatically overwrites the oldest files when the memory card is full. This feature is useful for continuous recording without manual management. Refer to the app settings to configure loop recording duration or disable it if desired.

Image: Camera in use for loop recording during cycling.
5. Waterproof Usage
For underwater activities or use in wet conditions, enclose the camera in the provided waterproof case. The case allows the camera to be waterproof up to 30 meters (33 feet), making it suitable for diving, surfing, skiing, and other water sports. Ensure the case is properly sealed before submerging.
Maintenance
- Cleaning: Use a soft, dry cloth to clean the camera body. For the lens, use a specialized lens cleaning cloth and solution.
- Storage: Store the camera in a cool, dry place away from direct sunlight and extreme temperatures.
- Battery Care: To prolong battery life, avoid fully discharging the battery frequently. Charge the camera regularly, even when not in use for extended periods.
- Waterproof Case: After each use in water, rinse the waterproof case with fresh water and allow it to air dry completely before storing. Inspect the seals for any damage.
Troubleshooting
- Camera Not Turning On: Ensure the battery is charged. Connect the camera to a power source and try again.
- Cannot Record: Check if the TF card is inserted correctly and has sufficient free space. If the card is full and loop recording is off, recording will stop.
- WiFi Connection Issues: Ensure the camera's WiFi is enabled and your smartphone is within range. Restart both the camera and your smartphone, then try reconnecting via the app.
- Poor Video Quality: Ensure the lens is clean and free from smudges. Check the recording settings in the app to confirm 1080P resolution is selected.
- Camera Overheating: If the camera becomes excessively hot, power it off and allow it to cool down. Avoid prolonged recording in direct sunlight or enclosed spaces.
Warranty and Support
For warranty information, technical support, or service inquiries, please refer to the official Camnoon website or contact their customer service directly. Keep your purchase receipt as proof of purchase for warranty claims.