1. Introduction
Thank you for choosing the Sharkoon AK6 RGB ATX PC Case. This manual provides essential information for the proper installation, operation, and maintenance of your new PC case. Please read this guide thoroughly before beginning the assembly process to ensure optimal performance and longevity of your components.
2. Safety Information
- Always disconnect the power supply from the wall outlet before installing or removing any components inside the PC case.
- Handle tempered glass panels with care. They are fragile and can break if dropped or subjected to impact.
- Avoid exposing the case to extreme temperatures, humidity, or direct sunlight.
- Keep small parts and screws out of reach of children.
- Ensure proper grounding to prevent electrostatic discharge (ESD) damage to sensitive electronic components.
3. Package Contents
Please verify that all items are present in your package:
- Sharkoon AK6 RGB ATX PC Case
- Accessory box (containing screws, cable ties, and other small parts)
- User Manual (this document)
4. Product Overview
The Sharkoon AK6 RGB ATX PC Case is designed with a modern glass aesthetic, featuring seamless integration of tempered glass on the front and side panels. It includes four pre-installed 120mm addressable RGB PWM fans for optimal airflow and visual appeal. The case supports a wide range of components, including BTF motherboards, and offers ample space for high-performance hardware.

Figure 4.1: Front interior view of the Sharkoon AK6 RGB PC case, showcasing the pre-installed addressable RGB fans and the spacious main chamber.

Figure 4.2: Angled view of the Sharkoon AK6 RGB PC case, highlighting the tempered glass side panel and the top mesh for ventilation.

Figure 4.3: Rear view of the Sharkoon AK6 RGB PC case, showing the I/O shield cutout, rear exhaust fan mount, and expansion slots.
Front I/O Panel
The front I/O panel is located on the side of the case and includes:
- Power Button
- Reset Button
- 2 x USB Ports (Type-A)
- 1 x USB Type-C Port
- Audio Jacks (TRRS)
5. Setup and Installation
Follow these steps to install your components into the Sharkoon AK6 RGB PC Case.
5.1 Preparing the Case
- Place the case on a flat, stable surface.
- Carefully remove the tempered glass side panel by unscrewing the thumb screws at the rear and gently pulling the panel away.
- Remove the rear metal side panel by unscrewing the thumb screws.
5.2 Motherboard Installation
The AK6 RGB supports Mini-ITX, Micro-ATX, ATX, and BTF motherboards.
- Install the I/O shield into the cutout at the rear of the case (if not pre-installed on your motherboard).
- Align your motherboard with the standoffs inside the case. Ensure all standoffs match the motherboard's mounting holes.
- Secure the motherboard with the appropriate screws from the accessory box.
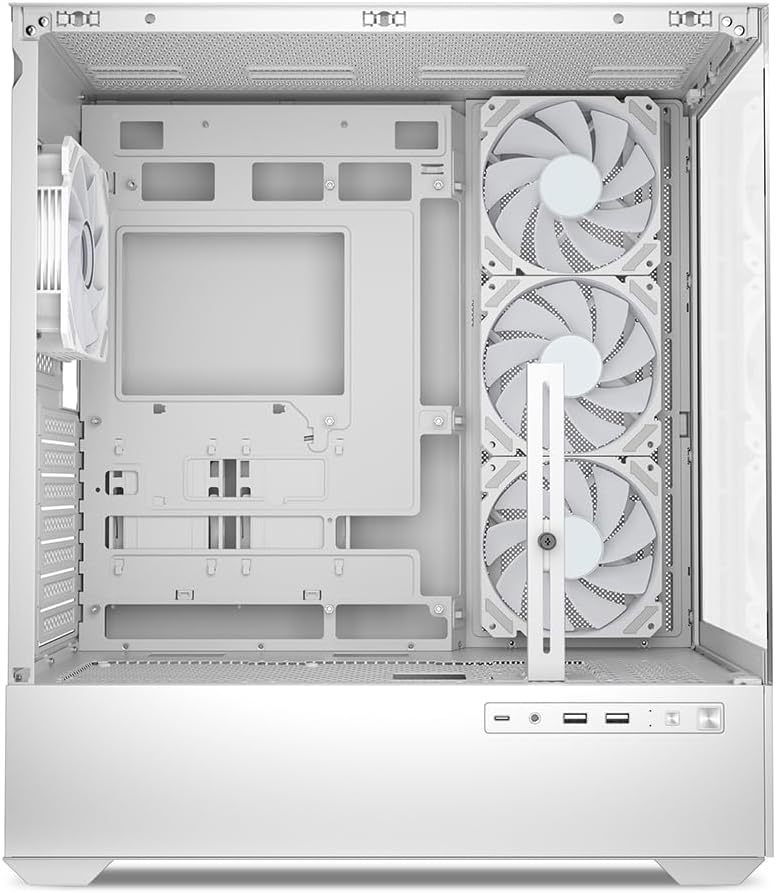
Figure 5.1: Interior view of the Sharkoon AK6 RGB PC case, illustrating the motherboard tray, cable management cutouts, and front fan mounting points.
5.3 Power Supply Installation
The case features a bottom-mount power supply design.
- Slide the power supply unit (PSU) into the dedicated compartment at the bottom rear of the case.
- Align the PSU with the screw holes at the rear of the case.
- Secure the PSU with the provided screws.
5.4 Storage Device Installation
The AK6 RGB supports up to two 3.5" HDDs or four 2.5" SSDs.
- For 3.5" HDDs: Locate the drive cages beneath the PSU shroud. Slide the HDD into a drive tray and secure it with screws.
- For 2.5" SSDs: SSDs can be mounted on the dedicated brackets behind the motherboard tray or on the 3.5" drive trays using adapter screws.
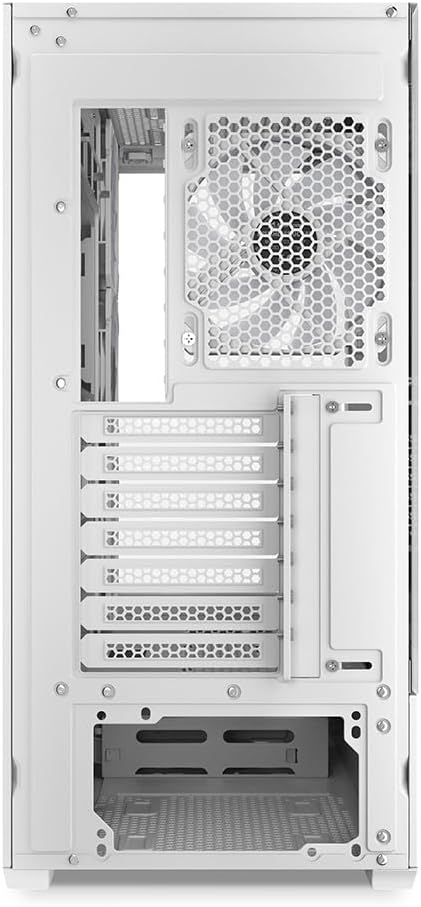
Figure 5.2: Rear interior view of the Sharkoon AK6 RGB PC case, detailing the drive cages for 3.5-inch HDDs and 2.5-inch SSDs, and the power supply shroud area.
5.5 Graphics Card and Expansion Card Installation
- Remove the necessary expansion slot covers at the rear of the case.
- Insert your graphics card or other expansion cards into the appropriate PCIe slots on your motherboard.
- Secure the cards with screws. The case includes a rubberized graphics card support for larger cards.
5.6 CPU Cooler and Radiator Installation
The case supports CPU coolers up to 17 cm in height and allows for extensive liquid cooling setups.
- Install your CPU cooler according to its manufacturer's instructions.
- For liquid cooling, the case can accommodate a 360mm radiator at the top and an additional 280mm radiator.
5.7 Cable Management
Utilize the cable management cutouts and tie-down points behind the motherboard tray to route and secure cables. This improves airflow and aesthetics.
6. Operating Instructions
6.1 Powering On
After all components are installed and cables are connected, replace the side panels. Connect the power cable to your PSU and a wall outlet, then press the power button on the front I/O panel to start your system.
6.2 RGB Fan Control
The AK6 RGB comes with four pre-installed addressable RGB PWM fans. These fans are connected to an RGB controller which also provides connections for up to four LED elements and four PWM fans. The RGB lighting can typically be controlled via your motherboard's RGB software (if compatible) or through a dedicated button on the case (if present and connected).
6.3 Airflow Optimization
The case is designed for ideal airflow, with three inverted fans drawing air from the side into the case. The top and rear fan mounts allow for additional exhaust fans. Ensure proper fan orientation for optimal cooling performance.

Figure 6.1: Example of a fully assembled system within the Sharkoon AK6 RGB PC case, featuring various components and active RGB lighting.
7. Maintenance
Regular maintenance helps ensure the longevity and performance of your PC components.
- Dust Filters: Periodically clean the removable dust filters (e.g., on the top and bottom) to maintain optimal airflow and prevent dust buildup inside the case. Use compressed air or a soft brush.
- Glass Panels: Clean tempered glass panels with a soft, lint-free cloth and a glass cleaner. Avoid abrasive materials that could scratch the surface.
- Interior Cleaning: Use compressed air to remove dust from internal components and fans. Ensure the system is powered off and unplugged before cleaning.
8. Troubleshooting
If you encounter issues with your PC case, refer to the following common troubleshooting steps:
- No Power: Ensure the power supply is properly connected to the wall outlet and the motherboard. Check all internal power cables (24-pin ATX, 8-pin CPU, PCIe power).
- Fans Not Spinning/RGB Not Working: Verify that all fan and RGB cables are correctly connected to the motherboard or the included RGB controller. Check your motherboard's BIOS/UEFI settings or RGB software for fan speed and lighting control.
- Front I/O Ports Not Functioning: Confirm that the front panel connectors (USB, audio, power/reset switches) are correctly plugged into the corresponding headers on your motherboard.
- Overheating: Ensure all fans are spinning correctly and oriented for proper airflow. Clean dust filters and internal components. Verify CPU cooler installation.
For further assistance, please contact Sharkoon support.
9. Specifications
| Feature | Specification |
|---|---|
| Brand | Sharkoon |
| Model Name | AK6 RGB |
| Model Number | C-AK6W |
| Case Type | ATX Tower |
| Color | White |
| Material | Tempered Glass |
| Motherboard Compatibility | Mini ITX, Micro ATX, ATX, BTF |
| Power Supply Mounting Type | Bottom Mount |
| Cooling Method | Air |
| Pre-installed Fans | 4 x 120mm Addressable RGB PWM Fans |
| Max CPU Cooler Height | 17 cm |
| Max Graphics Card Length | 41 cm (with rubberized support) |
| Max PSU Length | 23.5 cm |
| Radiator Support | Top: up to 360mm, Additional: up to 280mm |
| Drive Bays | 2 x 3.5" HDD or 4 x 2.5" SSD |
| Front I/O Ports | 2 x USB Type-A, 1 x USB Type-C, Audio (TRRS) |
| Item Weight | 6.1 Kilograms |
| Special Features | RGB Lighting, Unique Glass Appearance, BTF Motherboard Support |
10. Warranty
Sharkoon products are manufactured to high quality standards. For detailed warranty information, please refer to the warranty card included with your product or visit the official Sharkoon website. The warranty typically covers defects in materials and workmanship under normal use.
11. Support
If you require technical assistance or have questions regarding your Sharkoon AK6 RGB ATX PC Case, please visit the official Sharkoon website for support resources, FAQs, and contact information. You may also find updated drivers or software for the RGB controller there.
Website: www.sharkoon.com