Introduction
Thank you for choosing the SMAEL 8105 Digital Watch. This manual provides detailed instructions on how to set up, operate, and maintain your watch. Please read this manual carefully to ensure proper use and to maximize the lifespan of your timepiece.
Watch Components and Button Functions
The SMAEL 8105 watch features four primary buttons for navigation and function control, along with a clear digital display.
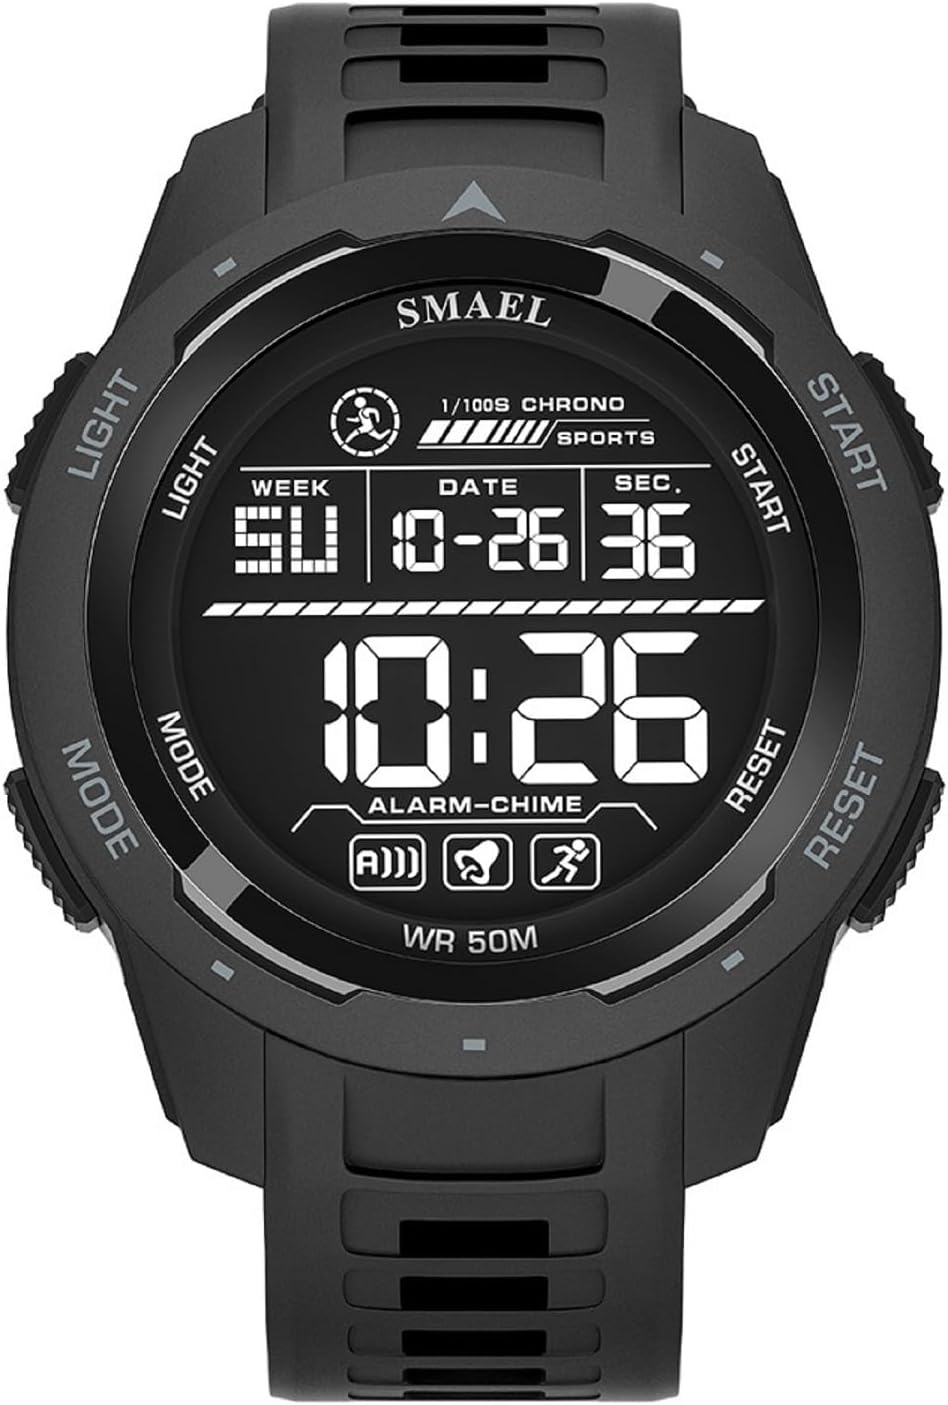
Image 1: Front view of the SMAEL 8105 Digital Watch, highlighting the display and button locations. The buttons are typically labeled LIGHT (top left), MODE (bottom left), START (top right), and RESET (bottom right).
- LIGHT Button (Top Left): Activates the backlight for visibility in low-light conditions.
- MODE Button (Bottom Left): Cycles through different modes: Time Display, Stopwatch, Alarm Setting.
- START Button (Top Right): Used to start/stop functions (e.g., stopwatch) or increase values during setting.
- RESET Button (Bottom Right): Used to reset functions (e.g., stopwatch) or select items during setting.
Setup: Initial Time and Date Setting
- Enter Time Setting Mode: From the normal time display, press the MODE button three times until the seconds begin to flash. This indicates you are in time setting mode.
- Set Seconds: Press the RESET button to reset the seconds to 00.
- Adjust Hour: Press the MODE button once to move to the hour setting. The hour digits will flash. Press the START button to advance the hour. Note the 'A' for AM and 'P' for PM indicators, or 'H' for 24-hour format.
- Adjust Minute: Press the MODE button once to move to the minute setting. The minute digits will flash. Press the START button to advance the minute.
- Adjust Month: Press the MODE button once to move to the month setting. Press the START button to advance the month.
- Adjust Date: Press the MODE button once to move to the date setting. Press the START button to advance the date.
- Adjust Day of Week: Press the MODE button once to move to the day of the week setting. Press the START button to advance the day.
- Exit Setting Mode: Press the MODE button again to return to the normal time display.
Operating Instructions
1. Stopwatch Function
- Access Stopwatch: From the normal time display, press the MODE button once. The display will show "00:00:00" or similar.
- Start/Stop: Press the START button to begin timing. Press START again to pause.
- Reset: While the stopwatch is paused, press the RESET button to clear the time to "00:00:00".
- Return to Time: Press the MODE button to cycle back to the normal time display.
2. Alarm Setting and Activation
- Access Alarm Mode: From the normal time display, press the MODE button twice. The display will show the alarm time.
- Set Alarm Hour: Press the RESET button until the hour digits flash. Press the START button to adjust the hour.
- Set Alarm Minute: Press the MODE button once to move to the minute setting. Press the START button to adjust the minute.
- Activate/Deactivate Alarm: In alarm mode (after pressing MODE twice), press the START button to toggle the alarm ON/OFF. An alarm icon (e.g., a bell) will appear or disappear on the display.
- Hourly Chime: In alarm mode, press the RESET button to toggle the hourly chime ON/OFF. A chime icon will appear or disappear.
- Exit Alarm Setting: Press the MODE button to return to the normal time display.
3. Glow Mode (Backlight)
To illuminate the display in dark environments, simply press the LIGHT button (top left). The backlight will remain active for a few seconds.
Water Resistance Guidelines
Your SMAEL 8105 watch is designed with a 3ATM (30 meters) water resistance rating. This means it is suitable for:
- Daily use, such as hand washing.
- Exposure to rain or splashes.
Important Precautions:
- DO NOT press any buttons while the watch is submerged in water.
- DO NOT use the watch during swimming, diving, or any prolonged water activities.
- AVOID exposure to hot water, such as in showers, saunas, or hot tubs, as this can compromise the watch's seals.
- Ensure the watch is completely dry before operating buttons if it has been exposed to moisture.
Maintenance
- Cleaning: Wipe the watch case and strap regularly with a soft, dry cloth. For stubborn dirt, a slightly damp cloth can be used, followed by immediate drying. Avoid harsh chemicals or abrasive materials.
- Storage: When not in use, store your watch in a cool, dry place away from direct sunlight and extreme temperatures.
- Battery: The watch uses a standard watch battery. When the display dims or functions become erratic, it may be time for a battery replacement. It is recommended to have this done by a professional watch technician to ensure water resistance seals are properly maintained.
- Impact: While the watch features a shockproof design, avoid unnecessary impacts or drops to prevent damage to internal components or the display.
Troubleshooting
| Problem | Possible Cause | Solution |
|---|---|---|
| Display is blank or dim. | Low battery. | Replace the battery. |
| Buttons are unresponsive. | Watch may be wet, or internal malfunction. | Ensure watch is dry. If problem persists, seek professional service. |
| Time is incorrect. | Time not set correctly or battery low. | Re-set the time following the "Setup" instructions. If issue persists, replace battery. |
| Alarm does not sound. | Alarm is not activated or set incorrectly. | Verify alarm time and ensure the alarm icon is displayed. |
Specifications
- Brand: SMAEL
- Model: 8105
- Movement: Digital
- Case Material: Strong ABS Plastic
- Strap Material: TPU
- Glass Material: High-strength Hardened Glass
- Strap Length: 23 cm
- Strap Width: 26 mm
- Case Diameter: 51 mm
- Case Thickness: 16 mm
- Water Resistance: 3ATM / 30m (Splash/Rain Resistant, Not for Swimming/Diving)
- Features: Digital Time, Date, Day, Stopwatch, Alarm, Hourly Chime, Glow Mode (Backlight), Shockproof Design
Warranty and Support
SMAEL is committed to customer satisfaction. If you have any questions, concerns, or require assistance with your SMAEL 8105 Digital Watch, please do not hesitate to contact our customer support. We will endeavor to provide prompt and helpful solutions.
Please refer to your purchase documentation or the retailer's website for specific warranty terms and contact information.