Introduction
This manual provides detailed instructions for the installation, operation, and maintenance of your CAMECHO Android 15 Car Radio. Please read this manual thoroughly before using the product to ensure proper functionality and safety. Keep this manual for future reference.
Setup
What's in the Box
Verify that all components are present in the package:
- 1 x Android Car Radio + 1 x Canbus
- 2 x Power Cable + 1 x RCA Cable + 2 x USB Cable
- 1 x Rear Camera Cable
- 1 x Radio Antenna + 1 x GPS Antenna
- 1 x User Manual

Image: Overview of the CAMECHO Android 15 Car Radio's dimensions and included accessories such as USB cables, GPS antenna, rear camera input cable, radio antenna, RCA cable, user manual, Canbus, and power cables.
Vehicle Compatibility
This car radio is designed for specific Renault Dacia models:
- Renault Dacia Duster (2011-2017)
- Renault Dacia Sandero (2012-2017)
- Renault Dacia Lodgy (2012-2017)
- Renault Dacia Springs (2012-2017)
- Renault Dacia Capture (2013-2017)
- Renault Dacia Symbol (2013-2017)
- Lada Xray

Image: Various compatible Renault Dacia vehicle dashboards, including Dacia Duster (2010-2012), Dacia Sandero (2010-2012), Dacia Dokker (2012), Dacia Duster (2012-2015), Dacia Logan (2012), and Dacia Sandero (2012-2015), showing the original radio units.
Installation Overview
Professional installation is recommended for this product. Ensure the vehicle's power is disconnected before beginning installation. Connect all cables according to the wiring diagram provided in the included user manual. Secure the unit firmly in the dashboard.

Image: A side-by-side comparison showing a Renault Dacia dashboard before and after the installation of the CAMECHO Android car radio, highlighting the integrated appearance.
Operating Instructions
The CAMECHO Android 15 Car Radio offers a wide range of features. This section details how to use them.
Basic UI Navigation
The device features a customizable user interface. Swipe left or right to access different home screens and applications. Tap on icons to launch applications or settings.

Image: A collage displaying various user interface themes (MUI01 to MUI15) available on the CAMECHO Android car radio, allowing users to customize the look and feel of their system.
Wi-Fi Connection
To connect to Wi-Fi, navigate to Settings > Internet > Wi-Fi. Select your desired network and enter the password. Once connected, you can use online applications like YouTube, TikTok, and Spotify.
Video: Demonstrates how to connect the car radio to a Wi-Fi network. The video shows navigating through settings, selecting a Wi-Fi network, entering the password, and confirming the connection. This allows access to online features.
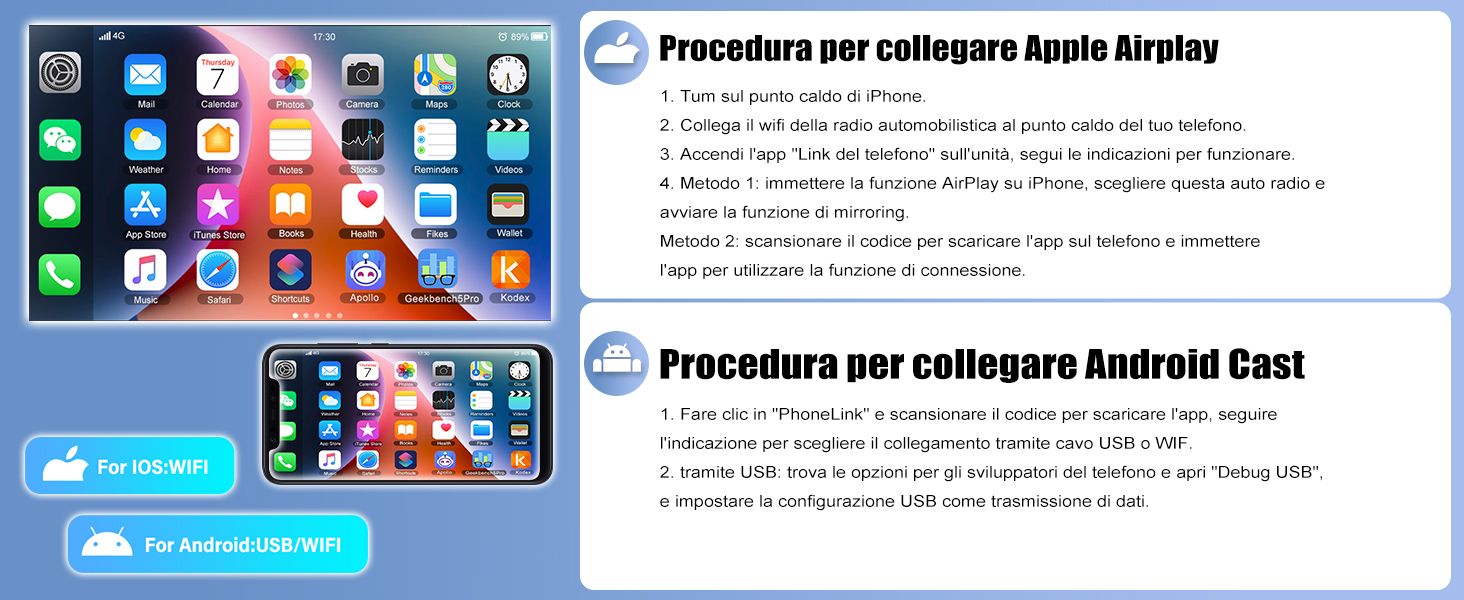
Image: The car radio screen showing various internet applications like YouTube, Facebook, and Twitter, accessible through a Wi-Fi connection, enhancing in-car entertainment and connectivity.
Display Settings (Brightness, Language, Time)
Adjust display brightness, change system language, and set the correct time and date through the settings menu.
- Brightness: Go to Settings > Display > Backlight Brightness. Adjust the slider as needed.
- Language: Go to Settings > Language & Input > Languages. Add and select your preferred language.
- Time: Go to Settings > Date & Time. Enable automatic time calibration or set manually.
Video: Illustrates how to adjust screen brightness, change the system language, and set the time and date on the car radio. It shows navigation through the 'Display', 'Language & Input', and 'Date & Time' settings.
Touch Screen Calibration
If the touch screen is unresponsive or inaccurate, perform a 5-point calibration. Simultaneously place all five fingers on the screen to activate the calibration mode, then follow the on-screen prompts to touch the crosshairs.
Video: Guides the user through the 5-point touch screen calibration process. It shows the user placing five fingers on the screen to initiate calibration and then touching the crosshairs at different points to ensure accurate touch response.
Car Protocol Settings
To configure vehicle-specific settings, access the factory settings menu. Enter the password '8888' when prompted. From there, select 'Vehicle Model Configuration' and choose the appropriate vehicle model for optimal integration.
Video: Demonstrates how to access and configure car protocol settings. It shows entering the factory password (8888) and selecting the vehicle model from a list to ensure proper communication between the radio and the car's systems.
Rear Camera Format Selection
If you have a rear view camera installed, ensure the correct video format is selected for proper display. Navigate to Factory Settings (password '8888') > Image Configuration > Rear Camera Channel Configuration. Select the format that matches your camera (e.g., AHD720P25).
Video: Shows the process of selecting the correct rear camera video format within the factory settings. This ensures compatibility and proper display of the rear view camera feed.
Steering Wheel Control (SWC) Learning
To use your vehicle's steering wheel controls with the car radio, you need to program them. Go to the SWC application from the main menu. Reset any previous settings, then press 'Start' and follow the on-screen instructions to assign functions to each button on your steering wheel.
Video: Demonstrates how to program the steering wheel controls (SWC) for the car radio. It shows resetting existing settings, initiating the learning process, and assigning functions like volume up/down and mute to physical steering wheel buttons.

Image: The car radio display showing the interface for programming steering wheel controls, with options for various functions like volume, track skip, and mode selection.
Bluetooth Connection
Connect your smartphone via Bluetooth for hands-free calling and audio streaming. Go to the 'BT Phone' application, turn on Bluetooth, and pair with your device. The device name is typically 'RK33261CB716'.
Video: Shows the steps to connect a smartphone to the car radio via Bluetooth. It demonstrates enabling Bluetooth on both devices, pairing them, and confirming the connection for hands-free calls and music streaming.

Image: The car radio displaying the Bluetooth 5.0 interface, showing options for dialing, contacts, call history, and music playback, along with a smartphone connected for hands-free communication.
Wireless Carplay Connection
To connect to Wireless Carplay:
- Enable Bluetooth on your iPhone and pair it with the car radio.
- Open the 'Zlink' app on the car radio.
- If connection fails, connect your phone to the car radio's hotspot, then retry 'Zlink', maintaining both Bluetooth and Hotspot connections.
Video: Demonstrates the process of connecting an iPhone to the car radio using Wireless Carplay. It shows pairing via Bluetooth, launching the Carplay app, and navigating through Carplay features like maps and music.

Image: Detailed instructions for connecting Wireless Apple Carplay and Wireless Android Auto, outlining the steps for Bluetooth pairing, app usage, and troubleshooting connection issues.
Wireless Android Auto Connection
To use Wireless Android Auto:
- Ensure the 'Android Auto' app is installed on your mobile phone.
- Enable Bluetooth on your phone and pair it with the car radio.
- Open the 'Zlink' app on the car radio.
Video: Demonstrates how to connect an Android phone to the car radio using Wireless Android Auto. It shows the Bluetooth pairing process and the successful launch of the Android Auto interface on the car radio screen.
FM/RDS Radio
Access the 'Radio' application from the main menu. You can manually tune frequencies, scan for stations, and save your favorite stations. The RDS (Radio Data System) feature provides additional information like station name and traffic updates.
Video: Illustrates how to operate the FM/RDS radio function. It shows tuning to different frequencies, saving preset stations, and utilizing the RDS feature for station information.

Image: The car radio displaying the FM/RDS radio interface, showing frequency tuning, preset stations, and RDS information, with a classic radio icon in the background.
Equalizer (EQ) and Digital Sound Processor (DSP)
Customize your audio experience using the built-in Equalizer and Digital Sound Processor. Access the 'EQ' application to adjust sound frequencies, select preset sound modes (e.g., Rock, Classic, Jazz), and fine-tune the balance and fade for optimal sound distribution within your vehicle.
Video: Demonstrates how to use the equalizer (EQ) and balance settings. It shows adjusting frequency bands, selecting different sound presets (like rock, classic, jazz), and fine-tuning the audio balance across the car's speakers.

Image: The car radio displaying a 32-band equalizer interface, allowing for precise audio customization with various sound presets and balance controls.
GPS Navigation
The car radio includes integrated GPS navigation. You can use both online and offline navigation. For offline navigation, download free maps from the 'Here WeGo' app after connecting to the internet.

Image: The car radio screen showing a GPS navigation map with route guidance, current speed, and estimated arrival time, set against a scenic road background.
Split Screen Functionality
Utilize the split-screen feature to run two applications simultaneously. For example, you can have navigation open on one side and music playback on the other. To activate, long-press an app icon and drag it to one side of the screen, then select another app for the other side.

Image: The car radio screen demonstrating the split-screen feature, showing navigation and radio applications running side-by-side, allowing for multitasking.
Rear View Camera
The system supports AHD rear view cameras (not included). When the vehicle is put into reverse, the display automatically switches to the camera feed, providing a clear view of the area behind your car. Ensure the camera format is correctly set in the factory settings.

Image: A visual representation of the backup camera feature, highlighting day and night vision capabilities, waterproof design, and wide-angle view for enhanced safety during reversing.
External Device Connectivity
The car radio supports various optional external devices to enhance functionality:
- USB Interface: For media playback and data transfer.
- USB Recorder (DVR): For recording driving footage.
- DAB+ Adapter: For digital audio broadcasting.
- OBD2: For vehicle diagnostics.
- External Microphone: For improved call quality.
- 360 Panoramic Camera: For a comprehensive view around the vehicle.
- Video Output: For connecting external displays.

Image: A display of various optional external functions and devices that can be connected to the car radio, including DVR, DAB+, 360 panoramic camera, OBD2, video output, and an external microphone.
Maintenance
Cleaning
To maintain the clarity of your screen and the cleanliness of the unit, gently wipe the screen with a soft, lint-free cloth. For stubborn smudges, slightly dampen the cloth with water or a screen-safe cleaner. Avoid abrasive materials or harsh chemicals.
Software Updates
Periodically check for software updates to ensure optimal performance and access to the latest features. Updates can typically be found through the system settings or the manufacturer's website. Follow the on-screen instructions carefully during the update process.
Video: Shows how to clear memory on the car radio by swiping down the status bar and tapping the 'clean' icon, optimizing system performance.
Troubleshooting
If you encounter issues with your car radio, refer to the following common problems and solutions:
- No Power: Check all power connections and fuses. Ensure the ignition is on.
- No Sound: Verify speaker connections, volume levels, and audio settings (EQ/Balance).
- Bluetooth Connection Issues: Ensure Bluetooth is enabled on both devices. Delete previous pairings and try reconnecting. Check for interference.
- GPS Not Working: Ensure the GPS antenna is properly connected and has a clear view of the sky. Check navigation app settings.
- Steering Wheel Controls Not Responding: Re-perform the SWC learning process as described in the 'Operating Instructions' section.
- Screen Unresponsive: Try restarting the unit. If the issue persists, perform a touch screen calibration.
- System Slow/Lagging: Clear system memory using the optimization tool (swipe down from top of screen and tap 'clean').
For issues not covered here, please contact customer support.
Specifications
| Feature | Detail |
|---|---|
| Brand | CAMECHO |
| Model Number | 1 (Internal Manufacturer Code) |
| Operating System | Android 15 |
| RAM | 4GB |
| ROM | 64GB |
| Processor | Quad-Core |
| Screen Size | 8 Inches |
| Connectivity Technology | USB, Bluetooth 5.0, RCA, WLAN (Wi-Fi) |
| Special Features | Carplay, Android Auto, Mirrorlink (wireless), GPS, DSP, FM/RDS, SWC |
| Audio Output Mode | Stereo, Surround (5.1 channels) |
| Video Encoding | MP4, AVI, MOV, MKV, WMV, RMVB |
| Output Power | 222 Watts (RMS), 445 Watts (Peak) |
| Internet Applications | Waze, YouTube, TikTok (and others via Play Store) |
| Weight | 1.03 Kilograms |
| Country of Origin | China |
Warranty and Support
Warranty Information
Your CAMECHO Android 15 Car Radio comes with a 2-year warranty. Additionally, a 30-day free return policy is offered. Please retain your proof of purchase for warranty claims.
Customer Support
For any technical assistance, troubleshooting, or warranty inquiries, please contact our customer support team. We offer 24-hour online service.
Email: CAMECHOVIP@126.com

Image: A customer support representative wearing a headset, with the email address CAMECHOVIP@126.com displayed, indicating available support.