
1. Product Overview
The Hotpoint ARISTON NF96WK IT is a 9kg front-load washing machine designed for efficient and convenient laundry care. It features a spacious drum, a maximum spin speed of 1400 RPM, and an energy efficiency class A rating, ensuring powerful cleaning while minimizing energy consumption. This appliance is a free-standing model with a white finish and digital display controls.

Figure 1: Hotpoint ARISTON 9kg Front-Load Washing Machine (Model NF96WK IT)
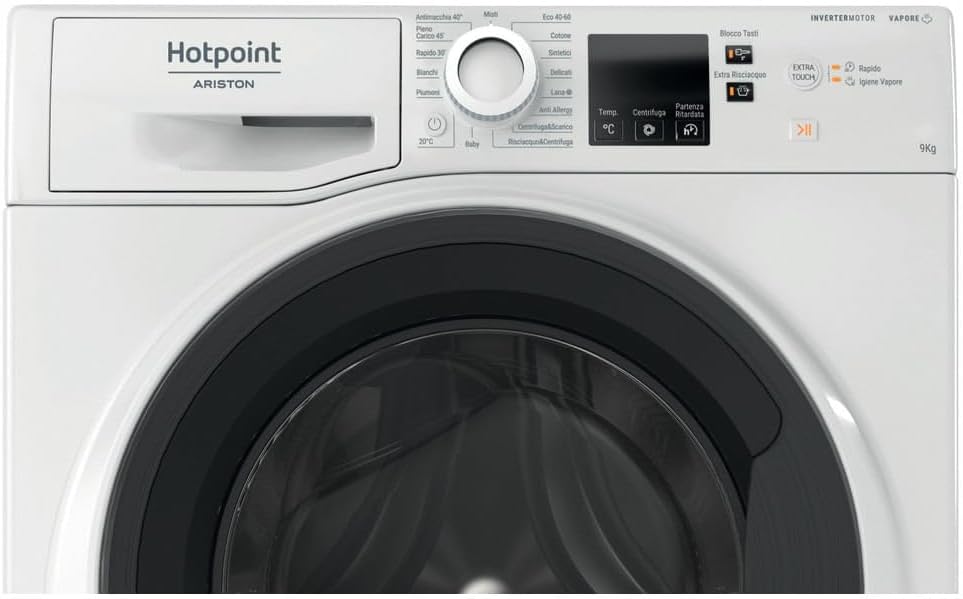
Figure 2: Close-up of the control panel, showing program selector, display, and function buttons.
2. Safety Information
Before operating the appliance, please read all safety instructions carefully. Keep this manual for future reference. Ensure the appliance is properly grounded and installed by a qualified technician. Do not allow children to play with the appliance. Always unplug the appliance and turn off the water supply before performing any maintenance or cleaning. Do not use flammable liquids near the washing machine.
3. Setup and Installation
3.1 Unpacking
Carefully remove all packaging materials. Ensure all transit bolts are removed from the rear of the machine before use. Keep packaging materials out of reach of children.
3.2 Positioning
Place the washing machine on a flat, stable surface. Adjust the feet to ensure the machine is level. Leave adequate space around the machine for ventilation and connections.
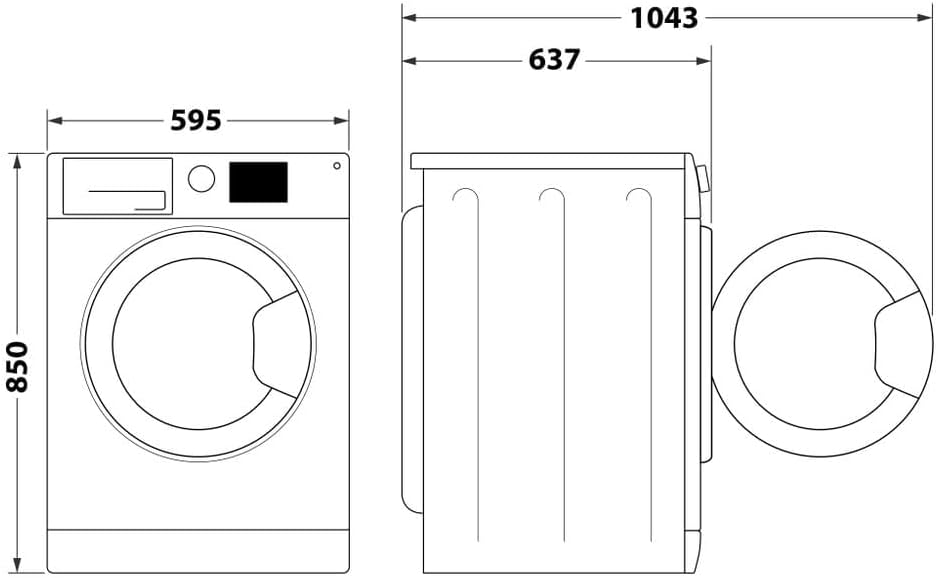
Figure 3: Dimensions of the Hotpoint ARISTON washing machine (Width: 595mm, Depth: 605mm, Height: 850mm).
3.3 Water and Electrical Connections
Connect the water inlet hose to a cold water tap. Ensure the drain hose is properly installed into a suitable drainage system. Plug the power cord into a grounded electrical outlet. Refer to the detailed installation guide provided with the appliance for specific instructions.
4. Operating Instructions
4.1 Loading Laundry
Open the door and load the laundry into the drum. Do not overload the machine. Close the door firmly.
4.2 Adding Detergent
Pull out the detergent dispenser drawer. Add the appropriate amount of detergent and fabric softener to the designated compartments. Close the drawer.
4.3 Selecting a Program
Turn the program selector knob to choose the desired wash program. The digital display will show the program details. You can adjust temperature and spin speed using the corresponding buttons.
4.4 Starting the Wash Cycle
Press the Start/Pause button to begin the wash cycle. The machine will automatically proceed through the selected program.
4.5 End of Cycle
Once the program is complete, the machine will signal with an audible alert (if enabled) and the display will indicate the end of the cycle. Open the door and remove the laundry.
5. Maintenance
Regular maintenance ensures optimal performance and extends the lifespan of your washing machine. Always unplug the appliance and turn off the water supply before cleaning.
5.1 Cleaning the Exterior and Rubber Components
Use a damp cloth with mild soap to clean the exterior and rubber components where dirt could accumulate. Do not use solvents or abrasives.
5.2 Checking Water Inlet and Drain Hoses
Regularly check the inlet and drain hoses for cracks, defects, and kinks. If damaged, replace with a new one available from After-Sales Service or your specialist dealer.
5.3 Cleaning the Water Supply Hose Filters
Turn off the tap. Unscrew the inlet hose from the tap and the back of the washing machine. Pull out the mesh filters from both ends with pliers and carefully clean them under running water. Reinsert the filters and reconnect the hoses, ensuring all connections are tight. Open the water tap and check for leaks.
5.4 Cleaning the Detergent Dispenser
To remove the dispenser, push the grey button down while pulling out the drawer and slightly raising it. Wash it under running water. This operation should be repeated frequently.
5.5 Cleaning the Water Filter / Draining Residual Water
Switch off and unplug the washing machine. If you used a hot wash program, wait until the water has cooled down before draining any water. Place a low, wide container under the water filter. Slowly turn the filter counter-clockwise until all the water has come out. Allow the water to flow out without removing the filter. Once the container is full, close the water filter by turning it clockwise. Empty the container. Repeat until all water has been drained. Remove the water filter by turning it out anticlockwise. Remove residues in the filter and clean it under running water. Reinsert the water filter again by turning it in clockwise direction. Make sure to turn it in as far as it goes; the filter handle must be in vertical position. Then reinstall the kick panel.
5.6 Cleaning Internal Parts & Descaling
Depending on your model, a message/icon on the display may suggest cleaning the TUB INTERNAL COMPONENTS. If your washing machine has an AUTO-CLEAN program, run it with NO LOAD in the drum. If the Auto-Clean program is not available, run an intensive cycle with NO LOAD in the drum.
To descale, use a specific additive (e.g., WPRO descaler). Empty the sachet into the detergent dispenser or directly into the drum. Run an intensive wash cycle with NO LOAD in the drum.
5.7 Maintenance Video
Washing Machine Maintenance Guide
This video provides a comprehensive guide on how to maintain your washing machine, including cleaning various components and checking hoses. (Source: European Appliances Italy S.r.l.)
6. Troubleshooting
If you encounter any issues with your washing machine, please refer to the troubleshooting section in the full user manual or contact customer support. Common issues include:
- Machine not starting: Check power supply, door closure, and water tap connection.
- Water not draining: Check the drain hose for kinks and clean the water filter.
- Excessive vibration/noise: Ensure the machine is level and transit bolts are removed.
- Error codes: Consult the full manual for specific error code meanings and solutions.
7. Specifications
| Feature | Specification |
|---|---|
| Brand | Hotpoint ARISTON |
| Model Number | NF96WK IT |
| Loading Type | Front-Load |
| Capacity | 9 kg |
| Max Spin Speed | 1400 RPM |
| Energy Efficiency Class | A |
| Spin-drying Efficiency Class | B |
| Noise Level (Spin) | 76 dB |
| Color | White |
| Dimensions (WxDxH) | 595 mm x 605 mm x 850 mm |
| Installation Type | Free-standing |
| Control Type | Touch, Digital Display |
| Voltage | 220 Volts (AC) |

Figure 4: Energy Efficiency Class A label.
8. Warranty and Support
This Hotpoint ARISTON washing machine comes with a standard manufacturer's warranty. Please refer to the warranty card included with your purchase for details on coverage and duration. For technical assistance, spare parts, or to schedule a service appointment, please contact Hotpoint customer support or visit their official website. Keep your proof of purchase for warranty claims.
Online Resources:


