Introduction
This instruction manual provides comprehensive guidance for assembling, customizing, and maintaining your Glarry DIY Electric Guitar Kit. Designed for beginners and enthusiasts, this kit offers a hands-on learning experience in guitar construction and electronics. All necessary components are included to build a functional electric guitar.
What's in the Box
Your Glarry DIY Electric Guitar Kit comes with all the essential parts required for assembly. Please verify that all items listed below are present before beginning the assembly process.

Image: Overview of all included components for the Glarry DIY Electric Guitar Kit.
- Pre-cut Wood Pieces: Mahogany body and Maple neck
- Hardware: Tuning machines, Bridge, Strap buttons, Connect buckle
- Electronics: Pickups (H-H configuration), Control knobs (Volume, Tone), 5-way blade switch, Output jack
- Strings: Nickel strings
- Tools & Accessories: Wrench tools, Amp wire, Plectrum, Whammy bar
- Small Parts: Screws, wires, and other necessary fasteners
- Operating Manual (this document)

Image: Labeled diagram of the guitar's components and their placement.
Assembly Instructions
The assembly process is designed to be straightforward, with pre-sanded and drilled components. No welding is required. Follow these steps carefully for successful construction.
- Preparation: Unpack all components and lay them out. Inspect the mahogany body and maple neck for any imperfections. Light sanding with fine-grit sandpaper may be beneficial for a smoother finish, especially if you plan to paint or stain.

Image: Preparing the guitar neck and body for assembly.
- Neck Attachment: Carefully align the maple neck with the neck pocket on the mahogany body. Ensure a snug fit. Secure the neck to the body using the provided screws. Refer to the assembly diagram for correct screw placement.

Image: Attaching the neck to the guitar body.
- Hardware Installation: Install the tuning machines onto the headstock. Attach the bridge to the body, ensuring it is correctly positioned for string alignment. Install strap buttons and the connect buckle.

Image: Installing hardware onto the guitar body.
- Electronics Wiring: Install the pickups into their designated cavities. Wire the pickups to the control knobs (volume, tone) and the 5-way blade switch. Connect these to the output jack. Follow the included wiring diagram for accurate connections.
- Stringing and Setup: Once all components are securely installed, string the guitar with the provided nickel strings. Perform initial tuning and basic setup adjustments, such as action and intonation, to ensure playability.
For a visual guide, an assembly video with detailed steps is available online. Please refer to the product page or manufacturer's website for access to this resource.
Customization
One of the key advantages of this DIY kit is the ability to personalize your guitar's appearance. The wood body and neck are unfinished, allowing you to apply your preferred paint, stain, or varnish.
- Finishing Options: You can choose to paint the guitar with acrylic or lacquer paints, apply wood stain to highlight the mahogany grain, or use a clear varnish for a natural look.
- Preparation for Finishing: Before applying any finish, ensure the wood surfaces are clean, dry, and smooth. Fine sanding is recommended to achieve the best results.

Image: Customizing the guitar body with paint.
Operation
Once assembled, your Glarry Electric Guitar operates like any standard electric guitar. Familiarize yourself with its controls:
- Volume Knob: Controls the overall output level of the guitar.
- Tone Knobs: Adjust the treble and bass frequencies of the sound.
- 5-Way Blade Switch: Selects different pickup configurations (e.g., neck pickup, bridge pickup, or combinations) to alter the tonal characteristics.
- Output Jack: Connects the guitar to an amplifier or audio interface using a 1/4" mono phone plug.
Ensure your guitar is properly tuned before playing. Regular tuning is essential for optimal sound.
Maintenance
Proper maintenance will extend the life and playability of your electric guitar.
- Cleaning: Wipe down the body, neck, and strings with a soft, dry cloth after each use to remove sweat and dirt. Use guitar-specific cleaning products for deeper cleaning when necessary.
- String Replacement: Replace strings regularly, typically every 1-3 months depending on usage, to maintain tone and playability.
- Fretboard Care: Periodically clean and condition the rosewood fretboard to prevent drying and cracking.
- Hardware Check: Periodically check all screws and hardware for tightness. Loose components can affect tuning stability and sound.
- Storage: Store the guitar in a stable environment, away from extreme temperature changes and humidity fluctuations, to prevent wood warping.
Troubleshooting
Here are some common issues you might encounter and their potential solutions:
| Problem | Possible Cause | Solution |
|---|---|---|
| No Sound from Amplifier | Loose output jack connection, faulty cable, incorrect amplifier settings, unpowered amplifier. | Check all cable connections. Ensure amplifier is on and set correctly. Verify internal wiring of the output jack and pickups. |
| Fret Buzz | Uneven frets, low action, neck relief issues. | Adjust bridge saddle height to raise action. Check neck relief and adjust truss rod if necessary (consult a professional if unsure). Lightly sand down high frets if identified as the cause. |
| Poor Tuning Stability | Loose tuning machines, improperly wound strings, nut friction. | Ensure tuning machine screws are tight. Learn proper string winding techniques. Apply graphite to nut slots to reduce friction. |
| Weak or Inconsistent Output | Loose pickup wiring, faulty switch/potentiometer, pickup height issues. | Inspect all wiring connections for pickups, switch, and pots. Adjust pickup height closer to strings. |
Specifications
Key technical specifications for the Glarry DIY Electric Guitar Kit:
- Body Material: Mahogany Wood
- Neck Material: Maple
- Fretboard Material: Rosewood
- Number of Strings: 6
- Pickup Configuration: H-H (Humbucker-Humbucker)
- Bridge System: Tremolo
- String Material: Nickel
- Connector Type: 1/4" Mono Phone Plug
- Item Weight: Approximately 10 pounds
- Product Dimensions (assembled): Approximately 39 x 12.6 x 1.65 inches
- Model Number: GLDIY
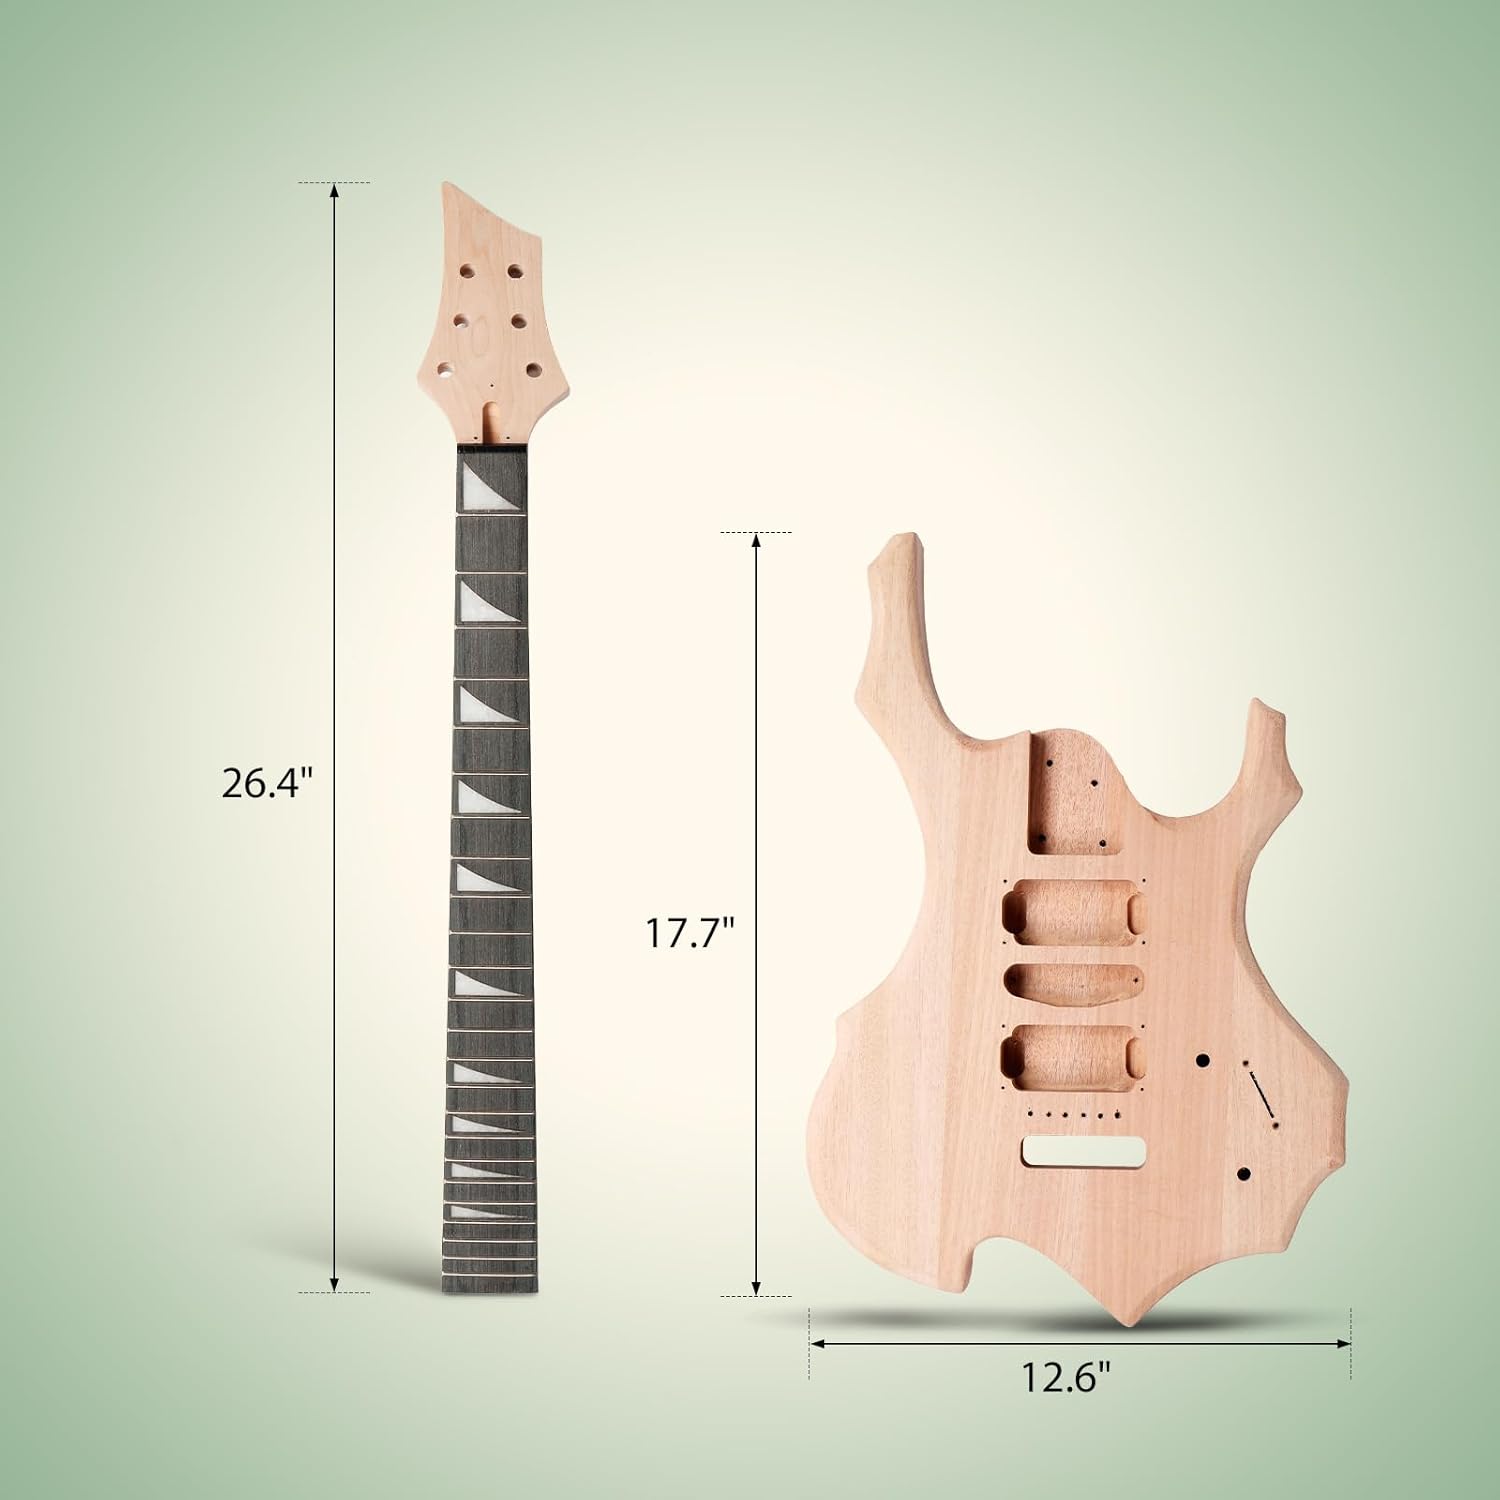
Image: Dimensions of the guitar neck and body components.
Support and Warranty
For any questions regarding assembly, parts, or general inquiries, please contact GlarryDirect customer support. The product typically includes a 30-day return policy. For specific warranty details, please refer to your purchase documentation or contact the seller directly.
- Customer Support: Contact GlarryDirect for assistance.
- Returns: A 30-day easy return policy is generally available.