1. Introduction
This manual provides essential information for the safe and efficient installation, operation, and maintenance of the ZHRCLY Electric Thin Oil Lubrication Pump, Model AMO-IV-150S-04IIP. Please read this manual thoroughly before using the product to ensure proper function and to prevent damage or injury.
1.1 Safety Information
- Always disconnect power before performing any maintenance or installation.
- Ensure proper grounding to prevent electrical shock.
- Use only recommended lubrication oils.
- Do not operate the pump if any parts are damaged or missing.
- Keep hands and clothing clear of moving parts during operation.
2. Product Overview
The ZHRCLY Electric Thin Oil Lubrication Pump is designed for precise and automated lubrication in various industrial applications. It ensures consistent oil delivery to critical components, extending equipment lifespan and reducing wear.
2.1 Main Components
- Pump Body
- Motor
- Oil Reservoir
- Pressure Gauge (if applicable)
- Control Panel (if applicable)
- Outlet Ports
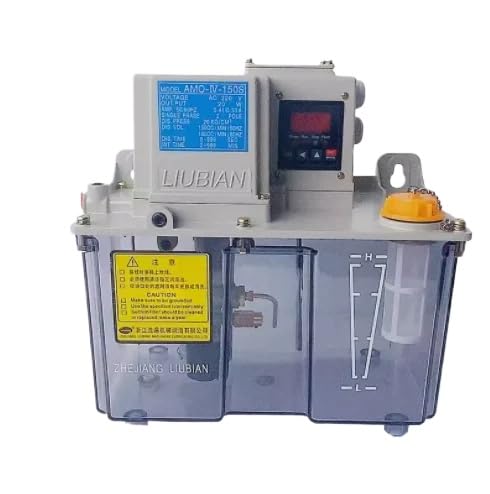
Figure 1: ZHRCLY Electric Thin Oil Lubrication Pump, Model AMO-IV-150S-04IIP. This image shows the overall structure of the lubrication pump, including its main housing and connections.
3. Setup and Installation
3.1 Mounting the Pump
- Select a stable, level surface near the machinery to be lubricated.
- Ensure adequate space for maintenance and oil refilling.
- Secure the pump using appropriate fasteners through the mounting holes.
3.2 Electrical Connection
- Verify the power supply voltage matches the pump's requirements (refer to specifications).
- Connect the power cable to a grounded electrical outlet or junction box.
- Consult a qualified electrician if unsure about wiring procedures.
3.3 Oil Filling
- Remove the oil reservoir cap.
- Fill the reservoir with the recommended thin lubrication oil, ensuring it does not exceed the maximum fill line.
- Replace the cap securely.
3.4 Lubrication Line Connection
- Connect the lubrication lines from the pump's outlet ports to the lubrication points on the machinery.
- Ensure all connections are tight and leak-free.
4. Operating Instructions
4.1 Initial Start-up
- After installation and oil filling, connect the pump to the power supply.
- Turn on the power switch. The pump should begin operating.
- Observe the pressure gauge (if present) to ensure proper operating pressure.
- Check all lubrication points for initial oil delivery.
4.2 Adjusting Lubrication Cycle (if applicable)
If your model includes a control panel, refer to the specific instructions for setting lubrication intervals and duration. Typically, these settings can be adjusted via buttons or a digital interface.
4.3 Shutting Down
To shut down the pump, simply turn off the main power switch. For extended periods of non-use, disconnect the pump from the power source.
5. Maintenance
5.1 Regular Inspection
- Daily: Check oil level in the reservoir. Refill if necessary.
- Weekly: Inspect lubrication lines for leaks or damage. Ensure all connections are secure.
- Monthly: Check the pump body for any signs of wear, corrosion, or unusual noise during operation.
5.2 Oil Replacement
The lubrication oil should be replaced periodically, typically every 6-12 months, or as recommended by the oil manufacturer. To replace:
- Disconnect power to the pump.
- Drain the old oil from the reservoir (if a drain plug is present) or carefully remove the reservoir to empty it.
- Clean the reservoir thoroughly.
- Refill with fresh, recommended thin lubrication oil.
- Dispose of used oil responsibly.
5.3 Cleaning
Wipe down the exterior of the pump with a clean, damp cloth. Avoid using harsh chemicals that may damage the housing or seals.
6. Troubleshooting
| Problem | Possible Cause | Solution |
|---|---|---|
| Pump does not start | No power supply Faulty wiring Motor issue | Check power connection and switch Inspect wiring for damage Contact technical support |
| No oil delivery | Low oil level Clogged lines/filter Air in system Pump malfunction | Refill oil reservoir Clean lines and filter Bleed air from system Contact technical support |
| Oil leakage | Loose connections Damaged seals/hoses | Tighten all connections Inspect and replace damaged components |
| Unusual noise | Low oil level Foreign object Motor bearing wear | Check and refill oil Inspect for obstructions Contact technical support |
7. Specifications
| Feature | Detail |
|---|---|
| Model Number | AMO-IV-150S-04IIP |
| Manufacturer | Original factory |
| Item Weight | 20 pounds |
| Product Dimensions | 1 x 1 x 1 inches |
| Color | New |
| Included Components | NEW |
| ASIN | B0DKNDC73D |
| Date First Available | October 23, 2024 |
8. Warranty and Support
For warranty information and technical support, please refer to the documentation provided with your purchase or contact the manufacturer directly. Keep your purchase receipt as proof of purchase.
Manufacturer: Original factory
Seller: Keyang Mechanical parts factory