1. Introduction
This manual provides comprehensive instructions for the safe and efficient operation, maintenance, and troubleshooting of your VEVOR 3L Digital Ultrasonic Cleaner. Please read this manual thoroughly before initial use and retain it for future reference.
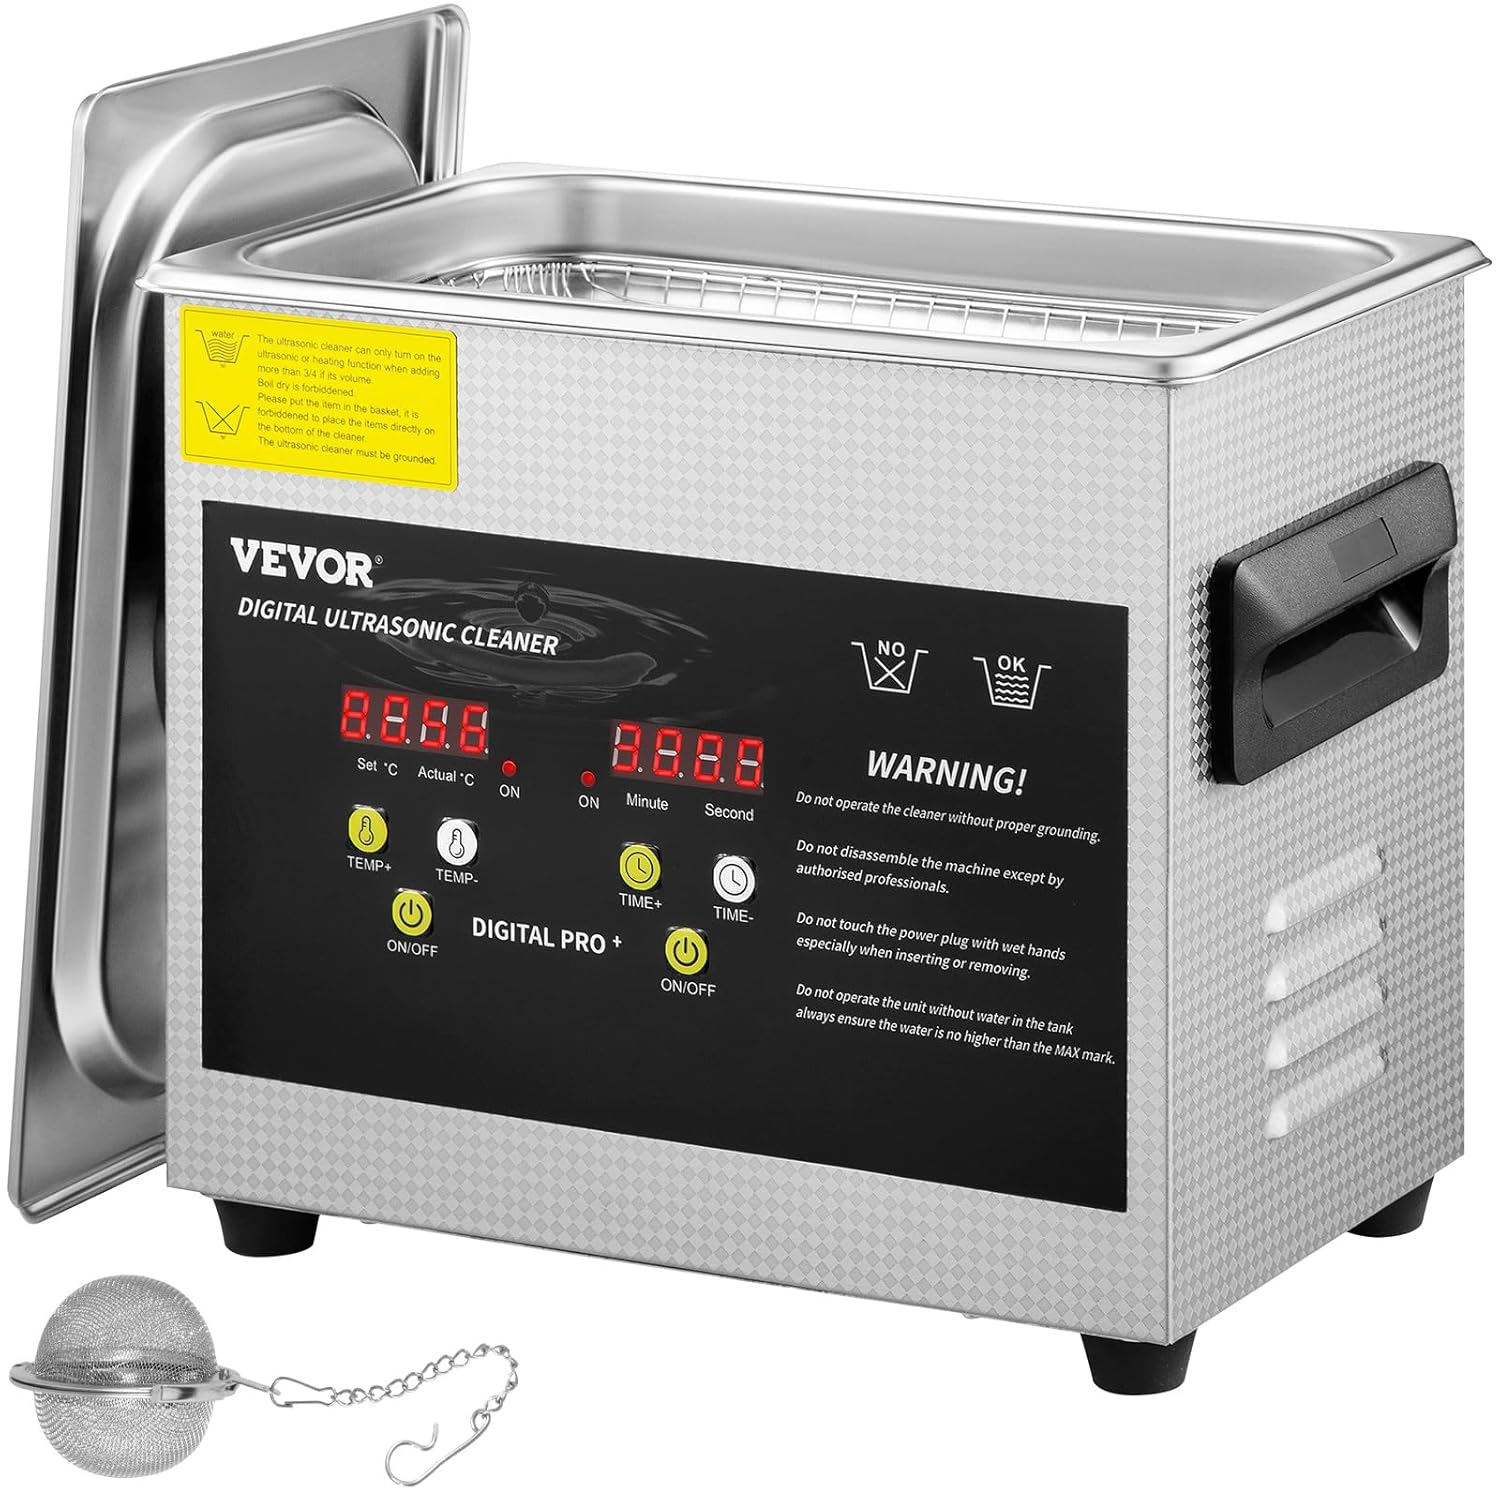
Image 1: VEVOR 3L Digital Ultrasonic Cleaner overview.
The VEVOR 3L Digital Ultrasonic Cleaner is designed for professional and home use, offering powerful 40KHz ultrasonic waves and a 200W heater to effectively clean various items such as jewelry, glasses, watches, dental instruments, lab equipment, and small parts. Its 304 stainless steel construction ensures durability and corrosion resistance.
2. Safety Instructions
WARNING: To reduce the risk of injury, the user must read the instruction manual carefully before operating this unit.
- Always ensure proper grounding of the unit.
- Do not disassemble the machine except by authorized professionals.
- Do not touch the power plug with wet hands, especially when inserting or removing.
- Do not operate the unit without water in the tank. Always ensure the water level is no higher than the MAX mark.
- Ensure the tank is filled with liquid before turning on the heater or ultrasonic function.
- Keep the unit away from children.
- Unplug the unit from the power outlet when not in use or before cleaning.
3. Product Components and Specifications
3.1 What's in the Box
- 1 x VEVOR 3L Digital Ultrasonic Cleaner
- 1 x Cleaning Basket
- 1 x Jewelry Cleaning Ball
- 1 x Power Cord

Image 2: Included accessories: cleaning basket and jewelry cleaning ball.
3.2 Technical Specifications
| Feature | Specification |
|---|---|
| Model | 3L Digital Ultrasonic Cleaner |
| Tank Capacity | 3 Liters |
| Ultrasonic Frequency | 40 KHz |
| Ultrasonic Power | 120 W |
| Heating Power | 200 W |
| Adjustable Heating Temperature | 0-80°C (32-176°F) |
| Adjustable Timer | 0-30 minutes |
| Tank Material | 304 Stainless Steel |
| Product Dimensions (L x W x H) | 10.4 x 6.3 x 8.8 inches (26.5 x 16 x 22.5 cm) |
| Tank Dimensions (L x W x H) | 9.4 x 5.3 x 3.9 inches (24 x 13.5 x 10 cm) |
| Weight | 7.4 Pounds |

Image 3: Product dimensions and typical applications.
4. Setup
- Unpacking: Carefully remove the ultrasonic cleaner and all accessories from the packaging. Inspect for any damage.
- Placement: Place the unit on a stable, flat, and dry surface. Ensure adequate ventilation around the unit.
- Power Connection: Connect the power cord to the unit's leakage-proof jack, then plug it into a properly grounded electrical outlet.
- Fill Tank: Open the lid and fill the stainless steel tank with an appropriate cleaning solution (water, or a specialized ultrasonic cleaning solution). Ensure the liquid level is between the MIN and MAX marks. Do not overfill or operate without liquid.
- Insert Basket: Place the cleaning basket or jewelry cleaning ball into the tank.

Image 4: User-friendly design features for setup and operation.
5. Operating Instructions
5.1 Control Panel Overview

Image 5: Control Panel Layout.
- Temperature Display: Shows set and actual temperature.
- Temperature Control: Adjusts the desired heating temperature.
- Temperature Control Switch: Activates/deactivates heating.
- Heating Lamp: Indicates when heating is active.
- Switch Light: General power indicator.
- Time Control: Adjusts the desired cleaning time.
- Time Control Switch: Activates/deactivates ultrasonic cleaning.
- Time Display: Shows set and remaining cleaning time.
5.2 Basic Operation Steps
- Prepare Items: Place the items to be cleaned into the cleaning basket or jewelry cleaning ball. Ensure items are fully submerged in the cleaning solution but do not touch the bottom of the tank directly.
- Set Temperature (Optional):
- Press the TEMP+ or TEMP- buttons to set the desired temperature (0-80°C).
- Press the ON/OFF button under "DIGITAL PRO +" (left side) to start the heating function. The heating lamp will illuminate. Allow time for the solution to reach the set temperature.
- Set Cleaning Time:
- Press the TIME+ or TIME- buttons to set the desired cleaning duration (0-30 minutes).
- Press the ON/OFF button under "DIGITAL PRO +" (right side) to start the ultrasonic cleaning cycle. The time display will count down.
- Cleaning Process: The unit will operate for the set duration. Ultrasonic waves will generate cavitation bubbles to clean the items.
- Completion: Once the timer reaches zero, the ultrasonic function will automatically stop. If heating was active, manually turn it off by pressing its ON/OFF button.
- Remove Items: Carefully remove the cleaning basket or jewelry cleaning ball from the tank. Rinse the cleaned items with clean water and dry them thoroughly.
Note: For optimal cleaning, especially for heavily soiled items, pre-heating the solution can enhance the ultrasonic cleaning effect.
6. Maintenance
- Draining the Tank: After each use, especially with cleaning solutions, unplug the unit and allow the solution to cool. Carefully pour out the used solution.
- Cleaning the Tank: Wipe the inside of the stainless steel tank with a soft cloth. Do not use abrasive cleaners or steel wool, as this can damage the tank surface.
- Exterior Cleaning: Wipe the exterior of the unit with a damp cloth. Avoid getting water into the control panel or electrical components.
- Storage: Store the ultrasonic cleaner in a cool, dry place when not in use. Ensure the lid is closed to prevent dust accumulation.
- Regular Inspection: Periodically check the power cord for any signs of damage. If damaged, contact customer support for replacement.
7. Troubleshooting
| Problem | Possible Cause | Solution |
|---|---|---|
| Unit does not power on. | No power supply; Power cord not properly connected; Blown fuse. | Check power outlet; Ensure power cord is securely plugged in; Check and replace fuse if necessary (consult a professional). |
| Ultrasonic function not working. | Timer not set or not activated; Insufficient water level. | Set the timer and press the ultrasonic ON/OFF button; Ensure water level is between MIN and MAX marks. |
| Heating function not working. | Temperature not set or not activated; Insufficient water level. | Set the desired temperature and press the heating ON/OFF button; Ensure water level is between MIN and MAX marks. |
| Poor cleaning results. | Incorrect cleaning solution; Insufficient cleaning time; Items too heavily soiled; Water temperature too low. | Use appropriate cleaning solution; Increase cleaning time; Pre-soak heavily soiled items; Increase water temperature. |
| Unit is excessively noisy. | Normal operation sound; Items touching tank bottom. | Some noise is normal during ultrasonic operation. Ensure items are in the basket and not directly touching the tank. |
8. Warranty and Support
VEVOR products are designed for durability and performance. For technical support, warranty information, or to register your product for an e-warranty certificate, please visit the official VEVOR support website:
Please have your product model number (3L Digital Ultrasonic Cleaner) and ASIN (B07ZNNXMZR) ready when contacting support.