KKKMart TPS305, TPS3010, TPS605, TPS1203
KKKMart Laboratory DC Power Supply User Manual
Models Covered: TPS305, TPS3010, TPS605, TPS1203
1. Introduction
Thank you for choosing the KKKMart Laboratory DC Power Supply. This series of high-precision, adjustable DC power supplies is designed for a wide range of applications, from professional laboratory use to DIY electronics and mobile phone repair. Our models feature advanced micro-switching technology, ensuring reliable and efficient power delivery.
Key features include:
- Four-digit display for precise voltage (0.01 V) and current (0.001 A) readings.
- Constant Voltage (CV) and Constant Current (CC) automatic switching modes.
- Over Voltage Protection (OVP), Over Current Protection (OCP), and Over Temperature Protection (OTP).
- Temperature-controlled fan for efficient cooling and low noise operation.
- Continuously adjustable output voltage and current.
- Integrated USB-A and Type-C ports for convenient device charging.
This manual covers the following models:
- TPS305: 30V 5A DC Power Supply
- TPS3010: 30V 10A DC Power Supply
- TPS605: 60V 5A DC Power Supply
- TPS1203: 120V 3A DC Power Supply
2. Package Contents
Please verify that all items listed below are included in your package:
- 1x KKKMart DC Power Supply (Your selected model)
- 1x Power Cord
- 1x Test Line (Red and Black leads)
- 1x User Manual

Figure 2.1: Package Contents
3. Product Overview
Familiarize yourself with the various components and controls of your DC power supply.
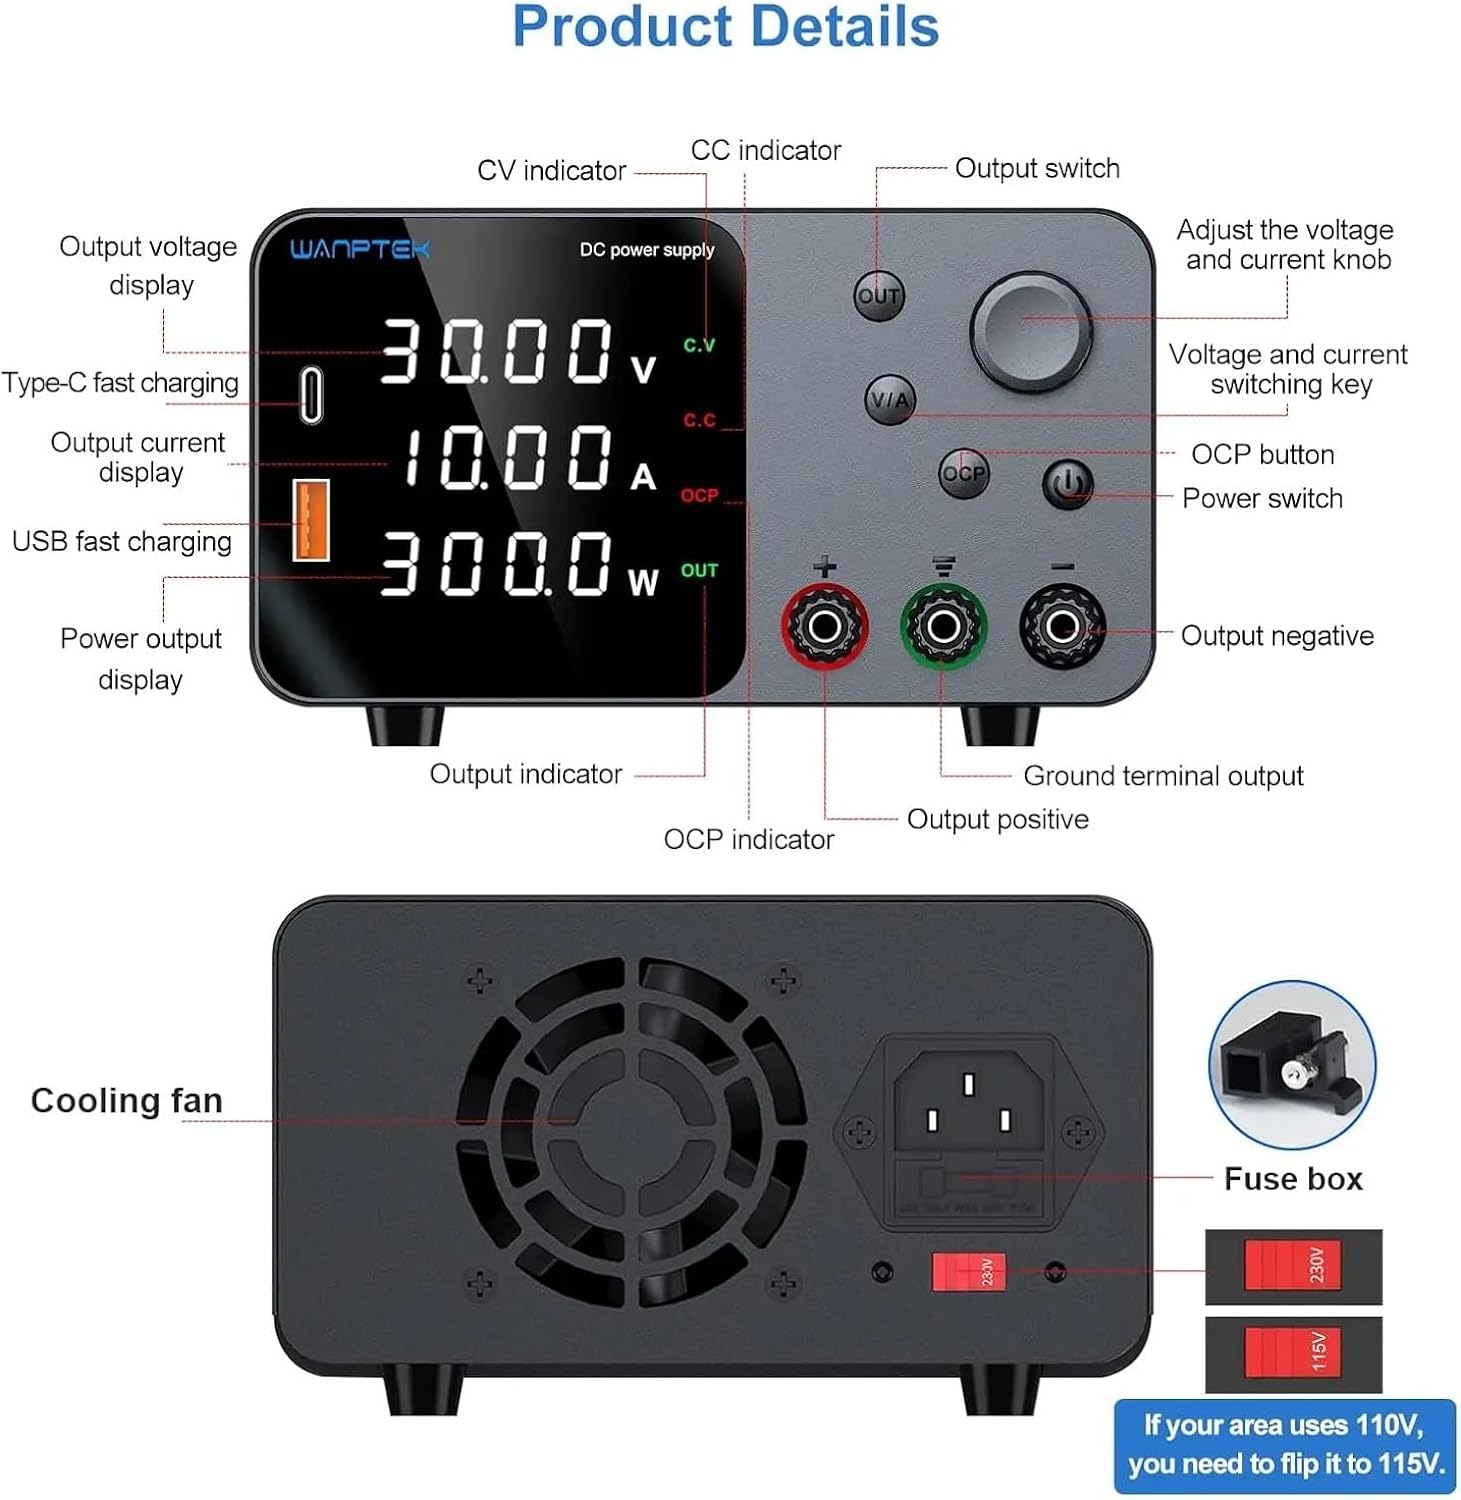
Figure 3.1: Front and Rear Panel Details
3.1 Front Panel Controls and Indicators
- Output Voltage Display: Shows the current output voltage in Volts (V).
- Output Current Display: Shows the current output current in Amperes (A).
- Power Output Display: Shows the calculated output power in Watts (W).
- CV Indicator: Illuminates when the power supply is operating in Constant Voltage mode.
- CC Indicator: Illuminates when the power supply is operating in Constant Current mode.
- OCP Indicator: Illuminates when Over Current Protection is active.
- Output Indicator: Illuminates when the output is enabled.
- Encoder Adjustment Knob: Used to adjust voltage and current values. Press to switch digital position, rotate to increase/decrease digit.
- V/A Switching Button: Press to switch between voltage and current adjustment modes.
- OCP Button: Activates or deactivates Over Current Protection.
- Power Switch: Turns the unit on or off.
- Output Enable/Disable Button (OUT): Toggles the power output on or off.
- USB-A Fast Charging Port: For charging compatible USB-A devices.
- Type-C Fast Charging Port: For charging compatible USB-C devices.
- Output Positive Terminal (+): Red terminal for positive output connection.
- Output Negative Terminal (-): Black terminal for negative output connection.
- Ground Terminal Output: Green terminal for grounding connection.
3.2 Rear Panel Features
- Cooling Fan: Automatically activates to dissipate heat and maintain optimal operating temperature.
- AC Power Input: Socket for connecting the power cord.
- Fuse Box: Contains the protective fuse for the unit.
- Voltage Selector Switch (115V/230V): Allows selection of input voltage (110V or 220V). Ensure this is set correctly for your region before connecting power.
4. Setup
4.1 Unpacking and Inspection
Carefully remove the power supply from its packaging. Inspect the unit for any signs of damage during transit. If any damage is found, do not operate the device and contact customer support immediately.
4.2 Environmental Requirements
Place the power supply on a stable, level surface with adequate ventilation. Ensure there is sufficient space around the cooling fan on the rear panel for proper airflow. Avoid placing the unit in direct sunlight, high humidity, or dusty environments.
4.3 Input Voltage Selection
Before connecting the power cord, locate the voltage selector switch on the rear panel (refer to Figure 3.1). Set the switch to match your local AC mains voltage (115V for North America/Japan, 230V for Europe/most other regions). Incorrect voltage selection can damage the unit.
4.4 Power Connection
Connect the provided power cord to the AC power input socket on the rear panel of the power supply, then plug the other end into a grounded AC outlet.
4.5 Initial Power On
Press the Power Switch on the front panel to turn on the unit. The display will illuminate, showing the default voltage and current settings. The cooling fan may briefly activate.
5. Operation
5.1 Adjusting Voltage and Current
The encoder adjustment knob and V/A button are used to set the desired output voltage and current.
- Press the V/A button to toggle between voltage (V) and current (A) adjustment modes. The active parameter will be highlighted on the display.
- While in voltage or current adjustment mode, press the encoder knob to select the digit you wish to adjust (e.g., tens, units, tenths). The selected digit will blink.
- Rotate the encoder knob clockwise to increase the value of the selected digit, and counter-clockwise to decrease it.

Figure 5.1: Encoder Adjustment Knob and V/A Switching
5.2 Output Enable/Disable
The OUT button controls the power output to your connected load. It is recommended to set your desired voltage and current before enabling the output to prevent accidental damage to your circuit or device.
- Press the OUT button once to enable the output. The Output Indicator will illuminate, and power will be supplied to the output terminals.
- Press the OUT button again to disable the output. The Output Indicator will turn off, and power will be cut from the terminals.

Figure 5.2: Output Enable/Disable Button
5.3 USB & Type-C Charging Interface
The power supply includes dedicated USB-A and Type-C ports for charging mobile phones and other compatible devices. These ports provide a stable charging output independent of the main adjustable DC output.

Figure 5.3: USB & Type-C Charging in Use
5.4 Adjustable Brightness and Mute Function
You can adjust the display brightness and toggle the sound feedback for the encoder knob.
- Adjustable Brightness: Refer to the product's specific button combination (often a long press of a button or a specific menu option) to cycle between low and high brightness modes.
- Mute Function: The unit can be set to mute the beeping sound that occurs when the encoder knob is pressed or turned. Consult the device's on-screen menu or specific button press for this feature.

Figure 5.4: Brightness Adjustment and Mute Function
5.5 Over Current Protection (OCP)
The OCP feature protects your connected load from excessive current. When the output current exceeds the set OCP limit, the power supply will automatically cut off the output and illuminate the OCP indicator. To reset, reduce the load or increase the OCP limit, then toggle the output off and on using the OUT button.
6. Applied Scenes
The KKKMart Laboratory DC Power Supply is suitable for a variety of applications, including but not limited to:
- Production line testing and quality control.
- Mobile phone, computer, monitor, and general electrical appliance repair and maintenance.
- Product aging tests for components like resistors, capacitors, relays, DC motors, and LEDs.
- Battery charging for various types of batteries.
- Laboratory experiments, scientific research, and educational purposes in schools and universities.
- Industrial research and development, and manufacturing production lines.
- Any other occasion requiring a stable and adjustable DC power source.
7. Specifications
| Parameter | Value |
|---|---|
| Model Numbers | TPS305, TPS3010, TPS605, TPS1203 |
| Output Power | 201 - 300W (varies by model) |
| Output Current | 0-10A (varies by model) |
| Output Type | SINGLE |
| Output Frequency | 50/60 HZ |
| Display | Four-digit LED (0.01 V / 0.001 A resolution) |
| Protection Features | OVP (Over Voltage Protection), OCP (Over Current Protection), OTP (Over Temperature Protection) |
| Cooling | Temperature-controlled fan |
| Input Voltage | AC 110V/220V (selectable) |
| Package Dimensions | 1.18 x 0.79 x 0.39 inches |
| Item Weight | 2.2 pounds |
| Country of Origin | China |
8. Maintenance
To ensure the longevity and optimal performance of your KKKMart DC Power Supply, follow these maintenance guidelines:
- Cleaning: Regularly wipe the exterior of the unit with a soft, dry cloth. Do not use abrasive cleaners or solvents.
- Ventilation: Ensure the cooling fan and ventilation openings on the rear and sides are free from dust and obstructions. Periodically clean dust from these areas using compressed air.
- Storage: When not in use for extended periods, store the power supply in a cool, dry place, away from direct sunlight and extreme temperatures.
- Fuse Replacement: If the unit fails to power on, check the fuse located in the fuse box on the rear panel. Replace it with a fuse of the same type and rating if necessary. Always disconnect the power cord before replacing the fuse.
9. Troubleshooting
If you encounter issues with your power supply, refer to the following common problems and solutions:
- No Power/Display Off:
- Check if the power cord is securely connected to both the unit and the AC outlet.
- Verify that the AC outlet is functional.
- Ensure the Power Switch on the front panel is in the 'ON' position.
- Check the fuse on the rear panel and replace if blown (refer to Maintenance section).
- Confirm the 115V/230V selector switch is set correctly for your region.
- No Output Voltage/Current:
- Ensure the OUT button is pressed and the Output Indicator is illuminated.
- Check if the OCP indicator is on. If so, the over current protection has been triggered. Reduce the load or increase the OCP limit, then toggle the output off and on.
- Verify that the output terminals are correctly connected to your load.
- Check if the set voltage or current is too low for the load.
- Unstable Output:
- Ensure connections to the load are secure and not intermittent.
- Verify the load is within the power supply's rated specifications.
- Check for proper ventilation; overheating can cause instability.
- Fan Not Running:
- The fan is temperature-controlled and may not run if the unit is cool or under light load.
- If the unit is hot and the fan is not running, check for obstructions around the fan vents.
If the problem persists after trying these solutions, please contact KKKMart customer support.
10. Safety Information
Please read and adhere to the following safety precautions to prevent injury or damage to the device:
- Always connect the power supply to a grounded AC outlet.
- Do not operate the unit in wet or damp conditions.
- Do not open the casing of the power supply. There are no user-serviceable parts inside, and opening it voids the warranty and exposes you to dangerous voltages.
- Ensure the input voltage selector switch is set correctly for your region before plugging in the unit.
- Avoid short-circuiting the output terminals, especially when the output is enabled.
- Disconnect power before making any connections or disconnections to the output terminals.
- Do not overload the power supply beyond its rated specifications.
- Keep the unit away from flammable materials and heat sources.
11. Warranty and Support
KKKMart products are manufactured to high quality standards and are backed by a limited warranty. For specific warranty terms and conditions, please refer to the warranty card included with your product or visit the official KKKMart website.
For technical support, troubleshooting assistance, or inquiries regarding parts and service, please contact KKKMart customer support through the contact information provided on our website or your purchase documentation. Please have your model number and purchase date ready when contacting support.
Ask a question about this manual
Ask about setup, troubleshooting, compatibility, parts, safety, or missing instructions. Manuals+ will review the question and use this page’s manual context to help answer it.