VEVOR WBFCHP30OZ
VEVOR Tumbler Heat Press Machine User Manual
Model: WBFCHP30OZ
Introduction
This manual provides detailed instructions for the safe and efficient operation of your VEVOR Tumbler Heat Press Machine. Designed for sublimation on various drinkware, this machine allows for personalized creations on ceramic mugs, stainless steel tumblers, and more. Please read this manual thoroughly before initial use to ensure proper setup, operation, and maintenance.
Safety Information
Always adhere to the following safety precautions to prevent injury or damage to the machine:
- Ensure the machine is placed on a stable, heat-resistant surface.
- Do not touch the heating element during or immediately after operation, as it will be extremely hot. Use heat-resistant gloves.
- Keep children and pets away from the machine during operation.
- Do not operate the machine near flammable materials or liquids.
- Always unplug the machine from the power outlet when not in use or before cleaning and maintenance.
- If the power cord is damaged, it must be replaced by the manufacturer or a qualified service agent to avoid hazards.
- The machine features an over-temperature warning function and automatic power-off after 30 minutes of inactivity for safety and energy conservation.
Product Overview
Familiarize yourself with the components of your VEVOR Tumbler Heat Press Machine.

Figure 1: Front view of the VEVOR Tumbler Heat Press Machine, showing the control panel and heating element.
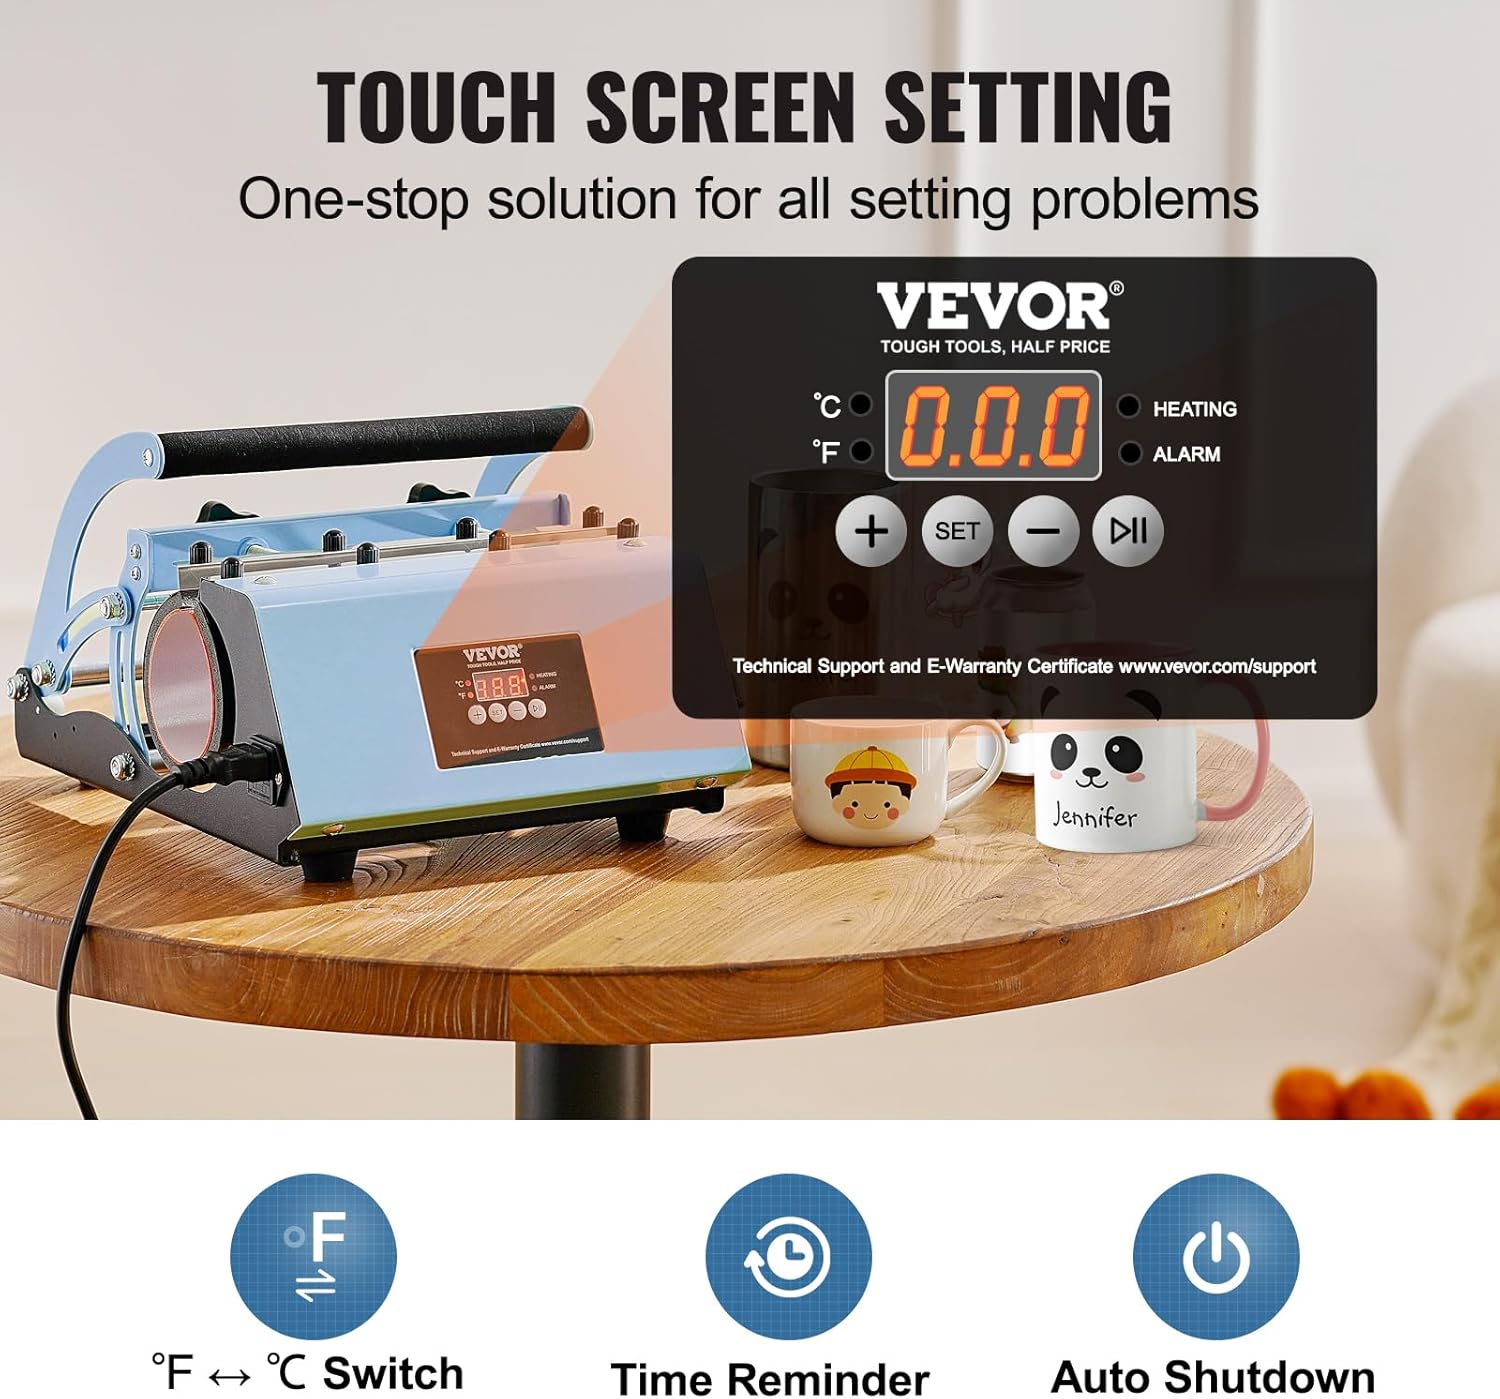
Figure 2: Close-up of the touchscreen control panel, indicating temperature and time settings, along with heating and alarm indicators. It also highlights the Fahrenheit/Celsius switch, time reminder, and auto-shutdown features.

Figure 3: Side view of the heat press, illustrating the adjustable pressure mechanism and the handle for operation.
Specifications
Technical specifications for the VEVOR Tumbler Heat Press Machine.

Figure 4: Diagram showing key dimensions and technical specifications of the heat press.
| Feature | Specification |
|---|---|
| Model Number | WBFCHP30OZ |
| Power (US/EU/AU) | 580W (US) / 500W (EU, AU) |
| Voltage | 110V AC |
| Temperature Range | 32°F - 482°F (0°C - 250°C) |
| Time Range | 0 - 999 seconds |
| Max. Compatible Cup Capacity | 30oz / 887ml |
| Compatible Cup Diameter | 2.95 - 3.43 inches (75 - 87 mm) |
| Product Dimensions (L x W x H) | 13.3 x 11.3 x 8.7 inches (338 x 288 x 220 mm) |
| Item Weight | 12.79 pounds (5.8 kg) |
| Material | Carbon Steel, Stainless Steel |
| Color | Blue |

Figure 5: Illustration of various cup types and sizes compatible with the 11-30oz tumbler heat press, including tumblers, can coolers, sippy cups, coffee cups, and mugs, along with maximum cup height and diameter.
Setup
Follow these steps to set up your heat press machine for the first time:
- Unpack: Carefully remove all components from the packaging. Verify that all parts listed in the packing list are present.
- Placement: Place the heat press on a flat, stable, and heat-resistant surface. Ensure there is adequate ventilation around the machine.
- Power Connection: Connect the power cord to the machine and then plug it into a grounded electrical outlet. Ensure the voltage matches the machine's requirements (110V AC for US models).
- Initial Power On: Turn on the main power switch, usually located on the side or back of the machine. The digital display should illuminate.
Operating Instructions
This section guides you through the process of using your heat press for sublimation.
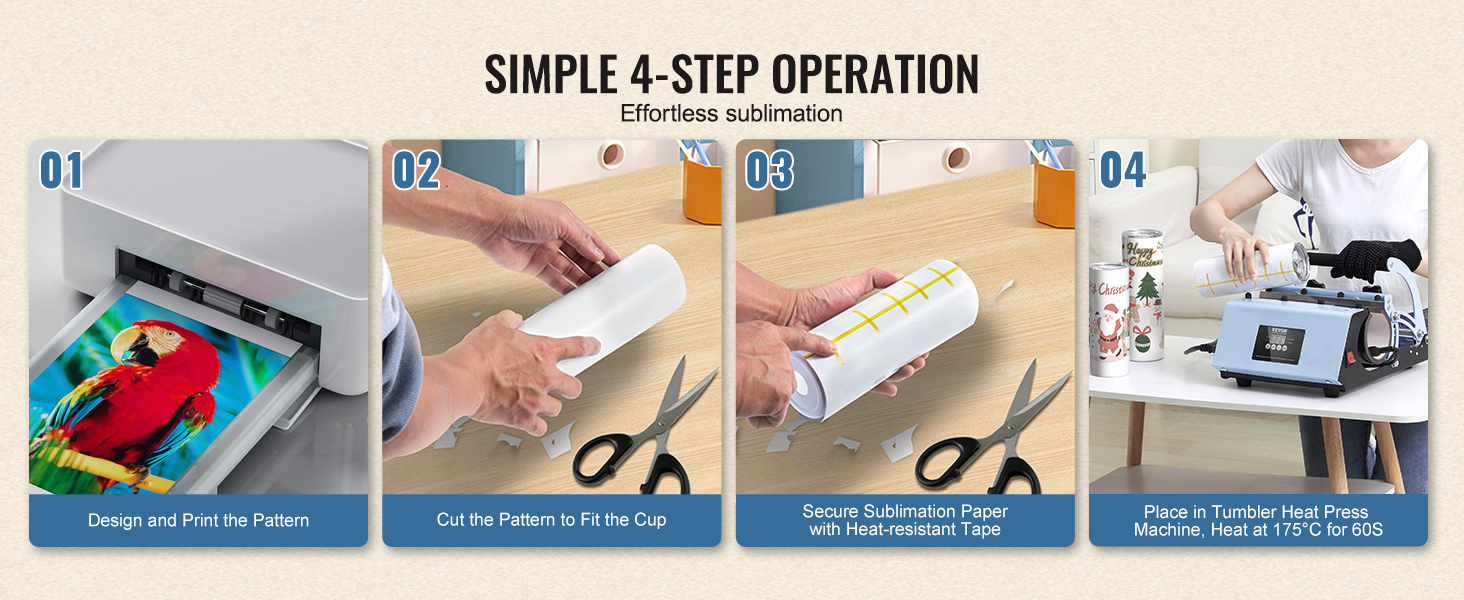
Figure 6: Visual guide to the simple 4-step operation for sublimation: Design and Print, Cut Pattern, Secure Sublimation Paper, and Heat Press.
- Prepare Your Design: Create or select your desired artwork. Print the design onto sublimation paper using a sublimation printer and sublimation ink. Ensure the design is mirrored if necessary.
- Cut and Position: Carefully cut the printed sublimation paper to fit your tumbler or mug. Wrap the paper tightly around the blank item, ensuring the design is flat and smooth. Secure it with heat-resistant tape to prevent shifting during pressing.
- Set Temperature and Time:
- Press the SET button on the control panel.
- Use the + and - buttons to adjust the desired temperature. Common settings are 356°F (180°C) for tumblers and 392°F (200°C) for ceramic mugs.
- Press SET again to confirm the temperature and move to time setting.
- Use the + and - buttons to adjust the desired time. Typical times are 60 seconds for tumblers and 90 seconds for ceramic mugs.
- Press SET one last time to save the settings. The machine will begin heating to the set temperature.
- You can switch between Fahrenheit (°F) and Celsius (°C) using the dedicated button on the control panel.

Figure 7: Display showing quick sublimation settings for temperature and time, highlighting the 1-minute press capability.
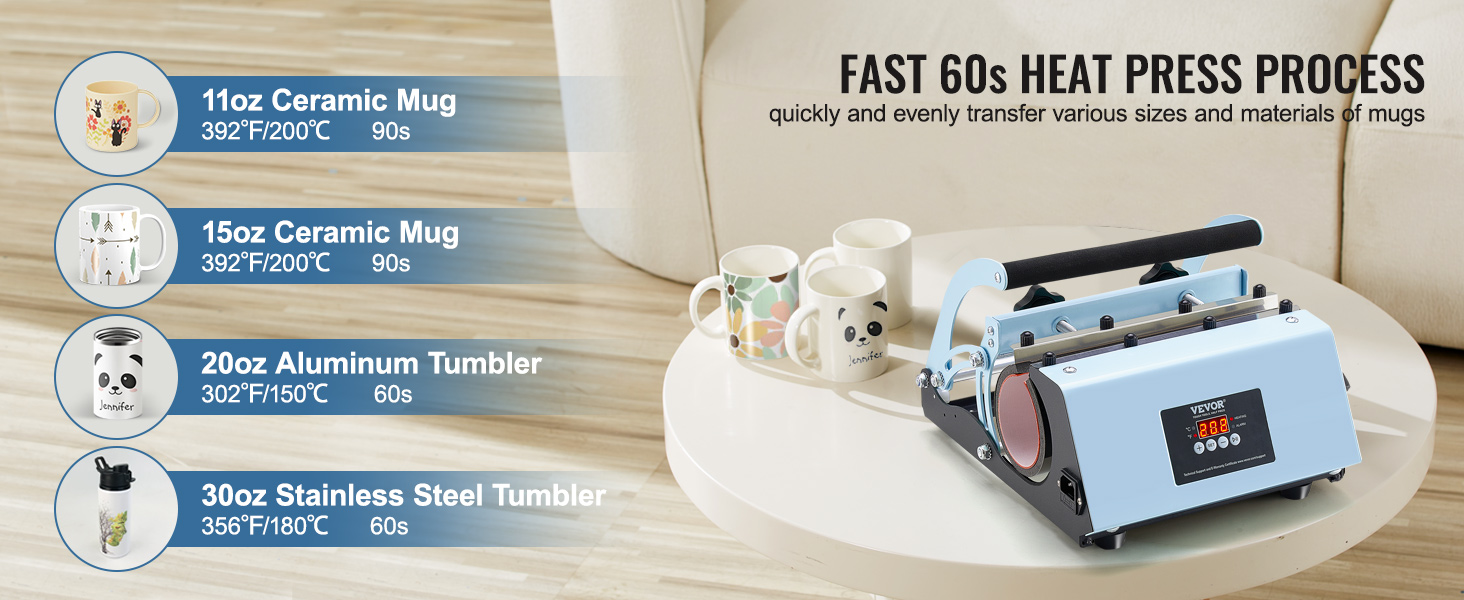
Figure 8: Recommended heat press times and temperatures for different items: 11oz Ceramic Mug (392°F/200°C, 90s), 15oz Ceramic Mug (392°F/200°C, 90s), 20oz Aluminum Tumbler (302°F/150°C, 60s), 30oz Stainless Steel Tumbler (356°F/180°C, 60s).
- Insert Item: Once the machine reaches the set temperature, carefully open the press and insert the prepared tumbler or mug into the heating element. Ensure it is centered and fits snugly.
- Apply Pressure: Close the press handle firmly. Adjust the pressure knob if needed to ensure even contact between the heating element and the item. The machine will automatically start the timer.
- Remove Item: When the timer finishes and the alarm sounds, carefully open the press. Using heat-resistant gloves, remove the hot item. Be cautious as the item will be extremely hot.
- Peel Paper: Immediately or after a brief cooling period (depending on the blank and ink), carefully peel off the sublimation paper to reveal your finished design.

Figure 9: Visual representation of safe and easy operation: Print the pattern, secure the paper with heat tape, adjust pressure/temperature/time, and take out the tumbler to reveal the final product.
Maintenance
Proper maintenance ensures the longevity and optimal performance of your heat press.
- Cleaning: After each use, allow the machine to cool completely. Wipe down the exterior with a soft, damp cloth. For the heating element, use a dry, lint-free cloth. Do not use abrasive cleaners or solvents.
- Storage: Store the machine in a dry, dust-free environment when not in use.
- Regular Inspection: Periodically check the power cord for any signs of damage. Ensure all knobs and moving parts operate smoothly.
Troubleshooting
Refer to this section for common issues and their solutions.
| Problem | Possible Cause | Solution |
|---|---|---|
| Machine does not power on. | Not plugged in; power switch off; faulty power cord/outlet. | Ensure power cord is securely plugged into a working outlet. Check if the main power switch is in the "ON" position. Test the outlet with another device. |
| Temperature not reaching set value. | Incorrect temperature setting; heating element issue. | Verify the temperature setting on the control panel. Allow sufficient time for preheating. If the issue persists, contact customer support. |
| Sublimation design is faded or incomplete. | Insufficient temperature or time; uneven pressure; incorrect sublimation paper/ink. | Increase temperature or time slightly. Ensure even pressure by adjusting the knob. Verify you are using proper sublimation paper and ink. Ensure the paper is tightly secured. |
| Design is blurry or ghosted. | Sublimation paper shifted during pressing; item moved. | Secure the sublimation paper firmly with heat-resistant tape. Ensure the item is stable within the press. |
| Alarm sounds during operation. | Over-temperature warning; timer completion. | If it's an over-temperature warning, allow the machine to cool down. If it's the timer completion alarm, the pressing cycle is finished. |
Warranty and Support
For warranty information, technical support, or service inquiries, please refer to the official VEVOR website or contact their customer service directly. Keep your purchase receipt as proof of purchase for warranty claims.
VEVOR Official Website: www.vevor.com
Support Page: www.vevor.com/support
Related Documents - WBFCHP30OZ
 |
VEVOR Multifunctional Digital Heat Press Machine User Guide Comprehensive user guide for the VEVOR Multifunctional Digital Heat Press Machine, covering parts identification, assembly steps, temperature controller operation, printing methods, and troubleshooting common transfer quality issues. |
 |
VEVOR 5-in-1 Heat Press Machine 12x15 Inch - User Manual and Specifications Comprehensive guide for the VEVOR 5-in-1 Heat Press Machine (12x15 inch). Learn about its features, operation, digital temperature control, and applications for T-shirts, mugs, plates, and cups. |
 |
VEVOR Heat Press Machine TL1215/TL1515 User Manual and Instructions Official user manual for VEVOR Heat Press Machines, models TL1215 and TL1515. Provides detailed instructions for operation, setup, calibration, spare parts, troubleshooting, and safety guidelines for heat transfer printing. |
 |
VEVOR Can Shaped Cups User Manual and Product Information Detailed information, safety instructions, and transfer methods for VEVOR Can Shaped Cups, including various models and main parameters. Learn how to create personalized tumblers using heat transfer technology. |
 |
Dual-Display Heat Press Machine User Instructions Comprehensive user instructions and technical specifications for the Dual-Display Heat Press Machine. Covers features, parts identification, operation, assembly, temperature settings for various materials, and troubleshooting guide. |
 |
VEVOR Multifunctional Digital Heat Press Machine User Guide Detailed user guide for the VEVOR Multifunctional Digital Heat Press Machine, covering setup, operation, temperature control, printing techniques, and troubleshooting for sublimation and heat transfer applications. |